This guide describes how to use the Eclipse* Integrated Development Environment (IDE) to compile and debug Data Parallel C++ (DPC++) programs on a Linux* OS host. For the current Intel® oneAPI Base Toolkit (Base Kit) beta release, debugging with Eclipse supports only CPU kernel offload. To compile and debug in CLI mode, refer to Get Started with Debugging Data Parallel C++ for Linux* OS Host (Beta).
In this article, you will learn how to:
- Install Eclipse
- Integrate Eclipse with the DPC++ compiler
- Compile and run a DPC++ sample program
- Configure Eclipse to debug a DPC++ sample program
Step 1: Install Eclipse*
To get started, you need Eclipse v4.9 or above and Eclipse C/C++ Development Tools (CDT) 9.3 or above.
- Download the latest Eclipse Installer eclipse-inst-linux64.tar.gz.
- Extract the files.
- Start the installer executable file and select Eclipse IDE for C/C++ Developers. Select a folder for the Eclipse installation.
Step 2: Integrate Eclipse with the DPC++ Compiler
If you haven’t yet installed the Base Kit, follow these steps:
- Go to the Intel® oneAPI Toolkits website.
- Download and install the oneAPI toolkit by clicking Get the Base Kit.
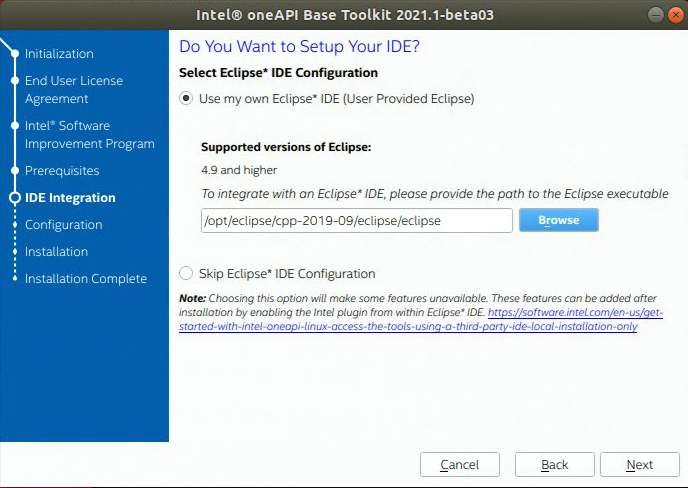
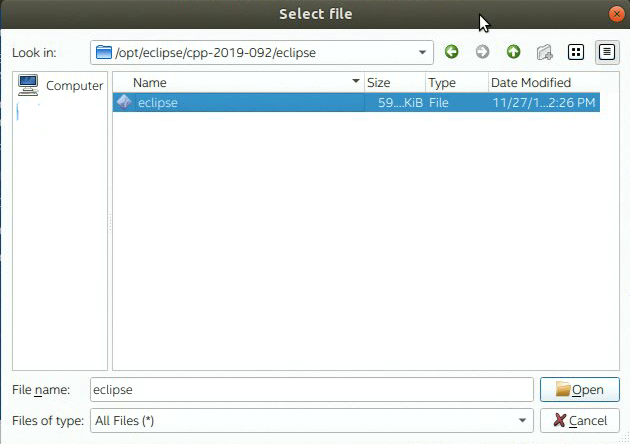
- During installation, you are asked if you want to set up your IDE. Click Select Eclipse* IDE Configuration, and browse to select the Eclipse installation path.
If the Base kit is already installed, you can install Eclipse as described in Step 1. In addition, you need to complete the following steps.
- Search for the Eclipse Plugins in the Base Kit:
cd <oneAPI install dir>/inteloneapi
find . -type f -regextype awk -regex ".*(com.intel|org.eclipse).*[.]zip"
./compiler/2021.1-beta03/linux/ide_support/com.intel.compiler.p2.oneapi-19.1.0SNAPSHOT.zip
./compiler/2021.1-beta03/linux/ide_support/com.intel.dpcpp.compiler.p2-2021.1.0-SNAPSHOT.zip
./advisor/2021.1-beta03/ide-support/com.intel.launchers.update-advisor-1.0.0-SNAPSHOT.zip
./dpcpp-ct/2021.1-beta03/ide_support/com.intel.dpct.p2-2021.1.0-SNAPSHOT.zip
./dev-utilities/2021.1-beta03/ide-support/eclipse/com.intel.samples.update-1.0.0-SNAPSHOT.zip
./vtune/2021.1-beta03/ide-support/com.intel.launchers.update-amplifier-1.0.0-SNAPSHOT.zip
- In Eclipse, select Help -> Install New Software... The Install wizard opens.
- Click Add to open a dialog box.
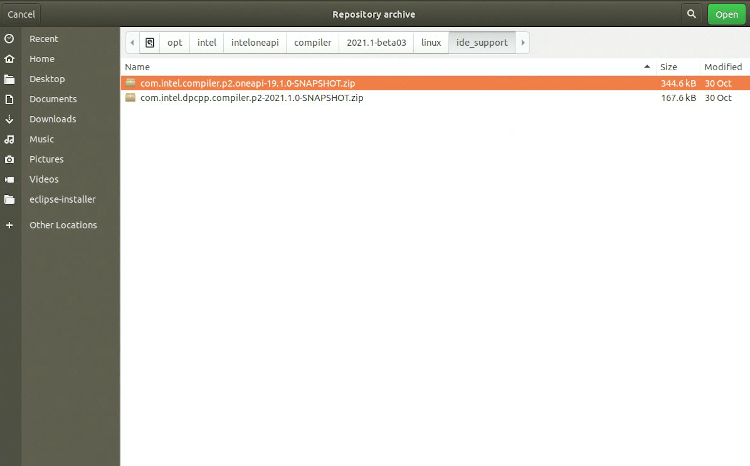
- In the Add Repository box, click Archive… to open a file browser.
- In the file browser, go to the /opt/intel/inteloneapi/compiler/2021-1-beta03/linux/ide-support directory (found in the previous step).
- Double-click the com.intel.compiler.p2.oneapi-19.1.0-SNAPSHOT.zip plugin, then click Add.
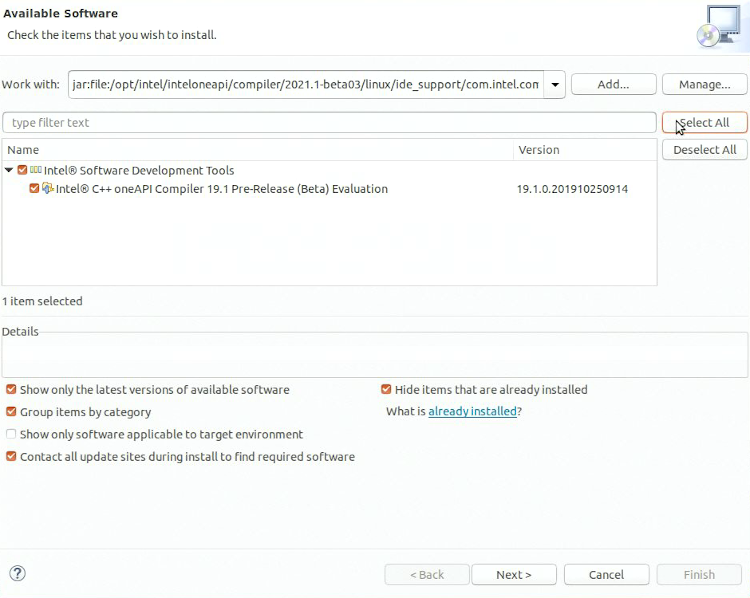
- Click Select All, and then click Next.
- Restart Eclipse.
Step 3: Compile and Run a DPC++ Sample Program
This step describes how to compile and run a Data Parallel C++ program with Eclipse. It uses a DPC++ sample program as an example.
- Set up the proper environment variables for the oneAPI toolkit in a terminal:
source <oneAPI install dir>/setvars.sh
- Start Eclipse:
<eclipse_install_dir>/cpp-2019-09/eclipse/eclipse
- Click Launch to display the Eclipse IDE for C/C++ Developers. Click on Create a new C/C++ project.
- To create a new project:
- Go to File -> Choose New Project.
- Under C/C++ Choose C/C++ Project, click Next.
- Choose C++ Managed Build, then click Next.
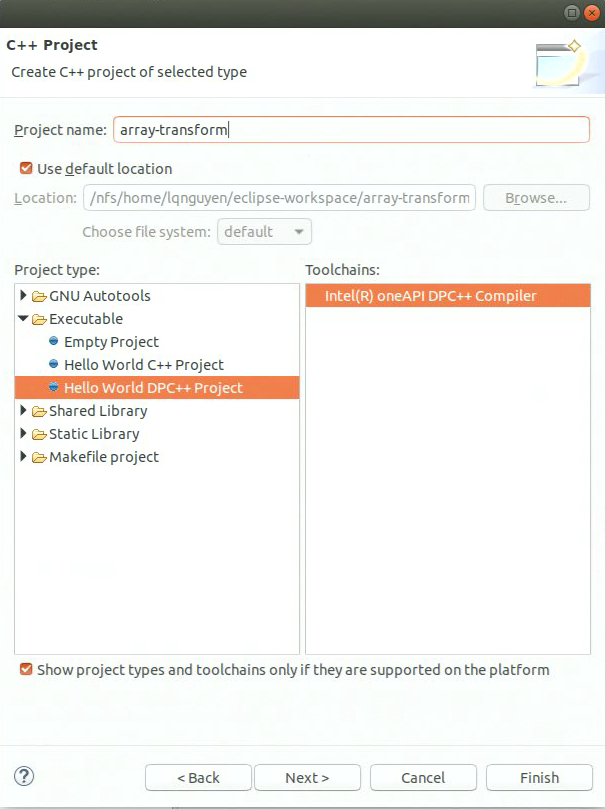
- Name the project, for example “array-transform”.
- Choose the Hello World DPC++ Project, then click Finish. (Note that in the Toolchain field, Intel® oneAPI DPC++ Compiler is selected.)
- Click Finish to create a new project. This will create the <eclipse-workspace>/array-transform workspace directory. In this example, we work with a sample program called array-transform.cpp, which is available in the intel/BaseKit-code-samples GitHub repository.
- Copy the sample array-transform.cpp program from the Intel oneAPI Base Toolkit code sample package to the working folder:
cp <BaseKit-code-samples_install_dir>/Debugger/array-transform/src/array-transform.cpp <eclipse-workspace>/array-transform/.
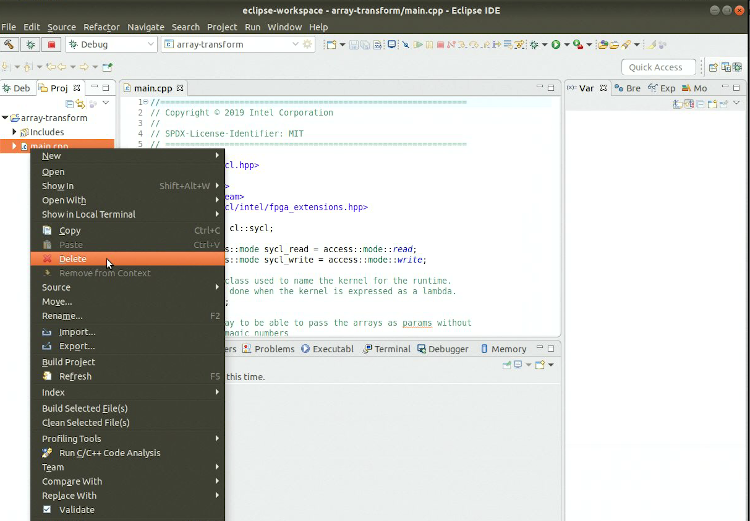
- Delete the main.cpp file from the project: right-click on main.cpp and select Delete.
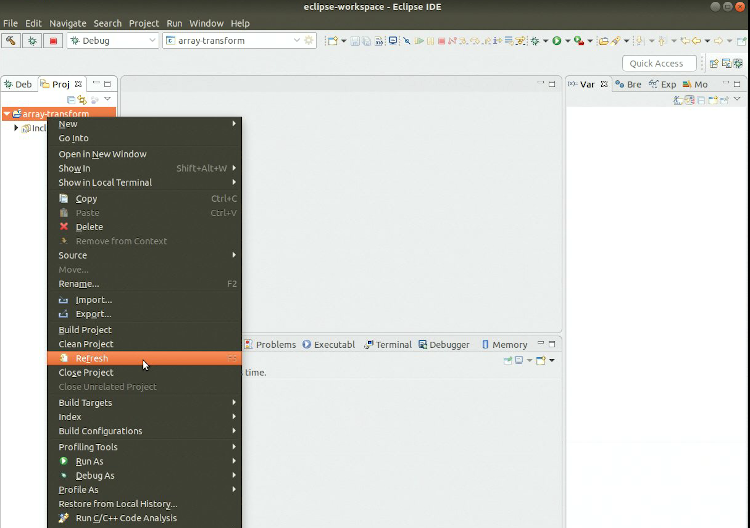
- Refresh the project: right-click on array-transform and select Refresh. You should see the array-transform.cpp file appearing in the project.
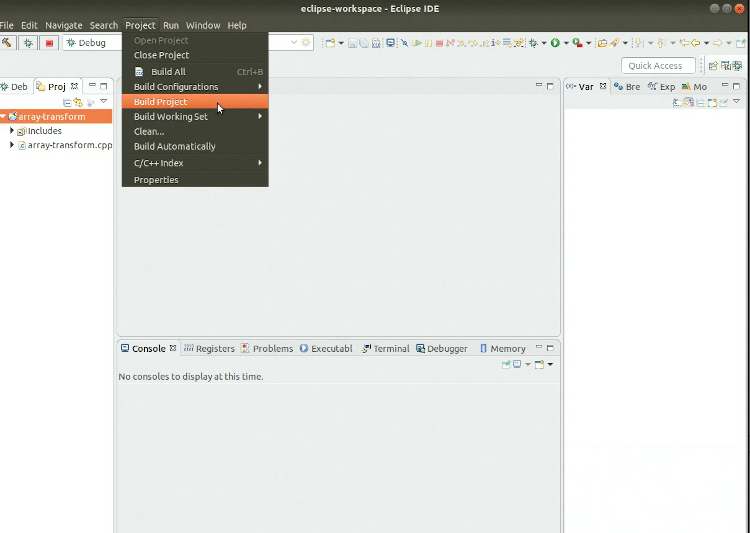
- To compile the program, select Project -> Build Project.
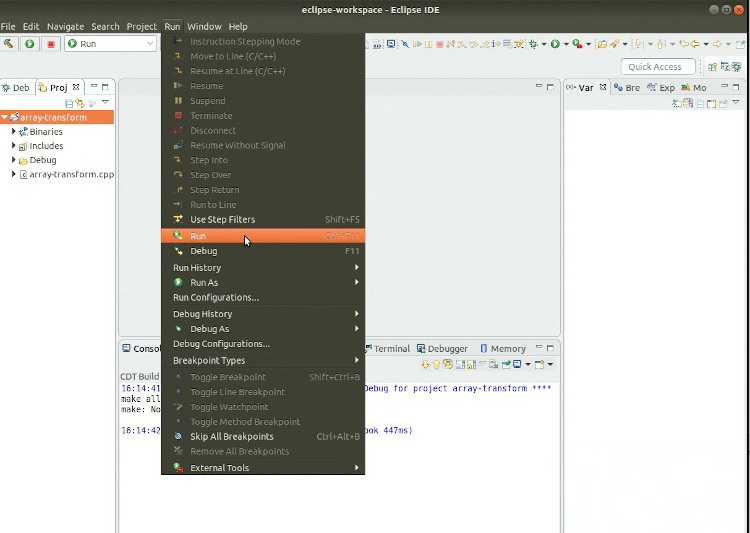
- To run the executable file, select Run -> Run.
Step 4: Configure Eclipse to Debug a DPC++ Program
In the current oneAPI toolkit beta release, debugging with Eclipse only supports debugging the CPU kernel offload. Debugging the GPU kernel offload is not yet supported.
To configure the Eclipse debugger:
- In Eclipse, select Run -> Debug Configurations to create a Debug Configuration window.
- In the Debugger tab, set the GDB debugger to use the gdb-oneapi debugger:
<oneAPI install dir>/debugger/latest/gdb/intel64/bin/gdb-oneapi
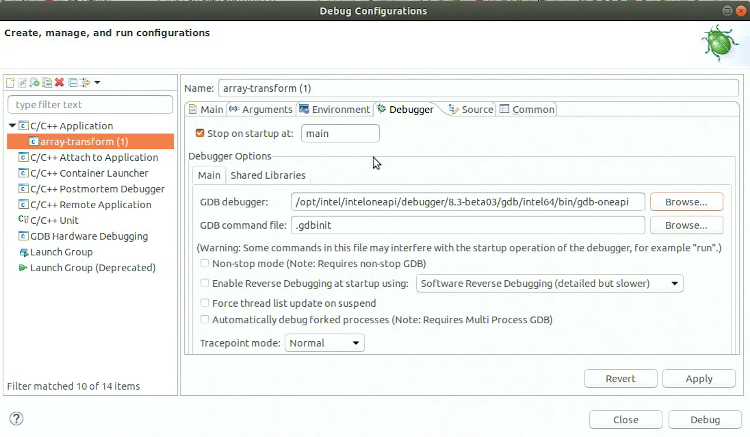
- In the Environment tab, set:
- DISABLE_AUTO_ATTACH=1 to turn off auto-attach, which conflicts with Eclipse
- SYCL_DEVICE_TYPE=CPU to enforce kernel running in CPU
- Click Apply.

- To start debugging in Eclipse, select Run -> Debug.
- In the Debugger windows, create a breakpoint at line 49 of the array-transform.cpp file, then type continue. You will see multiple threads hit this breakpoint:
(gdb) break 49
(gdb) continue
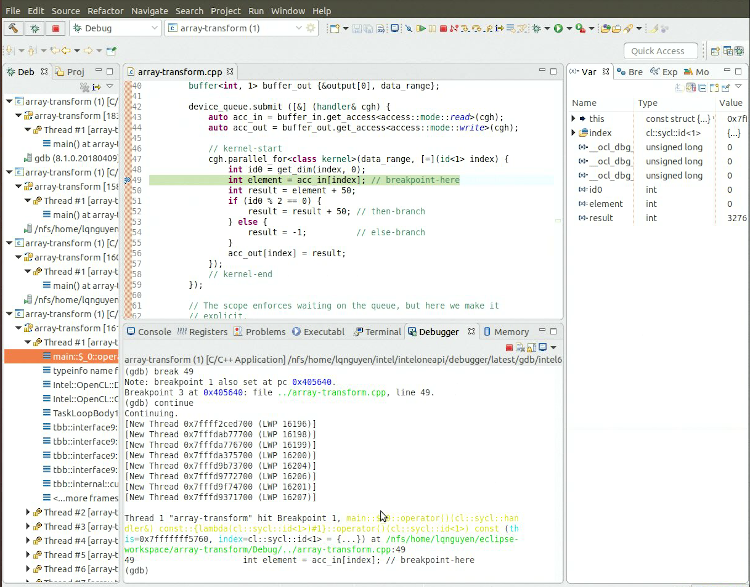
7. You can now use the usual GDB* commands:
- F5 key to step into
- F6 key to step over
- F7 key for step return
- F8 key for resume
For example, to print the local variable index and the value of acc_in[index]:
(gdb) print index
(gdb) print acc_in[index]
To examine four word-size items in decimal format:
(gdb) x /4dw acc_in
To go to another thread:
(gdb) continue
To examine a current thread in a multi-thread program:
(gdb) set scheduler-locking on
(gdb) next
You can also examine the values of local variables and registers:
(gdb)info locals
(gdb)info registers
(gdb)info registers all
Finally, to terminate the GDB:
(gdb) quit
Summary
You are now ready to get started using DPC++ in the Eclipse IDE. Use the references below to learn more about programming with DPC++, and visit the site Intel® oneAPI Toolkits to learn how oneAPI products deliver the tools you need to develop and deploy your applications and solutions across multiple architectures.