Intel® Xeon® processor family
Indexing DICOM* Images on Cloudera Hadoop* Distribution white paper
Executive Summary
Medical imaging has rapidly become the best non-invasive method to evaluate a patient and determine whether a medical condition exists1. Imaging is used to assist in the diagnosis of a condition and in most cases is the first step of the journey through the modern medical system. Advancements in imaging technology has enabled us to gather more detailed, higher-resolution 2D, 3D, 4D, and microscopic images that are enabling faster diagnosis and treatment of certain complex conditions.
A high-resolution microscopic scan of a human brain can be as large as 66 terabytes2. Examples of some 3D modalities like computer tomography (CT) is about 4 MB per image (2048x2048 pixels)3. We can appreciate medical imaging becoming a Big Data problem when we realize that there are approximately 750 PB (Petabytes) of medical images in all the repositories in the United States, projected to cross 1 Exabyte by 20164.
Currently, Picture Archiving and Communication System (PACS*)5 that provides proprietary data formats and objects, is used in the industry for storage and retrieval of medical imaging files. In this paper we describe an alternate solution for storage and retrieval of medical imaging files on a Hadoop cluster to provide a high-performance and cost-effective distributed processing. The advantages of such a solution include the following:
- Allow organizations to bring their medical imaging data closer to other sources already in use like genomics, electronic medical records, pharmaceuticals, wearable data, and so on, reducing cost of data storage and movement.
- Enable solutions with lower cost using open source software and commodity servers.
- Enable medical image analytics and correlation of many forms of data within the same cluster.
Objectives
This paper will help you replicate our work as a proof point to index DICOM6 images for storage, management, and retrieval on a Cloudera Hadoop cluster, using open source software components. This open source solution is not an alternative to a commercial PACS system.
The key objectives of this paper are the following:
- Describe the alternate solution.
- Describe the operating system, software stack, and tools.
- List the setup and configuration of the proposed solution on a multi-node Hadoop cluster.
- Run tests to validate that the installation of all components was successful and the solution works.
Audience
Software developers and technologists can use this document to install the above software as a proof point. We assume you are familiar with Linux* (especially the CentOS*7) commands, installation, and configurations used in this document).
Solution Overview
Use Case
For this paper, we focused on a simple but essential use case: the ability to store and retrieve DICOM images. This use case assumes no dependency on other existing image repositories. Hospitals and imaging facilities send copies of DICOM images to a HIPAA-compliant Cloud or locally hosted server cluster where the images would be stored. On demand, the physician or caregiver should be able to search and retrieve patient DICOM images from the remote cluster connected to a local machine for viewing, as shown in Figure 1.
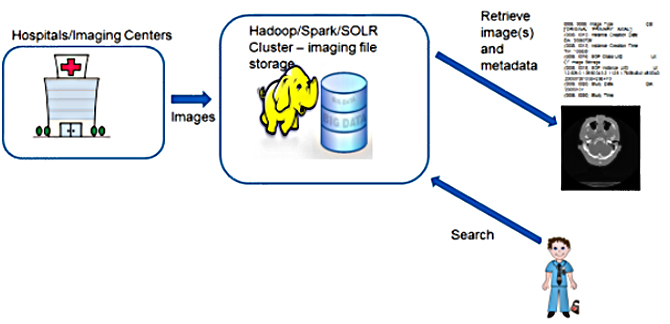
Figure 1. Depiction of Storage and Search Use Case
Details
DICOM images consist of two sections: text header and binary image. To ensure images are stored and searchable as shown in Figure 2 and Figure 3, use the steps outlined below.
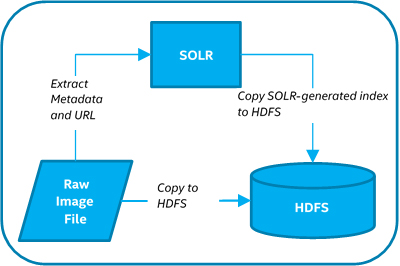
Figure 2. Image Storage
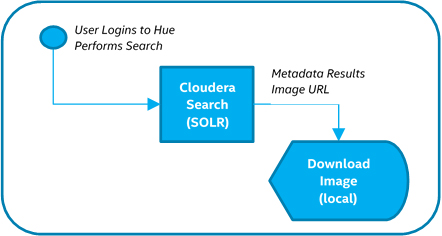
Figure 3. Image Retrieval
Note that Figure 2 represents the perspective of a software developer. Figure 3 represents the perspective of an end user interacting with the architected solution. As software developers, we must actually go through this process ourselves to validate functionality for the end user.
- Extract metadata from the DICOM image.
- Store the original DICOM image on the Hadoop distributed file system (HDFS*)9.
- Use metadata to generate an index file (that will also reside on the HDFS).
- Search using the Hue* interface to retrieve an image.
- Download the image to the local system and open/view it using a DICOM viewer.
Commodity servers are flexible in terms of performance and storage when compared to the cost per node of high-performance server nodes. Our server nodes each used a 2-CPU Intel® Xeon® processor E5 family, 4 TB x 12 (48 TB) storage, and 192 GB RAM. Processing and storage needs can be “horizontally scaled” by increasing the number of nodes in the cluster when required. Cloudera Hadoop distribution is primarily open source along with other components in our solution: Python*, Cloudera Morphlines*, and DCM toolkit* libraries.
Hadoop distributions maintain a 3x replication on HDFS by default, to provide for fault tolerance. Although this leads to larger storage needs, this cost can be offset by benefits like lower computing times due to data being closer to the node processing it and protection against data node failures. Hard drives have also become cost effective and reliable, providing longer usage lifespans. Furthermore, solid-state drives (SSDs) can be used to accelerate disk read/write speeds and provide more reliability at the expense of higher cost.
System setup and configuration
Listed below are the specs of our test six-node Hadoop cluster and one edge node.
Hardware Components
| Component | Details | QTY |
|---|---|---|
| Chassis | Chassis-2U Wildcat Pass Black Intel® Server Chassis R2000WTXXX | 1 |
| Motherboard | Intel® Server Board S2600WT2 (code-named Wildcat Pass) 1Gb Ethernet ports | 1 |
| CPU | Intel® Xeon® processor E5-2699 v3 LGA2011 2.3 GHz 45 MB 145W 18 cores CM8064401739300 | 2 |
| Heatsink | Included | 2 |
| Memory | 16 GB 2133 Reg ECC 1.2V DDR4 RDIMM Crucial CT8G4RFS4213 (192 GB) | 12 |
| Ata Hard Drive | 4 TB HDD 3.5-in SATA 7200RPM 128 MB Seagate Constellation* ES.3 ST2000NM0033 | 12 |
| Ata Hard Drive | 800 GB SSD 2.5-in SATA 6 Gb/s Intel® Solid State Drive Data Center S3700 Series SSDSC2BA800G301 7mm | 1 |
| Optical Drive | DVDRW – SATA Slim Black Intel® AXXSATADVDRWROM | 1 |
| Network Adapter | NIC – 10 Gbe RJ-45 Server I/O Module Dual Port Intel® AXX10GBTWLIOM | 1 |
| Network Adapter | On Board | 2 |
| Chassis Component | HDD Bay – 2U Hot-Swap Drive Cage Upgrade Kit 8x3.5-in A2U8X35S3HSDK | 1 |
| Power Supply | Pwr Supply- 1100W Common Redundant Platinum Efficiency Intel® AXX1100PCRPS | 2 |
| Cable | Cable – (2) 950mm Straight SFF8643 Connectors Intel® AXXCBL950HDHD | 1 |
| Power Cord | Pwr Cord – 6ft 14AWG 15A w/3 Conductors (C13/5-15P) Black Monoprice 5292 | 2 |
| Cable | Cable- (2) 800mm Straight SFF8643 To Straight SFF8643 Connectors Intel® AXXCBL800HDHD | 1 |
| Chassis Component | PCIe* Riser- 2U Intel® A2UL8RISER2 | 2 |
| Network Component | Expansion Module LSI Logic Corp 9300-8I SATA/SAS Controller 2 LSI00344 | 1 |
Software
| Component | Details |
|---|---|
| Operating System | CentOS* 6.6 (Developers Workstation version) |
| Application Software | Cloudera Distribution of Hadoop (CDH) 5.44 (Apache Hadoop* 2.6.0)8 Apache Spark* 1.3.0 Apache Solr* 4.1012 (SolrCloud* mode)13 Cloudera Search* 1.0.010 Hue 3.7.011 Apache Zookeeper* 3.4.515 |
| Scripting | Python 2.6, Bash Script |
| ETL library | Cloudera Morphlines14 |
| Python library | DCM Toolkit (dcm2xml utility) |
Software Requirements
In this paper, we have used CDH 5.4 with the following services enabled in CDH Manager:
- HDFS
- To store input DICOM xml files which need to be indexed
- To store output indexed results
- Solr (Solrcloud mode)
- Uses Schema.xml to index given input DICOM xml files
- Zookeeper
- SolrCloud mode uses Zookeeper for distributed indexing purpose
- Hue (Search feature enabled)
- Graphical interface to view Solr indexed results, where you can search DICOM images based on indexed fields
- Cloudera Search
- Using MapReduceIndexerTool for offline batch indexing
Data Set
Our test data set consisted of DICOM CT images that were downloaded from the Visible Human Project.
Workflow
Figure 3 describes the workflow approach we used.
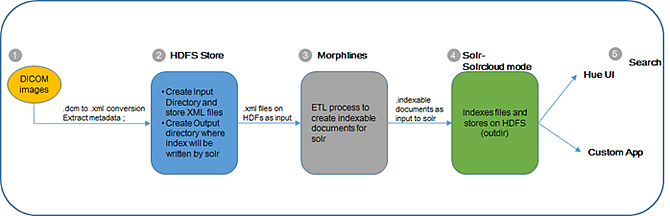
Step 1: Assuming you have stored all DICOM images in a local folder, extract DICOM metadata from images using the DCM Toolkit (DCMTK)2 with the dcm2xml utility and store them in XML format (see Appendix 1 for an example of an xml file).
Example: dcm2xml <input-file-path> <output-file-path>
./dcm2xml source.dcm source.xml
In the above example, for dcm2xml utility to work, you have to set the path as below in .bashrc after downloading DCMTK to your local machine from where you want to run this script
Example: export DCMDICTPATH="/home/root/Dicom_indexing/dicom-script/dcmtk-3.6.0/share/dcmtk/dicom.dic"
Step 2: Import the converted DICOM images to HDFS at /user/hadoop/input-dir and also create /user/hadoop/output-dir to store indexed results
Step 3: ETL process- In this step we use Morphlines configuration file, which parses and extracts the required files as per our requirement and creates indexable documents that Solr uses.
Step 4: Solr uses schema.xml configuration to determine which fields to index from a given xml file. We have also used MapReduceIndexerTool for this offline batch indexing (See Appendix 2).
Detailed steps on Solr offline batch indexing for step 4
We did a few preparation steps to index our DICOM data.
- First make sure your Solr service (in SolrCloud mode) on the cluster is up and running. Visit http://<your –solr-server-name>:8983/solr
- Generate a configuration file using solrctl utility and include schema.xml with the fields that you want to index. (with -- zk option we can provide Zookeeper hostnames; you can find information on CDH manager in Zookeeper Service). The last entry of IP address needs the Zookeeper port. Note: replace hostip* with your Zookeeper host IPs.
Download schema.xml file to your local machine and edit it. Include all field names that you want to index. Field names should match the name attribute in your xml files to index. In the example here, the DICOM xml file contains 100s of fields out of which we are going to index only about 10–15 fields. Update modified schema.xml to your /conf folder.solrctl instancedir --zk hostip1,hostip2,hostip3:2181/solr --generate $HOME/solr_config cd $HOME/solr_config/conf
Source file - One of the generated DICOM xml files (See Appendix 1).
Customized schema.xml (See Appendix 2). - Clean up any collections and instance directories existing in Zookeeper:
solrctl --zk hostip1,hostip2,hostip3:2181/solr collection --delete demo-collection >& /dev/null solrctl --zk hostip1,hostip2,hostip3:2181/solr instancedir --delete demo-collection >& /dev/null - Upload the Solr configuration to SolrCloud:
solrctl --zk hostip1,hostip2,hostip3:2181/solr instancedir --create demo-collection $HOME/solr_configs - Create a Solr collection named demo-collection. -s 2 indicates that this collection has two shards:
solrctl --zk hostip1,hostip2,hostip3:2181/solr collection --create demo-collection -s 2 -r 1 -m 2 - Create a directory that the MapReduceBatchIndexer can write results to. Ensure it is empty:
hadoop fs -rm -f -skipTrash -r output-dir hadoop fs -mkdir -p output-dir - ETL process- In this step we have used Morphlines configuration file, which parses and extracts the required files as per our requirement and creates indexable documents, which in turn are used by Solr (See Appendix 3).
- Use MapReduceIndexerTool to index the data and push it live to demo-collection. (${DICOM_WORKINGDIR} is the location where log4j.properties, morphlines.conf exists).
${HDFS_DICOM_OUTDIR} - Location of output dir folder on hdfs (ex: /user/hadoop/output-dir)

${HDFS_DICOM_INDIR} – Location of input dir folder on hdfs (ex: /user/hadoop/input-dir/)
hadoop \ jar \ ${Solr_HOME}/contrib/mr/search-mr-*-job.jar org.apache.solr.hadoop.MapReduceIndexerTool \ -D 'mapred.child.java.opts=-Xmx500m' \ --log4j ${DICOM_WORKINGDIR}/log4j.properties \ --morphline-file ${DICOM_WORKINGDIR}/morphlines.conf \ --output-dir ${HDFS_DICOM_OUTDIR} \ --verbose \ --go-live \ --zk-host hostip1,hostip2,hostip3:2181/solr \ --collection demo-collection \ ${HDFS_DICOM_INDIR}/dicomimages
Solr stores the indexed results in output-dir created above.
Step 5: Indexed results can be viewed using the Hue interface; DICOM image URL can be used to download image locally for viewing.
Testing
To test the indexed results, log in to your Hue interface (We assume you already have access to Hue with the Search feature enabled in it).
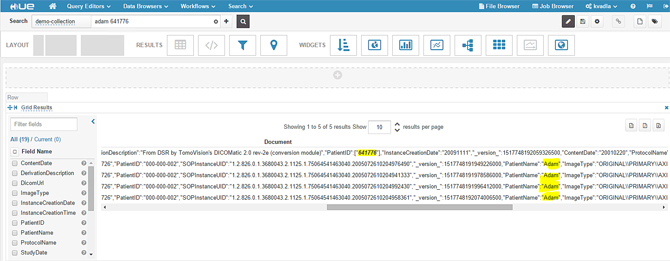
- Hover on Search and navigate to -> Indexes-> demo-collection->Search. Below is the default view of indexed results.

- Type a patient name or patient id or any field data that you have indexed. In this example we are typing a patient name and other patient id, highlighted in the following screenshot.
- When you expand a single result, you should see metadata fields as shown in the following screenshot.
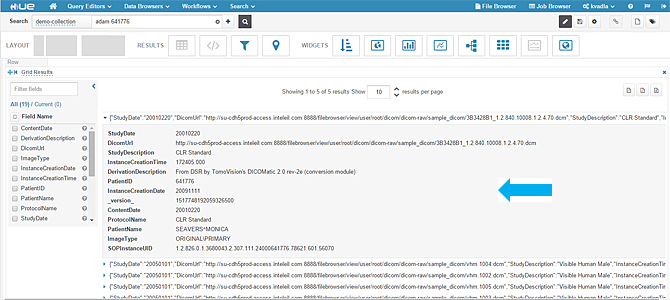
- In the above image you cannot click the DICOM URL. Also the UI looks crude, so we have used some Hue capabilities to build a nice dashboard using some graphing widgets and adding a clickable URL.
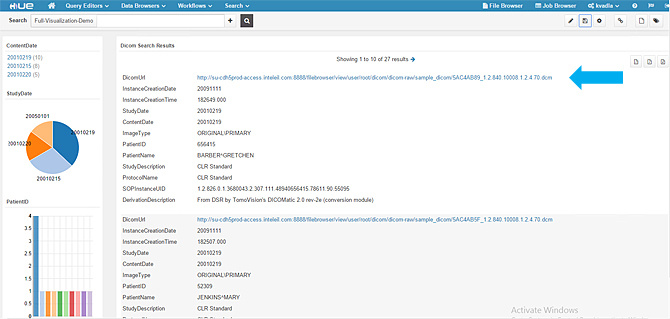
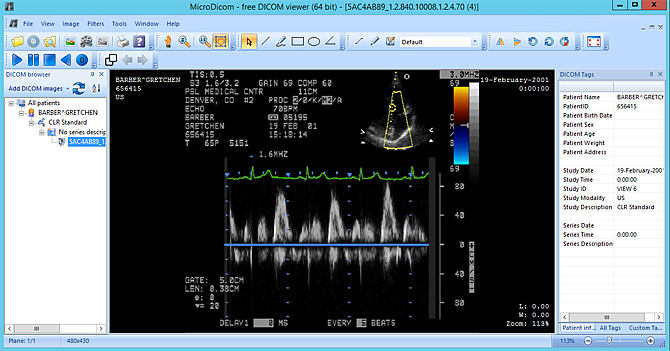
- When you click the DICOM URL, it gives you the option to download the .dcm file to your local machine. In this version, we are downloading to the local machine and viewing it with an open source tool called MicroDicom viewer.
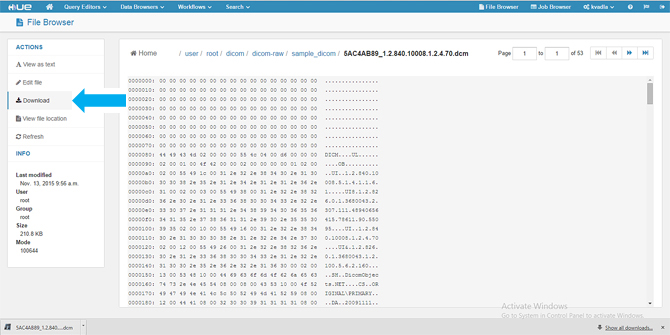
- View the image using the MicroDicom viewer.
Conclusion
We plan to continue to develop this reference architecture to allow a more streamlined method of downloading the DICOM file directly within the browser, using a plug-in. We will also be working toward better visualization capabilities and supporting multiple images to be downloaded simultaneously.
About the Authors
Karthik Vadla is a Software Engineer in the Big Data Solutions Pathfinding Group at Intel Corporation.
Abhi Basu is a Software Architect in the Big Data Solutions Pathfinding Group at Intel Corporation.
Monica Martinez-Canales is a Principal Engineer in the Big Data Pathfinding Group at Intel Corporation.
References
- The Vital Role Medical Imaging Plays in Treatment and Diagnosis. Accessed from https://www.slidellmemorial.org/blog/the-vital-role-medical-imaging-plays-in-treatment-and-diagnosis on December 3, 2015.
- I. Scholl, T. Aach, T. M. Deserno, and T. Kuhlen, “Challenges of medical image processing,” Computer Science-Research and Development, vol. 26, no. 1-2, pp. 5–13, 2011.
- Managing DICOM images: Tips and tricks for the radiologist. Accessed from https://www.ncbi.nlm.nih.gov/pmc/articles/PMC3354356/ on November 19, 2015.
- Frost and Sullivan, “Big Data Opportunities in the US Medical Imaging Market. April 2014. Accessed from http://www.frost.com/sublib/display-report.do?id=NF5B-01-00-00-00 on November 17, 2015.
- PACS. Accessed from https://en.wikipedia.org/wiki/Picture_archiving_and_communication_system on November 10, 2015.
- DICOM. Accessed from http://dicom.nema.org/standard.html on November 19, 2015.
- CentOS. Accessed from https://www.centos.org/. November 19, 2015.
- Cloudera Hadoop Distribution. Accessed from https://www.cloudera.com/downloads.html on November 17, 2015.
- Apache HDFS. Accessed from https://hadoop.apache.org/docs/r1.2.1/hdfs_design.html on November 17, 2015.
- Cloudera Search. Accessed from http://www.cloudera.com/content/www/en-us/documentation/archive/search/1-3-0/Cloudera-Search-User-Guide/csug_introducing.html on November 19, 2015.
- Hue. Accessed from https://github.com/cloudera/hue on November 19, 2015.
- Apache Solr. Accessed from http://lucene.apache.org/solr/ on November 19, 2015.
- SolrCloud. Accessed from https://wiki.apache.org/solr/SolrCloud on November 19, 2015.
- Cloudera Morphlines. Accessed from http://blog.cloudera.com/blog/2013/07/morphlines-the-easy-way-to-build-and-integrate-etl-apps-for-apache-hadoop/ on November 18, 2015.
- Apache Zookeeper. Accessed from https://zookeeper.apache.org/ on November 19, 2015.
Appendix 1
Source.xml (Example xml file to index)
<?xml version="1.0"?>
<file-format>
<meta-header xfer="1.2.840.10008.1.2.1" name="Little Endian Explicit">
<element tag="0002,0000" vr="UL" vm="1" len="4" name="FileMetaInformationGroupLength">216</element>
<element tag="0002,0001" vr="OB" vm="1" len="2" name="FileMetaInformationVersion" binary="hidden"></element>
<element tag="0002,0002" vr="UI" vm="1" len="28" name="MediaStorageSOPClassUID">1.2.840.10008.5.1.4.1.1.6.1</element>
<element tag="0002,0003" vr="UI" vm="1" len="58" name="MediaStorageSOPInstanceUID">1.2.826.0.1.3680043.2.307.111.48712655111.78571.301.34207</element>
<element tag="0002,0010" vr="UI" vm="1" len="22" name="TransferSyntaxUID">1.2.840.10008.1.2.4.70</element>
<element tag="0002,0012" vr="UI" vm="1" len="38" name="ImplementationClassUID">1.2.826.0.1.3680043.1.2.100.5.6.2.160</element>
<element tag="0002,0013" vr="SH" vm="1" len="16" name="ImplementationVersionName">DicomObjects.NET</element>
</meta-header>
<data-set xfer="1.2.840.10008.1.2.4.70" name="JPEG Lossless, Non-hierarchical, 1st Order Prediction">
<element tag="0008,0008" vr="CS" vm="2" len="16" name="ImageType">ORIGINAL\PRIMARY</element>
<element tag="0008,0012" vr="DA" vm="1" len="8" name="InstanceCreationDate">20091111</element>
<element tag="0008,0013" vr="TM" vm="1" len="10" name="InstanceCreationTime">164835.000</element>
<element tag="0008,0014" vr="UI" vm="1" len="30" name="InstanceCreatorUID">1.2.826.0.1.3680043.2.307.111</element>
<element tag="0008,0016" vr="UI" vm="1" len="28" name="SOPClassUID">1.2.840.10008.5.1.4.1.1.6.1</element>
<element tag="0008,0018" vr="UI" vm="1" len="58" name="SOPInstanceUID">1.2.826.0.1.3680043.2.307.111.48712655111.78571.301.34207</element>
<element tag="0008,0020" vr="DA" vm="1" len="8" name="StudyDate">20010215</element>
<element tag="0008,0023" vr="DA" vm="1" len="8" name="ContentDate">20010215</element>
<element tag="0008,0030" vr="TM" vm="0" len="0" name="StudyTime"></element>
<element tag="0008,0033" vr="TM" vm="1" len="10" name="ContentTime">093006.000</element>
<element tag="0008,0050" vr="SH" vm="0" len="0" name="AccessionNumber"></element>
<element tag="0008,0060" vr="CS" vm="1" len="2" name="Modality">US</element>
<element tag="0008,0070" vr="LO" vm="0" len="0" name="Manufacturer"></element>
<element tag="0008,0090" vr="PN" vm="0" len="0" name="ReferringPhysicianName"></element>
<element tag="0008,1030" vr="LO" vm="1" len="12" name="StudyDescription">CLR Standard</element>
<element tag="0008,2111" vr="ST" vm="1" len="66" name="DerivationDescription">From DSR by TomoVision's DICOMatic 2.0 rev-2e (conversion module)</element>
<element tag="0008,2124" vr="IS" vm="0" len="0" name="NumberOfStages"></element>
<element tag="0008,212a" vr="IS" vm="0" len="0" name="NumberOfViewsInStage"></element>
<element tag="0010,0010" vr="PN" vm="1" len="12" name="PatientName">BURRUS^NOLA</element>
<element tag="0010,0020" vr="LO" vm="1" len="6" name="PatientID">655111</element>
<element tag="0010,0030" vr="DA" vm="0" len="0" name="PatientBirthDate"></element>
<element tag="0010,0040" vr="CS" vm="0" len="0" name="PatientSex"></element>
<element tag="0018,0010" vr="LO" vm="0" len="0" name="ContrastBolusAgent"></element>
<element tag="0018,1030" vr="LO" vm="1" len="12" name="ProtocolName">CLR Standard</element>
<element tag="0018,5100" vr="CS" vm="0" len="0" name="PatientPosition"></element>
<sequence tag="0018,6011" vr="SQ" card="4" len="784" name="SequenceOfUltrasoundRegions">
………………………………………
</item>
</sequence>
</data-set>
</file-format>
Appendix 2
Schema.xml – (This is used by Solr to index specified fields)
Include below snippet inside <schema> tag of schema.xml file
<field name="SOPInstanceUID" type="string" indexed="true" stored="true" required="true" multiValued="false" />
<field name="PatientID" type="string" indexed="true" stored="true" multiValued="false" />
<field name="StudyDescription" type="string" indexed="true" stored="true"/>
<field name="PatientName" type="string" indexed="true" stored="true" />
<field name="DicomUrl" type="string" stored="true"/>
<field name="ImageType" type="string" indexed="true" stored="true"/>
<field name="InstanceCreationDate" type="string" indexed="true" stored="true"/>
<field name="InstanceCreationTime" type="string" indexed="true" stored="true"/>
<field name="StudyDate" type="string" indexed="true" stored="true"/>
<field name="ContentDate" type="string" indexed="true" stored="true"/>
<field name="DerivationDescription" type="string" indexed="true" stored="true"/>
<field name="ProtocolName" type="string" indexed="true" stored="true"/>
And mention the unique key along with this
<uniqueKey>SOPInstanceUID</uniqueKey>
(Remove any previously existing unique key tag and replace with this tag)
Appendix 3
Morpholines.config file
Update your morphline as below
SOLR_LOCATOR : {

#This is the name of the collection which we created with solrctl utility in our earlier steps
 collection : demo-collection
#Zookeeper host names, you will find this information in CDH manager at Zookeeper service
zkHost : "hostip1:2181, hostip2:2181, hostip3:2181/solr"

}
And include this specific XQuery inside the commands tag of morphlines
xquery {
	fragments : [
	{
		fragmentPath : "/"
		queryString : """
		for $data in /file-format/data-set
		return
		<record>
			<SOPInstanceUID>{$data/element[@name='SOPInstanceUID']}</SOPInstanceUID>
			<ImageType>{$data/element[@name='ImageType']}</ImageType>
			<InstanceCreationDate>{$data/element[@name='InstanceCreationDate']}</InstanceCreationDate>
			<InstanceCreationTime>{$data/element[@name='InstanceCreationTime']}</InstanceCreationTime>
			<StudyDate>{$data/element[@name='StudyDate']}</StudyDate>
			<ContentDate>{$data/element[@name='ContentDate']}</ContentDate>
			<DerivationDescription>{$data/element[@name='DerivationDescription']}</DerivationDescription>
			<ProtocolName>{$data/element[@name='ProtocolName']}</ProtocolName>
			<PatientID>{$data/element[@name='PatientID']}</PatientID>
			<PatientName>{$data/element[@name='PatientName']}</PatientName>
			<StudyDescription>{$data/element[@name='StudyDescription']}</StudyDescription>
			<DicomUrl>{$data/element[@name='DicomUrl']}</DicomUrl>
		</record>
		"""
		}
		]
	}
}