This post shows how to create networks in OpenStack* that are backed by physical networks. This is used, for example, for virtual Customer Premises Equipment (vCPE) to provide additional functions between an Internet service provider (ISP) and customer (see Blog 1 of this series, Enabling vCPE with OpenStack* - Get Started). In this case, the LAN and WAN networks are connected to physical networks using provider networks. This starts with configuration on the host.
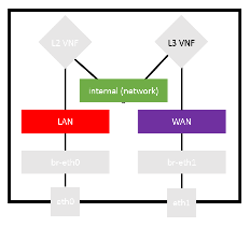
Figure 1 shows the network we are going to create in this post, using the vCPE as an example use case.

Figure 1: Network components and VNFs for vCPE setup using OpenStack*.
Configuration
The basics:
- The WAN/LAN networks will be "flat"
- Specify which physical interface is providing the network
- Physical network mapping (WAN/LAN) in local.conf
- Two networks to be created backed by each of the WAN/LAN maps
Disable reverse path filtering on the host
$ echo '0' > /proc/sys/net/ipv4/conf/default/rp_filter = 0
 $ echo '0' > /proc/sys/net/ipv4/conf/all/rp_filter = 0
and load the new kernel config
$ sysctl -p
Declare the bridge mappings in the local.conf, if using devstack, or int the appropriate config files if using an alternative deployment method. Here, the virtual networks are called LAN-provider and WAN-provider and will be mapped to the br-LAN and br-WAN bridges respectively. And and/or replace the following lines:
# OVS_PHYSICAL_BRIDGE=br-eth1
 # Create the mappings provider:interface
 OVS_BRIDGE_MAPPINGS=LAN-provider:br-LAN,WAN-provider:br-WAN
[[post-config|/$Q_PLUGIN_CONF_FILE]]
 [ml2_type_flat]
 # declare the flat networks
 flat_networks = LAN-provider,WAN-provider
Create the bridges for the provider networks and bind them to physical interfaces on the host:
$ sudo ovs-vsctl add-br br-LAN
 $ sudo ovs-vsctl add-port br-LAN p786p1
$ sudo ovs-vsctl add-br br-WAN
 $ sudo ovs-vsctl add-port br-WAN p786p2
Before building the network, allow ARP spoofing in the neutron agent so that the IP packets can be forwarded by the VNF instances. ARP spoofing is allowed so that frames can be forwarded unmodified by the L2 VNF, and then propagated throughout the network. Specify this in the local.conf:
[[post-config|/$Q_PLUGIN_CONF_FILE]]
 [agent]
 prevent_arp_spoofing=False
Create the networks
 The networks LAN and WAN are provider networks, backed by physical networks. The internal network is "local," so it does not require VLAN tagging:
$ neutron net-create LAN --shared --provider:physical_network LAN-provider --provider:network_type flat
 $ neutron net-create internal --provider:network_type local
 $ neutron net-create WAN --shared --provider:physical_network WAN-provider --provider:network_type flat
Subnets are needed to specify network addresses on the networks. The internal and LAN networks have the same subnet addresses because the bump is invisible and the router needs to appear to be on the LAN network. Create these subnets and then associate them with the appropriate networks:
$ neutron subnet-create --name LAN-subnet LAN 192.168.1.0/24
 $ neutron subnet-create --name internal-subnet internal 192.168.1.0/24
 $ neutron subnet-create --name WAN-subnet WAN 192.168.3.0/24
Create the network ports with security groups disabled; this is done so that the L2 VNF (which is invisible to the network), can receive packets that are not destined for it. The ports for the router will have specific IP addresses assigned, which are the gateways for the LAN and WAN networks:
# Ports for the "bump"
 $ neutron port-create --name LAN-port2 --no-security-groups LAN
 $ neutron port-create --name internal-port1 --no-security-groups internal
# Ports for the router
 $ neutron port-create --name $internal-port2 --no-security-groups --fixed-ip subnet_id=$internal-subnet,ip_address=192.168.1.1 $internal
 $ neutron port-create --name $WAN-port1 --no-security-groups --fixed-ip subnet_id=$WAN-subnet,ip_address=192.168.3.1 $WAN
Security groups are updated to allow ICMP and TCP traffic, so we can ping and SSH to the virtual machines (VMs):
$ nova secgroup-add-rule default icmp -1 -1 0.0.0.0/0
 $ nova secgroup-add-rule default tcp 22 22 0.0.0.0/0
Now the virtual network functions (VNFs) can be booted, and everything must be connected together. Each VM will have two ports connected.
To attach a port to a VM, the port-id is needed, so list the ports, filter them by name, and then grab the column containing the port-id:
$ neutron port-list | grep <port-name> | awk '{print $2}'
Now we need to create the VNFs and connect them to the correct networks and ports:
# Create VMs
 $ nova boot --flavor m1.small --image bump_image --nic port-id=$(neutron port-list | grep LAN-port2 | awk '{print $2}') --nic port-id=$(neutron port-list | grep internal-port1 | awk '{print $2}') bump
 $ nova boot --flavor m1.small --image router_image --nic port-id=$(neutron port-list | grep internal-port2 | awk '{print $2}') --nic port-id=$(neutron port-list | grep WAN-port1 | awk '{print $2}') router
These VMs should be added to the default security group, which has been modified to allow ping and SSH between VMs:
$ nova add-secgroup bump default
 $ nova add-secgroup router default
Hey presto! It works?
After following the instructions, the network setup should look a little like Figure 2 when viewed in Horizon* (OpenStack Dashboard). LAN and WAN networks are connected to eth0 and eth1, respectively, through the provider networks and bridge mappings (not shown here).

Figure 2: OpenStack* Horizon* network topology view.
Once this is set up, we must make sure it works. This can be done by assigning IP addresses to the br-LAN and br-WAN interfaces, and pinging from one to the other.
$ sudo ifconfig br-LAN 192.168.1.7
 $ sudo ifconfig br-WAN 192.168.3.7
$ ping -I br-LAN 192.168.3.7
If all went well, then there is a response, and traffic flows through the network!
Read the Other Blogs in the Series
You've just finished the third in a series of three blogs on the topic of enabling vCPE with OpenStack. Read the other two by clicking on the links below: