Virtual Reality (VR) technology moves fast. Since the reveal of the Oculus Rift* prototype in August 2012, incredible strides have been made in the field. Oculus* effectively kickstarted the democratization of VR for consumers and developers alike. As a result, we developers eagerly threw ourselves into creating experiences and games for the original Oculus Rift DK1 (Developer Kit 1), even though the only available resources were relatively primitive software development kits (SDKs) for Unreal* Engine and Unity* software.
With the 2015 announcement of Valve* VR prototype, and its partnership with HTC*, we were introduced to the HTC Vive*. This technology popularized room scale VR—the translation of player movement in the real world to movement in the virtual environment.
The HTC Vive also introduced unavoidable fragmentation in the VR SDK space. While the Valve Steam*VR API and its Unity software plugin were readily available and made it easy to start developing, there were now two competing VR APIs—Oculus Rift SDK and SteamVR. SteamVR, however, implemented OpenVR*, an API and runtime that allows different VR hardware to work under the same codebase. This encouraged an influx of developers to switch from using the then-standard Oculus SDK, and instead develop and prototype directly with the SteamVR Unity software plugin.
The benefit seemed obvious; one codebase, one deployment that would allow anyone to have the games and experiences they developed working on any SteamVR-supported VR device on the market. In truth, however, in order to gain access to native functionality or brand-specific stores, you still had to use proprietary SDKs.
The Microsoft* Store is also open to VR apps, providing new market opportunities for VR developers. To gain access to this marketplace, you'll need to adhere to specific guidelines and develop using the Universal Windows* Platform (UWP), Microsoft* effort to create a new way to develop universal apps that run across a variety of devices. Those devices include Windows® 10, Windows 10 mobile, Xbox*, Microsoft HoloLens* and mixed-reality devices. The common API makes it possible to develop once and deploy to any Windows 10 device. Every app offered in the Windows Store is a UWP app.
Before we get started, however, an important note for developers relates to the hardware. Microsoft propelled itself into the VR market by introducing Windows mixed reality (MR) devices, among them the Microsoft HoloLens headset, which the company describes as a self-contained holographic computer. These headsets employ inside-out tracking using sensors, and embedded, outward-facing cameras for positional tracking of user movements. In contrast, the HTC Vive and Oculus Rift use outside-in tracking, where built-in sensors and cameras that face the sensors track user movements. Another important distinction is the difference between holographic headsets and immersive headsets. Holographic headsets use see-through displays that allow the user to see the world around them. Immersive headsets have opaque displays that block the player's view of the physical world. (Access more on this here.)
The absence of external sensors and complicated camera setup procedures makes these immersive headsets especially attractive for developers on the move—taking it to conferences and carrying the headset in your backpack has never been so easy. Immersive headsets, including motion controllers, are currently available from about USD 200. The headsets are officially supported by OpenVR, and you can apply for Developer Kits and enter the Windows MR dev program.
That said, we're ready to begin. This article explores how to build UWP apps with Unity software, cover the simplest way to port VR software to UWP, and focuses on the Input Layer provided by the Microsoft API natively inside Unity software.
VR Design and Porting to Native UWP
There are several ways to approach creating cross-platform VR applications, ranging from elaborate automatic SDK setup creators (such as the one provided by the Virtual Reality Toolkit (VRTK) for Unity software; see below), to manually porting your application to each of your target platforms. A lot of developers choose to work with OpenVR to avoid having to port code to a range of devices. This approach isn't without problems. For example, different devices require different controller setups, and neither the input nor the controller (or custom) models will match. This creates problematic situations in which some experiences might not use the input as you expect. This can result in having the position of your in-game "hands" offset with respect to the positions of your real hands. Other compelling reasons to handle ports using multiple SDKs include being able to take advantage of native control functions, and to gain access to different online app stores.
Separating Game Logic from VR SDK Specifics
In high-end VR with positional tracking, room scale, and motion controllers, a game scene (the VR world) contains game logic driven by a VR rig consisting of left and right hand controllers and a camera. Head tracking is used to rotate and move the camera position, creating the player's in-game field of view.
In Unity software, the player entity is referred to as a camera rig. This GameObject represents the user's play space and contains the main stereo camera and controller objects. This setup provides a layer that separates your game logic from the specific VR SDK you're using. I recommend using the structure shown in figure one for cross-platform VR development.
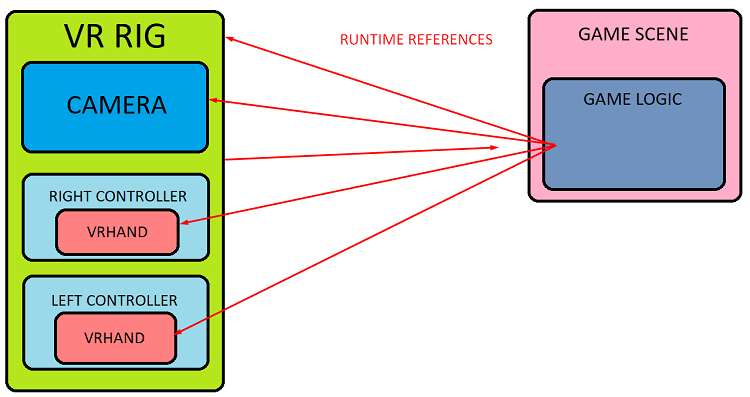
Figure 1. This scheme puts your game logic and rig on separate layers, making it easier to port to separate SDKs.
In figure one, all SDK-specific data flows only through the VRHAND scripts. VRHAND is a script component attached to the controller GameObjects. It contains public input methods for our specific SDK. Once references have been set up, you can call its methods from any game script for input; for example, VRHand.GetTriggerPress().
We could create a general-purpose script adaptive code, and IF statements, to discern SDKs, but I prefer to create individual VRHAND scripts for each specific SDK. If you work in a big team you might not have the option to create individual builds for each specific platform, and might want to speed development by creating a single camera rig that chooses the appropriate SDK at run time, depending on the headset that's plugged in. This is certainly a possibility, but it's easy to extend the previous scheme to adapt to that approach.
Later in this tutorial, we'll create a VR rig for Windows mixed reality headsets, using the native input and APIs exposed in Unity software —without any third-party plugins or prefabs. For now, the key is to keep as much of the game logic and scripting as possible, independent of the camera you use. Obviously, you'll need to reference your player VR rig and pass data forward and back, for your game to function. But we want to abstract all this from the specific SDK or camera rig you want to use and avoid hardcoded references that are ubiquitous in Unity software; the goal being the ability to swap your camera rig with a different VRHAND script with different SDK data and have your game up and running with a simple switch.
Creating runtime references helps you avoid the pitfall of hardcoding your components through the Unity software editor. You can set up these references at the Awake or Start methods in your game by using FindObjectOfType or tagging your camera and controllers and using FindGameObjectsWithTag. You can even create an editor manager script to set up references for you and run the script once per scene. Choose the option you're most comfortable with; one that fits your game architecture and design.
Being as close to this abstraction layer as possible puts you in a better position to make multiplatform VR content with minimal effort. This concept is common in game development, and is perfectly illustrated by the Input System utilized by the Unity software API. With the Input Manager you can actually set up actions associated with different buttons. It's a simple abstraction layer for input to be able to associate common input—for example, horizontal movement—to different input devices such as joysticks, keyboard arrows, a gamepad, and so on.
VR Frameworks Compatible with Mixed Reality
When developing native apps with the MR SDK in Unity software, we have several choices of starting point. Let's look at some of the open-source projects available online.
VRTK
VRTK is an impressive VR toolkit full of prefabs, scripts, and setups for rapidly getting up to speed with Unity software VR prototyping and app creation. Many studios have used it to develop games, and it has lowered the effort required to create VR apps in Unity software. VRTK is open source, with a large community contributing to the development of the framework. VRTK recently obtained development funding from Oculus. VRTK fully supports mixed-reality headsets and allows you to create VR UWP apps. You can get the project directly from the GitHub* page (which is more up to date than in the Asset Store). The official documentation doesn't include MR support yet, but it is officially supported. For dynamically loading MR controllers, you'll need the Windows MR extension.
With VRTK, SDK choice is set through a manager during the creation of your scene. VRTK creates a very powerful and complex abstraction layer that allows you to set up your camera rigs through said manager. This video illustrates working with multiple SDKs.
This practice follows the philosophy of having an editor script that creates references before run time. All its dependencies, however, are tied to the VRTK. As such, it works great if you're going to use VRTK for most of your game VR interactions—locomotion, and so on. It doesn't work as well, however, if you're planning a different approach. Fortunately, you can also extend the kit and expand it through inheritance, writing components that work seamlessly with the rest of the toolkit. VRTK is also very well documented.
Mixed reality toolkit
Microsoft has created a comprehensive toolkit with the goal of accelerating development of UWP applications for MR headsets and HoloLens. You'll find the Unity software version of the Mixed Reality Toolkit (MRTK) here.
MRTK includes lots of prefabs and scripts that provide complex and powerful functionality. It also includes a VR camera rig; see figure two.
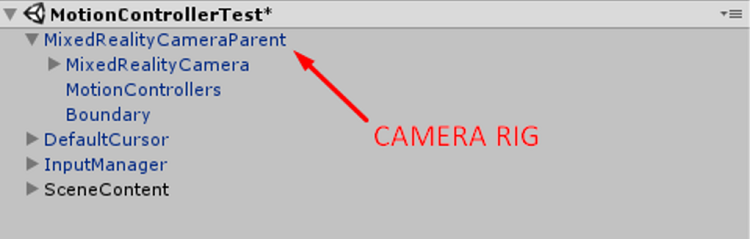
Figure 2. The MRTK camera rig.
As you can see in figure two, this VR rig appears to lack the controllers and has a slightly different structure than the camera rig described earlier. This has to do with the toolkit architecture and the way different components work with each other. When going to play mode in Unity software the structure changes, as shown in figure three.
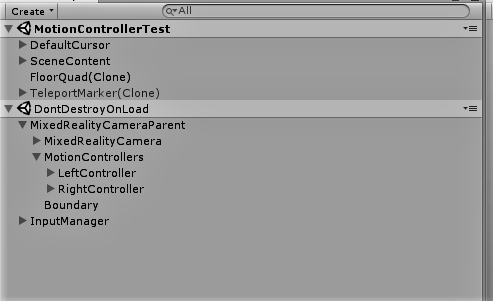
Figure 3. The camera rig structure in Unity* software play mode.
The first thing we see in figure three is that our camera rig becomes a DontDestroyOnLoad object. This is due to the way the rig is wired. It has a dependency on a MixedRealityCameraManager.cs script that inherits from a singleton base class. The controllers are spawned at run time, which creates another potential problem—if we want to follow our previous rule and set up references at run time, we have to deal with initialization problems, and can't set up references in the editor.
To reiterate, the architecture and inner workings of this camera rig are different from those presented earlier. The inherent complexity of having a general framework for developing simultaneously for HoloLens and MR while using a common codebase is a potential downside of this toolkit. It uses a different philosophy regarding input and interaction and, as you go deeper into the structure of the toolkit, you discover different design decisions. The framework exposed is restrictive (not necessarily a bad thing) in the way it works, and we have to adhere to many contracts embedded in the architecture. It uses layer upon layer of scripts that work great within the toolkit, but expanding it is a bit more complex, and the documentation is lacking.
VRTK and MRTK, Pros and Cons
While VRTK and MRTK are great starting points and provide powerful and complete features, they do restrict you to their architecture and design choices. If you delve deep and become comfortable with their codebase, by all means use them. VRTK is a fantastic project that lowered the barrier to entry for VR developers. Its components are very easy to use, and it enables fast VR scene- and interaction-creation. VRTK is also one of the best learning resources for getting up to speed with VR best practices. MRTK provides a perfect toy box for playing with and building an understanding of the philosophy and architecture of the Windows mixed reality (and HoloLens) ecosystem, and you will feel at home if you are experienced with the design choices in it. Having a codebase that supports HoloLens is also a big plus.
Custom camera rig and input
But what if you have an old project you want to adapt? Or if you'd rather have absolute control of your codebase without having to adhere to toolkit architectures? Let's look at the simplest way to implement a VR camera rig for Windows mixed reality, without the use of any external toolkits or third-party plugins.
Let's create a VR rig GameObject containing our camera and controller GameObjects, utilizing Unity software's native VR support. Unity XR encompasses VR, MR, and augmented reality (AR) support, and includes different VR SDKs out of the box (OpenVR, Oculus, MR), so you can include them, without external plugins, directly in your project settings. Do that for the MR headsets by clicking the plus sign in XR Settings to add any VR SDK you'd like to use (see figure four).
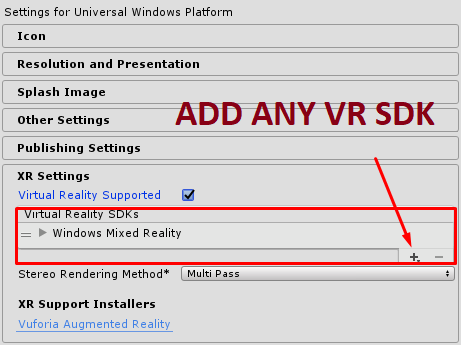
Figure 4. In Unity* XR, use the Settings for Universal Windows* Platform menu to add support for any VR SDK by clicking the plus (+) sign under XR Settings > Virtual Reality SDKs > Windows Mixed Reality.
Before going further, let's look in detail at what we need to build UWP apps, along with the specific set up process.
Set up Unity* software to build mixed reality UWP apps
To create a UWP app, we need to configure our project and install the appropriate software. Many Windows mixed reality headset components were installed when you set up your headset. If you don't have a Windows mixed reality headset, you might need to install the following:
- Microsoft Visual Studio* 2017. The community version included with Unity software is fine, but we'll need an extra bit of functionality that can be installed directly from Visual Studio. Specifically, we'll need the UWP development workload as well as the Windows 10 SDK. Normally you can choose your workloads when installing Visual Studio, but if your copy of Visual Studio came with Unity software, you'll need to open the Visual Studio Installer and modify your installation to include the UWP Development workload (see figure five).
Be sure to check UWP platform development as well as game development with Unity software, and include the Windows 10 SDK. For more information see the Visual Studio documentation.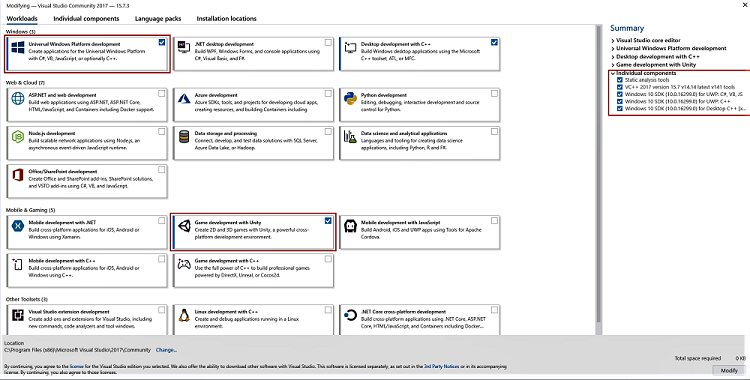
Figure 5. From the Microsoft Visual Studio* installer, add the UWP platform development and game development with Unity* software workloads, along with the Windows®10 SDK. - Windows 10 April 2018 Update.
- Unity 2017.4. At the time of writing, this is the recommended and supported version according to Microsoft. I have checked functionality with Unity 2018.1.2f1, and everything works well.
- Choose the .NET scripting backend, which you can set in Player Settings > Other Settings†.
- You will also need to configure developer mode by going to System Settings in Windows and selecting Update & Security > For Developers > Developer mode (see figure six).
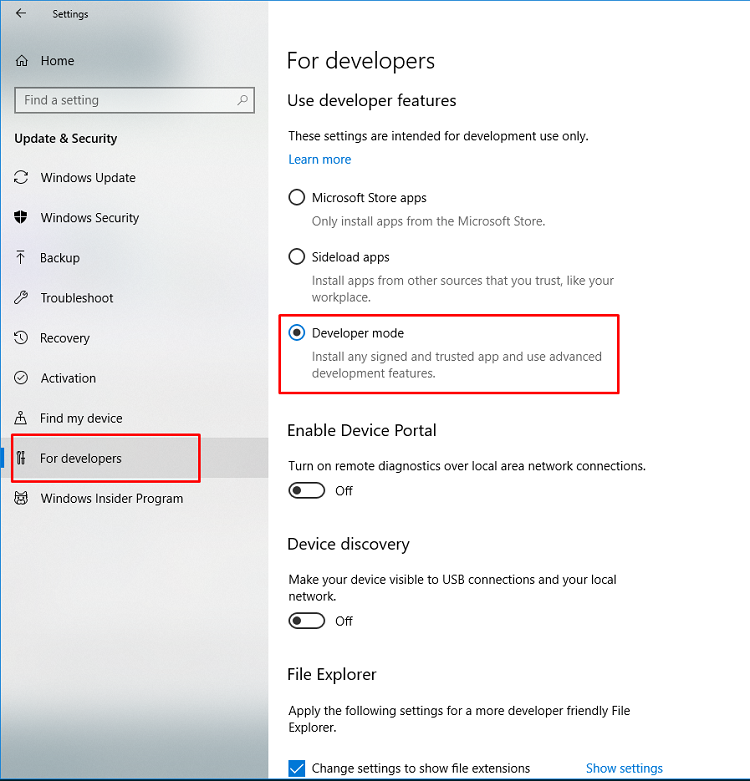
Figure 6. Use these Update & Security settings to configure Developer mode.
† UWP does not use the .NET 3.5 Class Libraries profile that is referenced from Unity IDE; when exported to Visual Studio only a subset of .NET 4.5 is referenced, so all functionality may not be available. Choosing IL2CPP solves many of these problems.
With all the pieces installed and working, we need to configure our Unity software project. The main task is to configure our build settings for the UWP platform. Most likely, your Unity software version will not have the Windows Platform module installed, so when going to Build Settings, you'll see the parameters shown in figure seven.
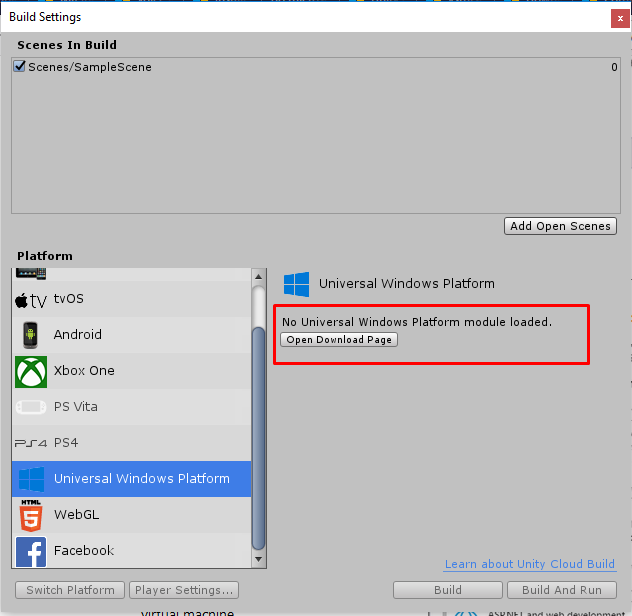
Figure 7. Check your Unity* software Build Settings to see whether the UWP module is loaded. In this image, the module is not present.
Selecting Open Download Page gets the necessary packages for you. Install them, and configure your build settings as shown in figure eight.
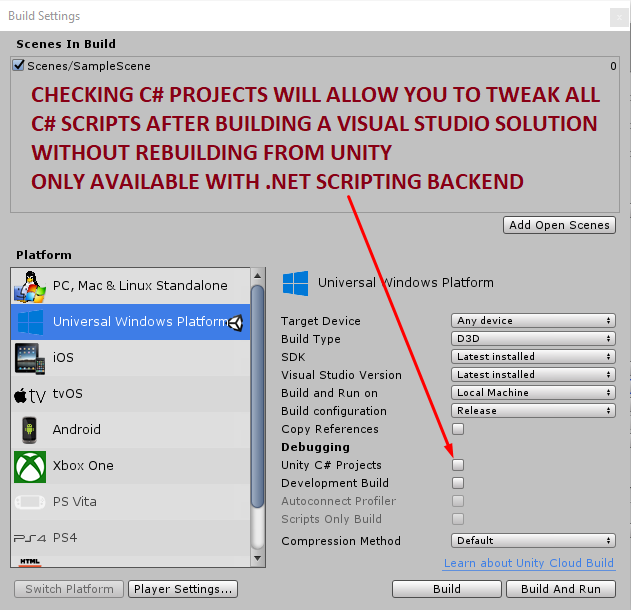
Figure 8. Enable Unity* C# projects under Unity's UWP on the build settings page.
After setting our platform to UWP, we can now choose the right XR Settings by going to Edit > Player Settings inside Unity software Build Settings (see figure nine).
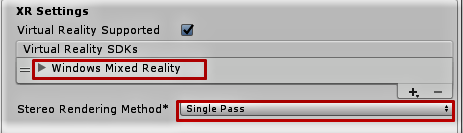
Figure 9. Set your preferred Stereo Rendering Method from the XR Settings menu. Select the Windows Mixed Reality SDK and select your preferred Stereo Rendering Method (Single Pass and Single Pass instanced provide better performance but your shaders should be compatible with it).
Now click Build on your Build Settings page, which prompts you to choose a folder for your project. After selecting a folder, the build process starts, and Unity software generates a Visual Studio Solution that we can now work on in Visual Studio, and then debug and deploy. In my project, named UWPNOKIT, Unity software generated the file shown in figure ten.
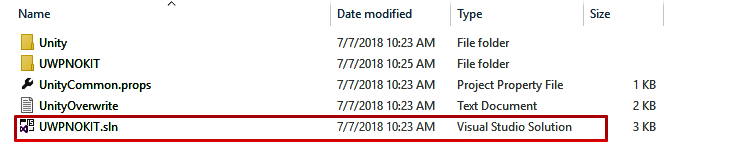
Figure 10. My Unity* software-generated project as it appears in the Windows* File Explorer.
Click on the Visual Studio Solution to open an instance of Visual Studio with a project ready for deployment or debugging. To get from here to the Microsoft Store takes just a few steps. To upload your project, create a ".appxupload" package. (Be sure you have a Microsoft Store developer account before submitting your app.) Within Visual Studio, select x86 or x64 build configuration, and then deploy the app. (For testing, select Local Machine.) Using the Primary configuration turns off profiling and includes optimizations for your app—this is the configuration you should use for release. You can then associate your app with the store through Project > Store (see figure 11).
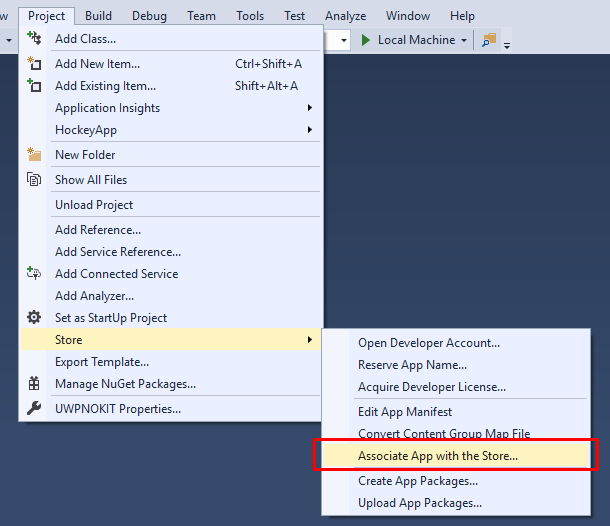
Figure 11. Associating your app with the Microsoft Store.
Next, you'll be prompted to supply information regarding your app and its requirements. Once completed, create a submission from the Windows Dev Center dashboard. For more information on this process, check Submitting an app to the Microsoft Store.
Setting Up the Camera Rig for Windows* Mixed Reality
With all the software installed and configured, we can start developing and creating our camera rig. Before getting hands on, let's stop and set up a very useful feature provided by Microsoft: the Windows Mixed Reality Simulator. The simulator creates a pseudo instance of a headset connected to your computer and lets you work and test your app without having a headset plugged in. Use mouse buttons as controllers and mouse or trackpad movements to navigate virtual environments. Access the simulator shown in figure 12 from the Mixed Reality Portal desktop app in Windows®10.
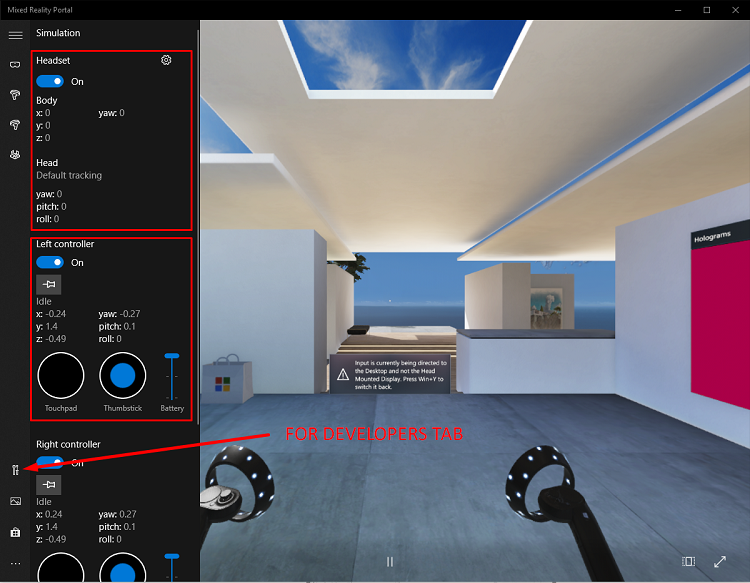
Figure 12. The Mixed Reality Simulator in Windows® 10 lets you test MR apps without having a headset connected to your PC.
To enable the simulator, make sure you have the Windows 10 Creators Update and follow the directions outlined on Setting Up Unity* Software to Build Mixed Reality UWP Apps. For more information see Using the Windows Mixed Reality Simulator section.
Creating the camera rig
Let's build our camera rig. In Unity software, having Virtual Reality Support checked in Player Settings automatically makes the main camera in your scene work as a stereo camera, with proper positional tracking enabled. To have positional tracking working on our controller GameObjects we need to provide positional data, which we can get from the UnityEngine.XR.WSA.Input namespace. The way the native MRTK gets position coordinates is by subscribing a method to Application.onBeforeRender and updating the position and rotation through the polling of the data. The InteractionManager from Microsoft provides different events that fire whenever new input or data is received from the controllers and headset (including tracking data). You can also use the GetCurrentReading method to poll data.
var interactionSourceStates = InteractionManager.GetCurrentReading();
foreach (var interactionSourceState in interactionSourceStates) {
//Get data, button presses etc from each interactionSourceState
}
Each interactionSourceState contains button presses, axis data, pressed amounts for supported buttons, and so on. For details, see the InteractionSourceState documentation.
To obtain positional tracking data, we can simply use the following code—
 Vector3 newPosition;

 if (interactionSourceState.sourcePose.TryGetPosition(out newPosition, InteractionSourceNode.Grip))
{                    	               currentController.ControllerParent.transform.localPosition = newPosition;
                	}
—where we feed an InteractionSourceNode to the TryGetPosition function. And we have two sources available: Grip (representing the controller), and Pointer (representing the tip and orientation of the forward-pointing direction of the controller). We can do the analogous TryGetRotation for rotation.
Unity software has its own version and you can poll tracking data with XR.InputTracking.GetLocalPosition. Let's use Unity software's implementation for our controllers because it's convenient—we don't have to use different methods for each SDK. Unity software makes it even simpler for us, providing a Tracked Pose Driver component (see figure 13) that we can attach to a GameObject, and feed it positional data.
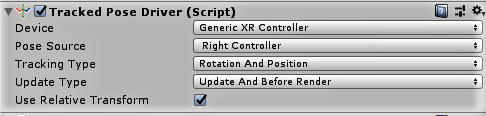
Figure 13. The Unity* Tracked Pose Driver component.
Let's assemble the rig with these, creating a parent object called VRRig, and three children—the main camera and two controllers (see figure 14). Let's zero out all the transforms as well and attach the pose driver to the controller GameObjects.
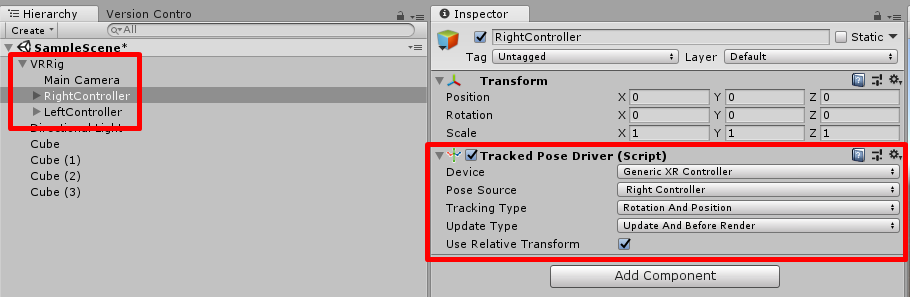
Figure 14. The VRRig hierarchy in Unity* software (left), zeroed XYZ transforms (upper right), and the Inspector > Tracked Pose Driver (Script) settings (lower right) as they appear in Unity software.
Select Generic XR Controller on the Device tab, along with the appropriate Pose Source (Right or Left Controller). If you attach some 3D model to your controllers and go to Play Mode, you'll have a perfectly functional camera rig working natively with Windows mixed reality that lets you see your hands moving.
Now, let's take care of the input for the controllers. As mentioned previously, the way I normally design VR experiences is by having a VRHand.cs component attached to my controller GameObjects, which I then set up references to through my game logic and call public methods for input; for example, VRHand.GetTrigger();. Using this scheme makes porting to different SDKs a matter of rewriting this VRHand.cs script to each specific platform.
So how can we get native input for Windows mixed reality? Unity software provides its standard Input API with Input.GetButton/Input.GetAxis. A specific mapping for MR controllers can be found in the Input for Windows Mixed Reality documentation. You can wire the Unity Input Manager to create multiplatform XR input systems. If you want to get more detailed input data, you'll have to use Windows specific APIs, under "UnityEngine.XR.WSA.Input." We can poll the controller positional data as we saw before, but we can also poll input data from the controllers.
if (interactionSourceState.selectPressed) {
     // Do something when the "Select" button is pressed
}
Select corresponds to the trigger in the MR controllers.
It's worth mentioning that the data obtained from this API is forward-predicted data to account for VR's motion-to-photon latency, resulting in rendered poses looking more correct.
When handling button input from the controller, the data needs to be accurate and properly in sync with when the user presses the button. Bluetooth* technology controllers induce up to 20ms latency in the input which, when added to the forward prediction, can amount to 40ms of delay after a user presses a button. To use historical pose data, the Microsoft API handles it through the Interaction Source Events in the InteractionManager. We can subscribe our methods to these events and update the state of our VRHand data every frame.
Let's look at how a simple implementation of trigger presses would be:
using System.Collections;
using System.Collections.Generic;
using UnityEngine;
using UnityEngine.SpatialTracking;
using UnityEngine.XR.WSA.Input;

[RequireComponent(typeof(TrackedPoseDriver))]
public class VRHand : MonoBehaviour {

TrackedPoseDriver tracker;
InteractionSourceHandedness handedness;
bool triggerpress;
void Start()
	{
    	tracker = GetComponent<TrackedPoseDriver>();
    	if (tracker.poseSource == TrackedPoseDriver.TrackedPose.LeftPose)
        	handedness = InteractionSourceHandedness.Left;
    	else
        	handedness = InteractionSourceHandedness.Right;

    	InteractionManager.InteractionSourcePressed +=                                                 InteractionManager_InteractionSourcePressed;
	}

 void OnDestroy()
	{
    	InteractionManager.InteractionSourcePressed -= InteractionManager_InteractionSourcePressed;
    	}
void InteractionManager_InteractionSourcePressed(InteractionSourcePressedEventArgs state)
	{
    	if (state.state.source.handedness == handedness)
    	{
		if(state.pressType==InteractionSourcePressType.Select)
			triggerpress=true;
}
}
 public bool GetTriggerPress()
	{
    	return triggerpress;
	}
private void LateUpdate()
	{
	triggerpress=false;
}
}
First, I sort the handedness of my controller by checking the Tracked Pose Driver. I subscribe a method to the InteractionManager event that fires when buttons are pressed (InteractionManager.InteractionSourcePressed). In my method, I check for the type of press. If it's a trigger press that corresponds to the correct-handedness, I set up a bool that I return in the GetTriggerPress method. Finally, I set the bool to "false" in LateUpdate, as I only want to get a reading when pressing initially. With this setup, we can access any and all of the functionality from the MR controllers while at the same time utilizing the design decision of abstracting most of the SDK specific methods to the VRHand.cs script. I have included my VRHand.cs script in the article with all the buttons implemented, so you can check the source code.
Conclusions
Microsoft's Windows mixed-reality ecosystem has attracted a wide variety of developers and partners and promises to bring VR to the masses. Beyond gaming, mixed-reality applications are being developed to transform the way we collaborate remotely, view data, design and interact with real and virtual objects, learn about the world around us, and more. (Learn more about some of the commercial applications of MR here.)
We've explored setting up our development environment to create a UWP application for Windows mixed reality headsets, and we discussed best practices for planning multiplatform content, specifically the structure of VR camera rigs. We also investigated several development frameworks to get started with native integration for UWP and MR controllers and headsets. We looked at two open source resources (VRTK and MRTK) that can accelerate development, but require working with complex but powerful frameworks. Finally, we implemented a native camera rig for Windows mixed reality headsets along with an input layer for obtaining native data from the controllers. I hope you start using all these resources to create some amazing MR content.
Code Sample
Download the code sample MRHand.cs as component to a gameobject in Unity. After setting up a Tracked Pose Driver component in the gameobject to the correct device and handedness the MRHand.cs script will provide you with public Input functions to obtain controller button presses to drive your game.
Resources
- What's a Universal Windows Platform (UWP) app?
- Be more than mobile
- Submitting an app to the Microsoft Store
- Development launchpad
- Unity development overview
- Exporting and building a Unity Visual Studio solution