Overview
With the evolution of IoT and Edge Computing use cases, multi-access becomes a growing requirement to enable resilient connectivity and improve user experience for the newly emerging applications such as Autonomous Mobile Robots (AMRs), AR/VR, and Smart Cities applications.
This Reference Implementation (RI) provides a software-defined multi-access solution that is agnostic to the connectivity technologies and the underlying protocols. This solution is tested with Smart Edge Private Wireless Experience Kit (PWEK) considering Cellular and Wi-Fi* connectivity for private 5G.
To run the reference implementation, you will need to first download and install the Intel® Smart Edge Private Wireless Experience Kit.
Once you have installed the Intel® Smart Edge Private Wireless Experience Kit, select Configure & Download to download the reference implementation and then follow the steps below to install it.
- Time to Complete: 120 - 150 minutes
- Programming Language: Python*
- Software: Intel® Smart Edge 22.04.01 PWEK Release (Currently tested but the Reference Implementation is forward compatible with PWEK releases).
Target System Requirements
Edge Controller
-
One of the following processors:
-
Intel® Xeon® Scalable processor.
-
Intel® Xeon® Processor D.
-
-
At least 64 GB RAM.
-
At least 256 GB hard drive.
-
An Internet connection.
-
CentOS* 7.9.2009.
Edge Nodes
-
One of the following processors:
-
Intel® Xeon® Scalable processor.
-
Intel® Xeon® Processor D.
-
-
At least 64 GB RAM.
-
At least 256 GB hard drive.
-
An Internet connection.
-
CentOS* 7.9.2009.
-
User Equipment: HUAWEI* Mate30 pro
Client Device
-
Laptop supporting Wi-Fi and cellular (or Wi-Fi + cellular/USB tethering) Sample: Lenovo* ThinkBook* 13s G2 ITL
-
Ubuntu* 20.04
-
Wi-Fi Access Point
How It Works
The solution has a client software part (running at the PC/UE/IoT device side) and a server software part (running at the Edge Server). The Generic Multi-Access (GMA) client software connects to the GMA server software over cellular and Wi-Fi connectivity.
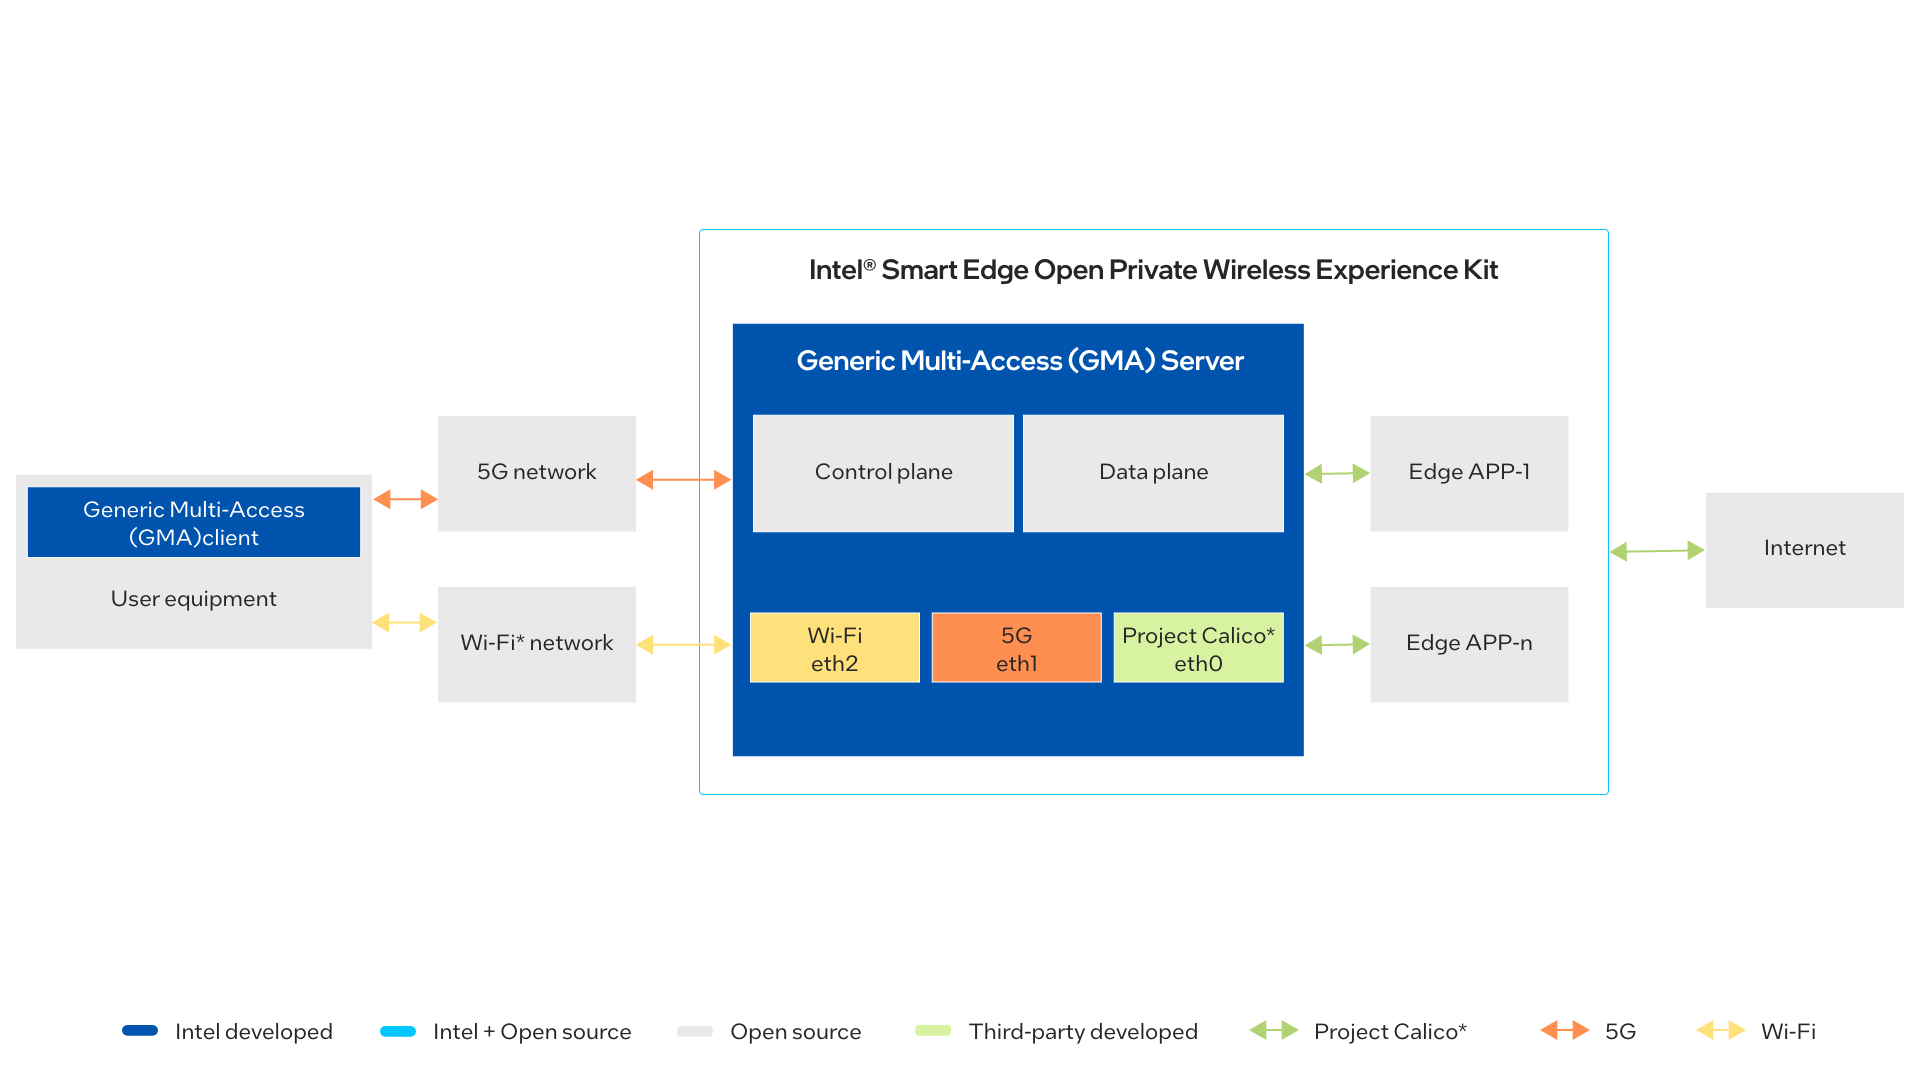
Figure 1: How It Works
At the very beginning, the client has only one connection established (e.g., cellular) and will try to establish the second connection. After both connections are established, the client will then establish a websocket-based secure connection between the client and the server to exchange messages. A new protocol layer is introduced by GMA to handle all multi-path related operations.
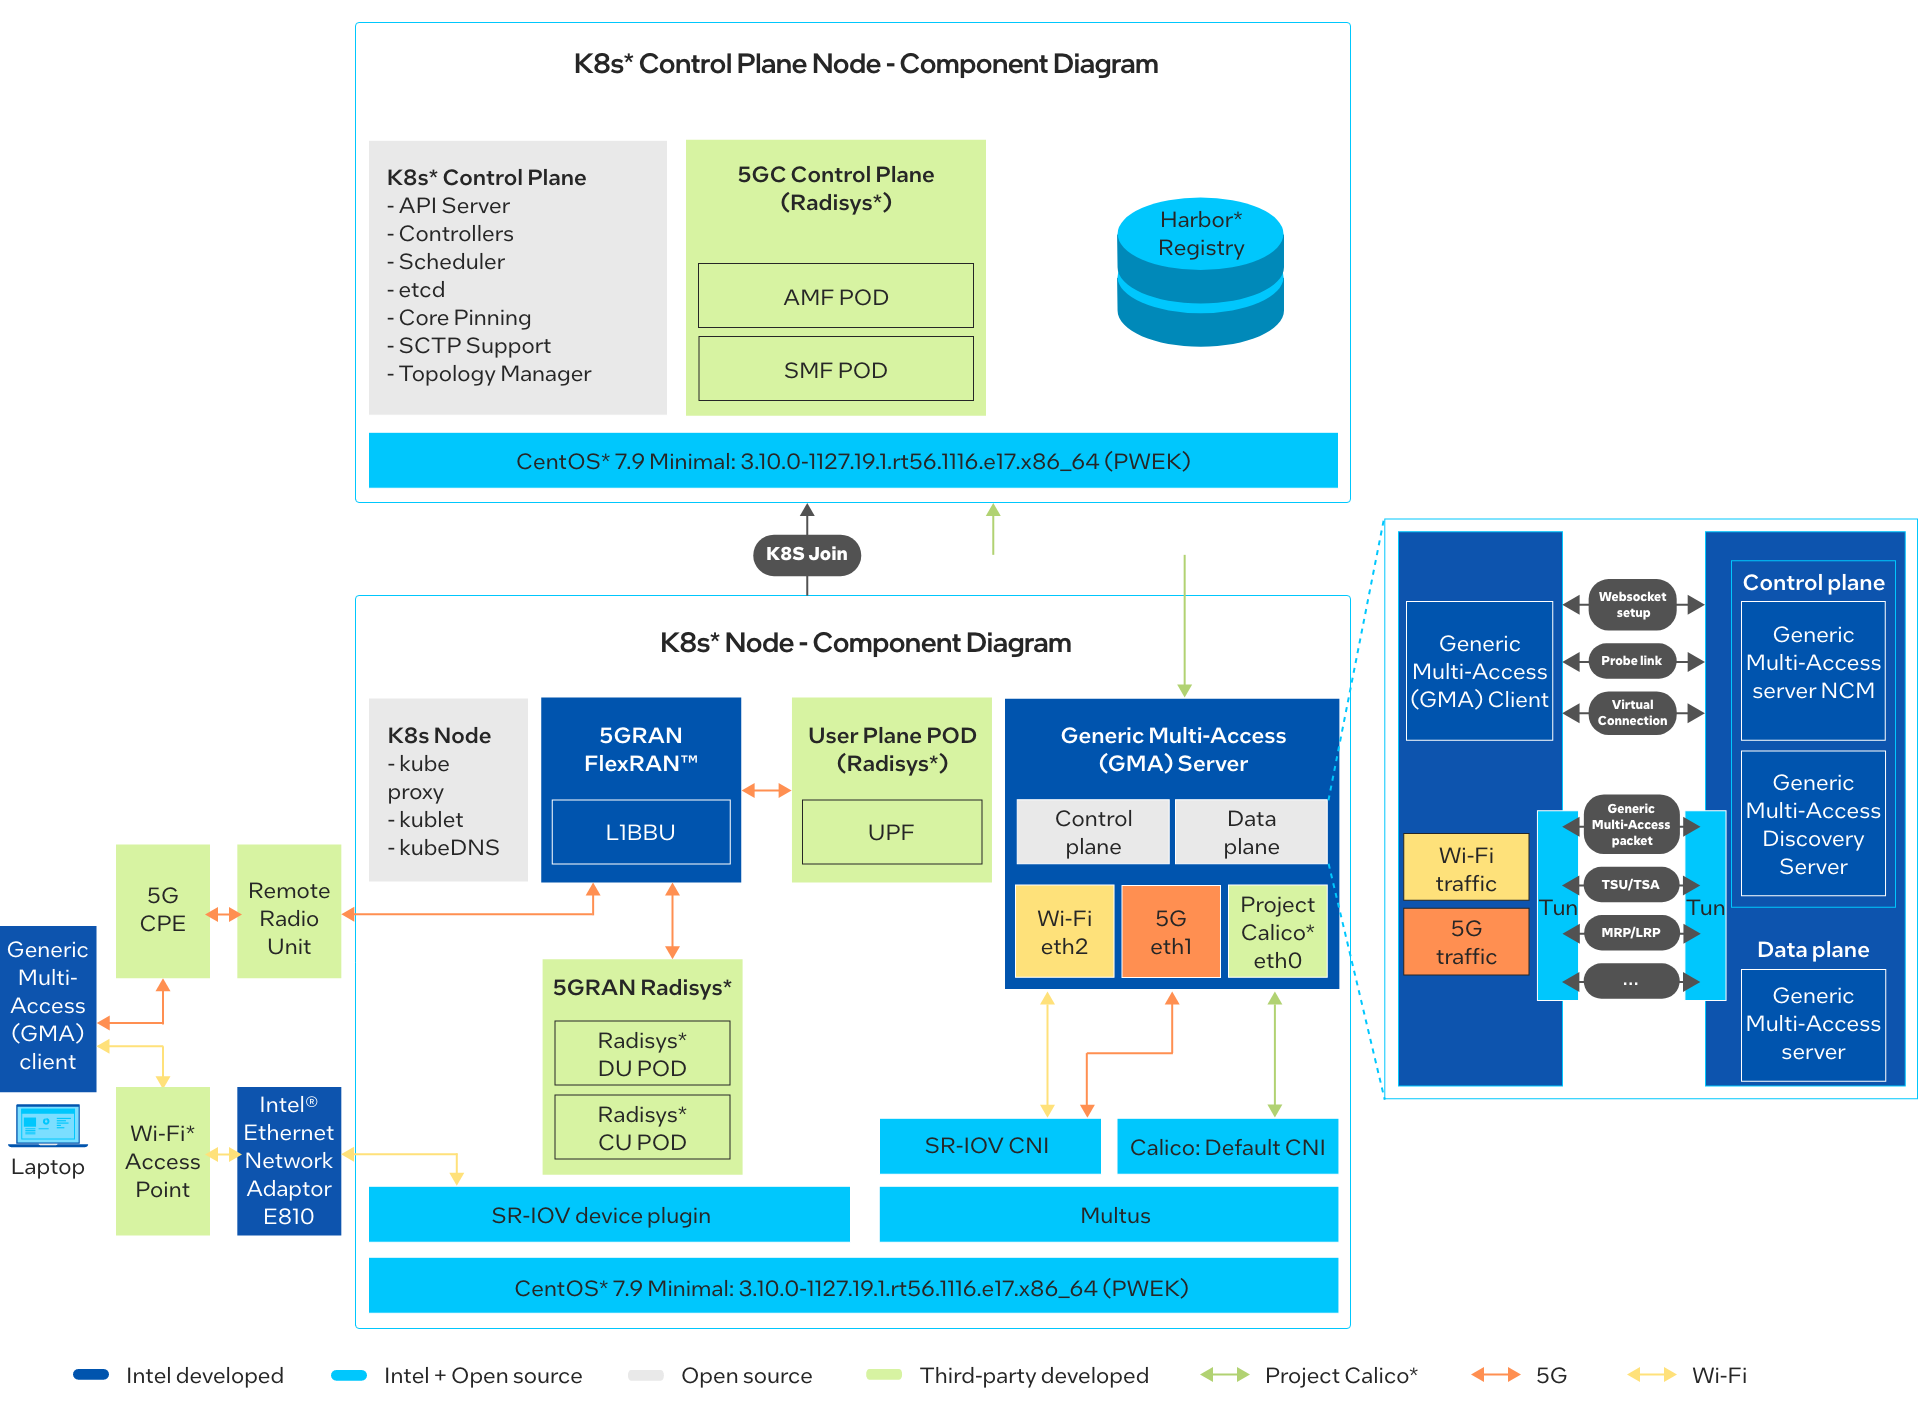
Figure 2: Architecture Diagram for GMA with Intel® Smart Edge
Get Started
Prerequisites
To run the reference implementation, you will need to first download and install the Intel® Smart Edge Private Wireless Experience Kit.
Ensure that the following conditions are met properly to have a smooth installation process for the reference implementation with Intel® Smart Edge Private Wireless Experience Kit.
-
Hardware Requirements
Make sure you have a fresh CentOS* 7.9.2009 installation with the Hardware specified in the Target System Requirements section.
-
Network connections
-
Laptop connected to Wi-Fi through Wi-Fi access point, which is connected to 100GbE Intel® Ethernet Network Adapter E810.
-
Laptop connected to cellular network through cellular tethering.
-
Step 1: Install the Reference Implementation
NOTE: The following sections may use
<Controller_IP>in a URL or command. Make note of your Edge Controller’s IP address and substitute it in these instructions.
Select Configure & Download to download the reference implementation and then follow the steps below to install it.
-
Make sure that the Target System Requirements are met properly before proceeding further.
-
If you are behind a proxy network, be sure that proxy addresses are configured in the system:
export http_proxy=proxy-address:proxy-port export https_proxy=proxy-address:proxy-port -
Under the user deploy PWEK, for example smartedge-open, download the GMA RI package:
mkdir path-of-downloaded-directory -
Open a new terminal and move the downloaded .zip package to the
/home/smartedge-openfolder:mv path-of-downloaded-directory/multi-access-with-private-5g.zip /home/smartedge-open -
Go to the
/home/smartedge-opendirectory using the following command and unzip the RI:cd /home/smartedge-open unzip multi-access-with-private-5g.zip -
Go to the
multi-access-with-private-5g/directory:cd multi-access-with-private-5gThree files will be generated: server.key, server.csr and server.crt.
-
Apply the Network Attachment Definition and network policy:
cd MultiAccess_with_Private_5G_Reference_Implementation_1.0.0/MultiAccess_with_Private_5G/GMA/deploy kubectl apply -f gma5g-net.yaml kubectl apply -f gmawifi-net.yaml kubectl apply -f gmanet-policy.yaml -
Change permissions of the executable edgesoftware file to enable execution:
cd ../../../.. chmod +x edgesoftware -
Run the command below to install the Reference Implementation:
./edgesoftware installNOTE: Installation logs are available at path:
/var/log/esb-cli/Multi-access-with-private-5g_<version>/<Component_Name>/install.log -
When the installation is complete, you see the message “Installation of package complete” and the installation status for each module.
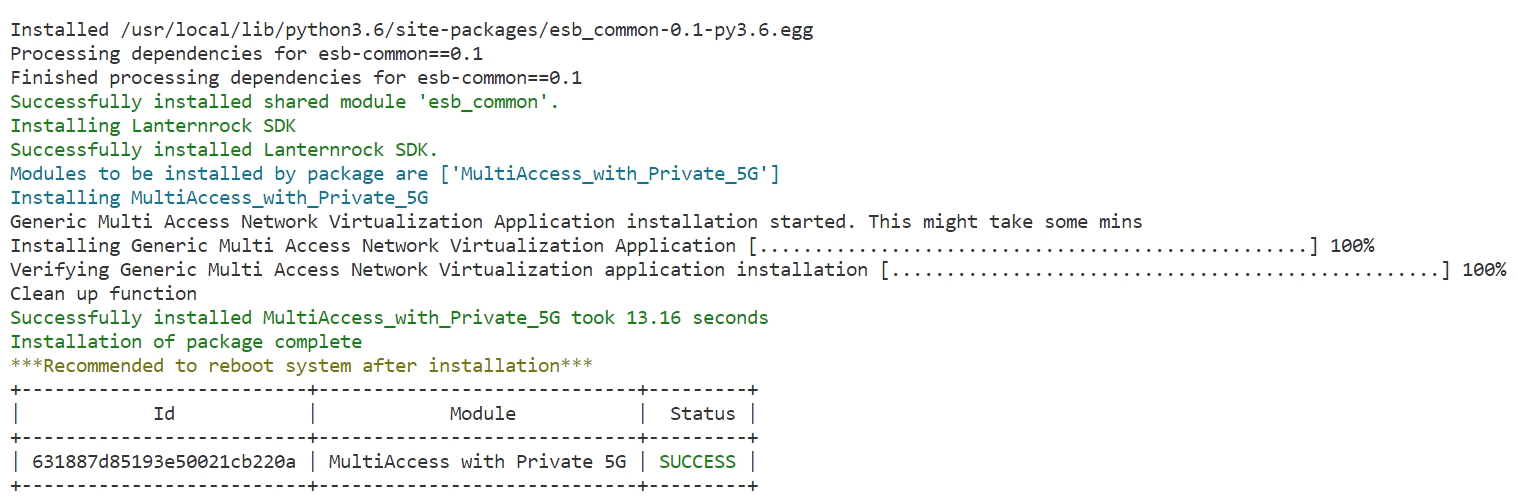
Figure 3: Successful Installation
NOTE: If the pods have a status of “ContainerCreating”, please wait for some time, since Kubernetes* will pull the images from the registry and then deploy them. This happens only the first time the containers are deployed, and the wait time will depend upon the network bandwidth available.
-
Check the GMA pods with the command:
kubectl get pods -n smartedge-apps
Figure 4: Status of pods
-
Get the Container ID of gmaserver with the command:
kubectl describe pod <gma-pod> -n smartedge-apps | grep "Container ID" -
Copy the SSL certificate to the GMA container:
openssl genrsa -out server.key 3072
openssl req -new -key server.key -out server.csr (input user info)
openssl x509 -req -in server.csr -out server.crt -signkey server.key -days 3650

docker cp ./server.key <gma-container-id>:/home/python
docker cp ./server.csr <gma-container-id>:/home/python
docker cp ./server.crt <gma-container-id>:/home/python
NOTE: Run the command on Kubernetes node.
-
Run the gmaserver application:
docker exec -itd <gma-container-id> bash -c "sudo ./rungma.sh"NOTE: Run the command on Kubernetes node.
-
Install test tools of gmaserver:
docker exec -itd <gma-container-id> bash -c "sudo apt-get update && sudo apt-get install iperf3 -y"NOTE: Run the command on Kubernetes node.
Step 2: Check the Application
-
Set up GMA client on the GMA client device, which is the laptop:
git clone https://github.com/IntelLabs/gma.git

sudo apt-get install libboost-all-dev
sudo apt-get install libssl-dev
sudo apt-get update
sudo apt-get install net-tools
sudo apt install screen speedometer iw -y
Change client key to generated key. Use
server.csrwhich was generated in Step 1.cp /path/to/server.crt /path/to/gma cd gma sed '/./{s/^/ "&/;s/$/&\\n"/}' server.crt > client.crtCopy the contents of
client.crttopath/to/gma/client/root_certificates.hppto replace std::string const cert content.Compile the GMA client:
 cd ./GMAlib/lib
 make -B
 cd ../../client
 make -B
Install the GMA client:
 sudo mkdir /home/gmaclient
 sudo chmod 777 ./gmaclient
 cd ./client
 cp ./gmaclient /home/gmaclient/
 cp ./config.txt /home/gmaclient/
Configure the GMA client using the command below, where:
wlan0: network interface for Wi-Fiwwan0: network interface for cellulargmaserver.apps.local: local DNS name for GMA service running at Edgea.b.c.d: GMA service IP address at the edge node via LTESERVER_NCM_IP=a.b.c.d WLAN_INTERFACE_CONFIG=wlan0 LTE_INTERFACE_CONFIG=wwan0Start the GMA client:
cd /home/gmaclient sudo ./gmaclient -
Ping the GMA server. You will do tun setup after connection setup.
ping 10.8.0.1 PING 10.8.0.1 (10.8.0.1) 56(84) bytes of data. 64 bytes from 10.8.0.1: icmp_seq=1 ttl=64 time=0.847 ms 64 bytes from 10.8.0.1: icmp_seq=2 ttl=64 time=0.824 ms 64 bytes from 10.8.0.1: icmp_seq=3 ttl=64 time=0.903 ms 64 bytes from 10.8.0.1: icmp_seq=4 ttl=64 time=0.871 ms 64 bytes from 10.8.0.1: icmp_seq=5 ttl=64 time=0.807 ms 64 bytes from 10.8.0.1: icmp_seq=6 ttl=64 time=0.830 ms -
Run Demo Tests. Install test tools in server and log in to GMA Docker*.
kubectl exec -it <gma-pod> -c gma -n smartedge-apps /bin/bash
iperf3 -s -i 5
Step 3: Check Seamless Access Across Cellular and Wi-Fi
-
Run demo test tools on the GMA client device:
iperf3 -c 10.8.0.1 -t 1000 -i 5 -u -R
speedometer -r tun0 -r <cellular-interface> -r <wifi-interface> -b -s -l -n 0 -m 200000
Figure 5: Start Demo Test Tools
-
Disconnect the Wi-Fi path:
nmcli device disconnect <wifi-interface>Now the flow is transferred from Wi-Fi to cellular:
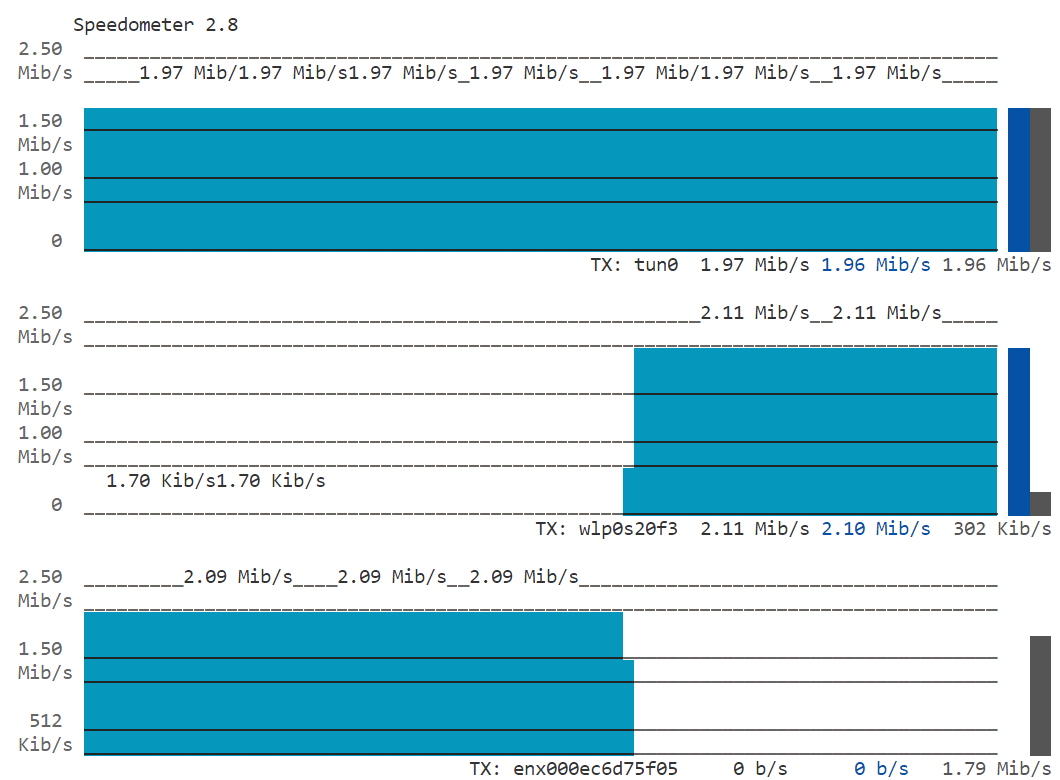
Figure 6: Disconnect the Wi-Fi Path
-
Reconnect the Wi-Fi path:
nmcli device connect <wifi-interface>Now the flow is transferred to Wi-Fi again:
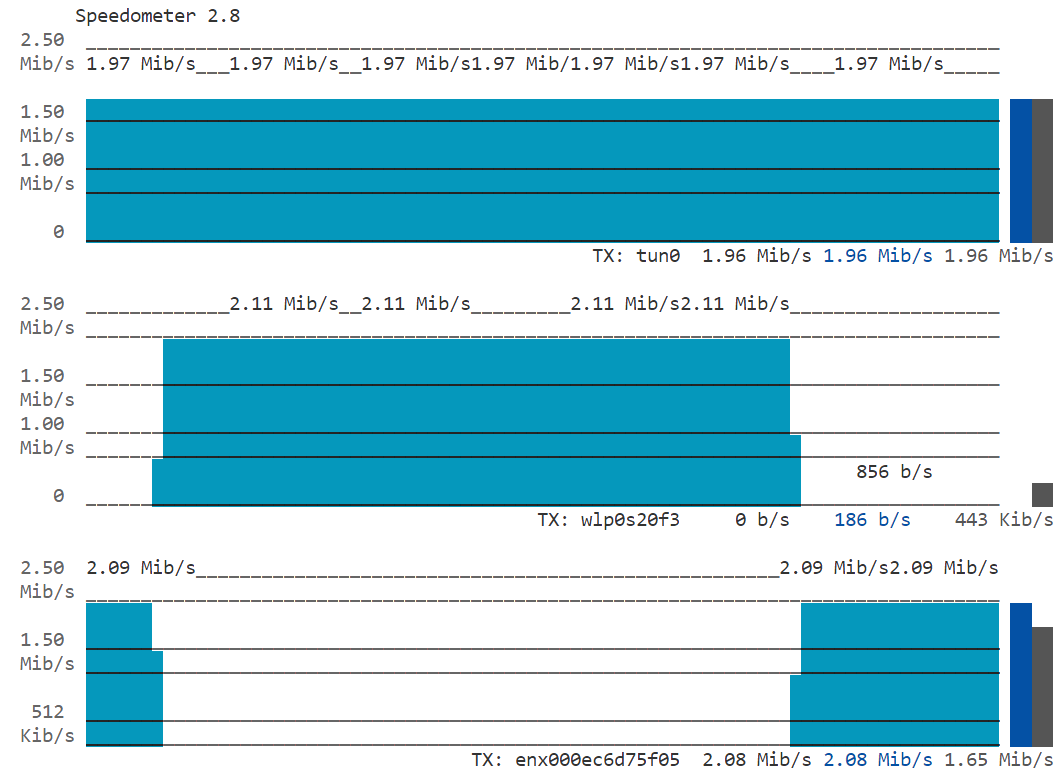
Figure 7: Reconnect the Wi-Fi Path
Step 4: Check Uplink Simultaneous Access (Cellular and Wi-Fi)
-
GMA Controller Command:
Traffic Steering Command tsc [clientIndex] [RTtsc] [NRTtsc] [NRTk1] [NRTk2] [NRTl] clientIndex: the last two bytes of the client IP address RTtsc: traffic steering command for RT flow 0: default (DL & UL over Wi-Fi for RT flow) 1: DL-over-LTE for RT flow 2: UL-over-LTE for RT flow 3: UL & DL-over-LTE for RT flow 4: no update for RT flow NRTtsc: traffic steering command for NRT flow 0: disable dynamic DL splitting for NRT flow 1: enable dynamic DL splitting for NRT flow 16: no update for NRT flow NRTk1: the Wi-Fi burst size (pkts), e.g. 16 NRTK2: the LTE burst size, e.g. 16 NRTl: the splitting cycle (pkts), e.g. 32 Traffic Flow Configuration (for uplink only) tfc [clientIndex] [flowId] [protoType] [portStart] [portend] clientIndex: the last two bytes of the client IP address flowId: 1: high-reliability (duplication) flow 2: real-time flow 3: non real-time flow (default) protoType: 0: disable UL QoS flow classification (default) 1: tcp 2: udp 3: icmp portStart: the lower bound of (UDP or TCP) destination port (not used if "icmp") portEnd: the upper bound of (UDP or TCP) destination port (not used if "icmp") -
Run demo test. Install test tools on the GMA client device:
iperf3 -c 10.8.0.1 -t 1000 -i 5 -b 2M -u -l 1000 speedometer -t tun0 -t <cellular-interface> -t <wifi-interface> -b -s -l -n 0 -m 400000 -
Set the packet loss rate to 50% for both Wi-Fi and cellular:
tc qdisc add dev <cellular-interface> root netem loss 50%
tc qdisc add dev <wifi-interface> root netem loss 50%
Figure 8: Packet Loss Rate on Speedometer Output
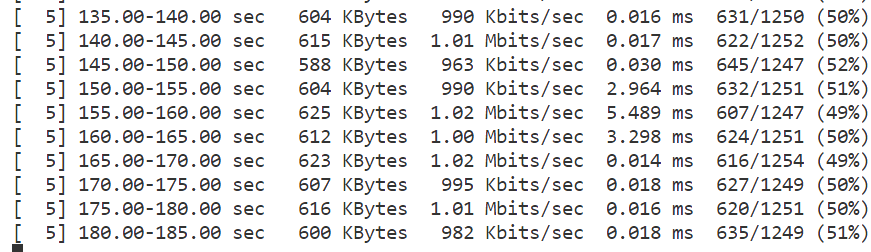
Figure 9: Packet Loss Rate on iperf Output
-
Run GMA controller and enable uplink redundancy:
./gmactl
tfc 2 1 2 0 65520
Now the packet loss rate of tun is decreased from 50% to about 25%:
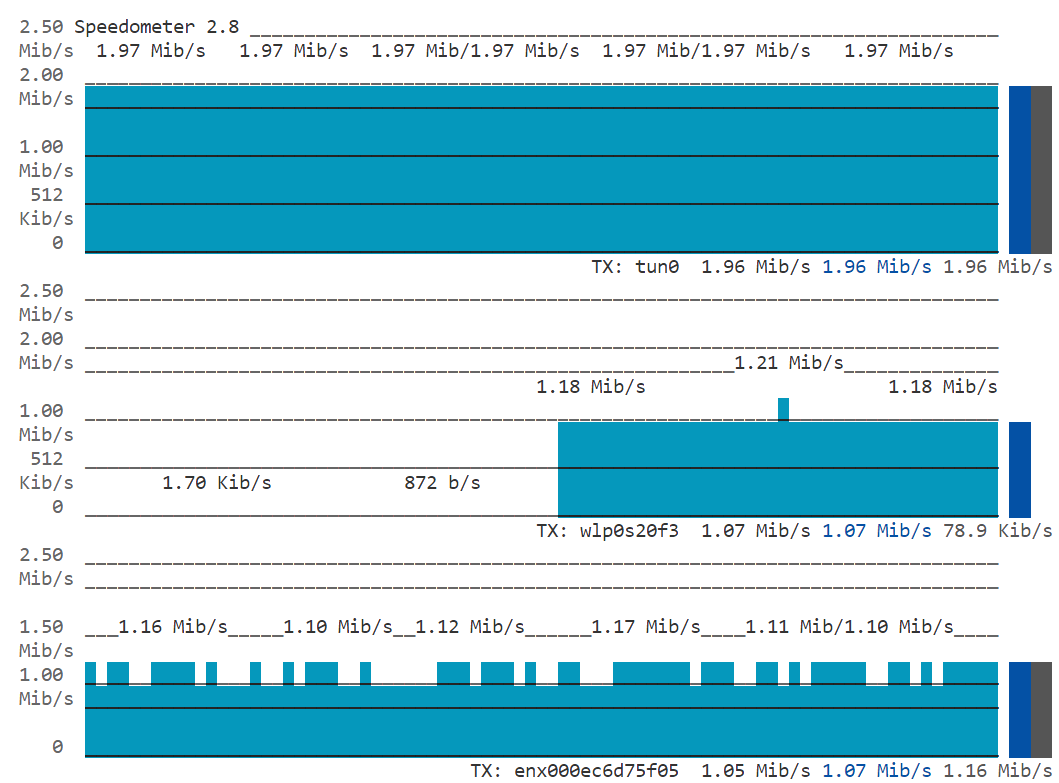
Figure 10: Real Time Transmission Status on Speedometer

Figure 11: Packet Loss Rate on iperf Output
-
Disable Uplink Simultaneous Access:
tfc 2 1 0 0 0Now the packet loss rate of tun is increased to 50% again:
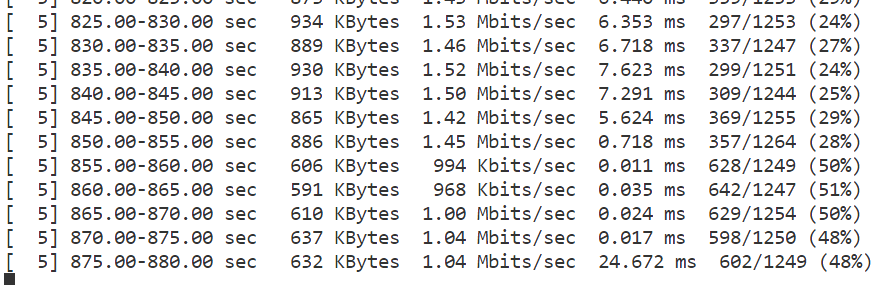
Figure 12: Packet Loss Rate on iperf Output
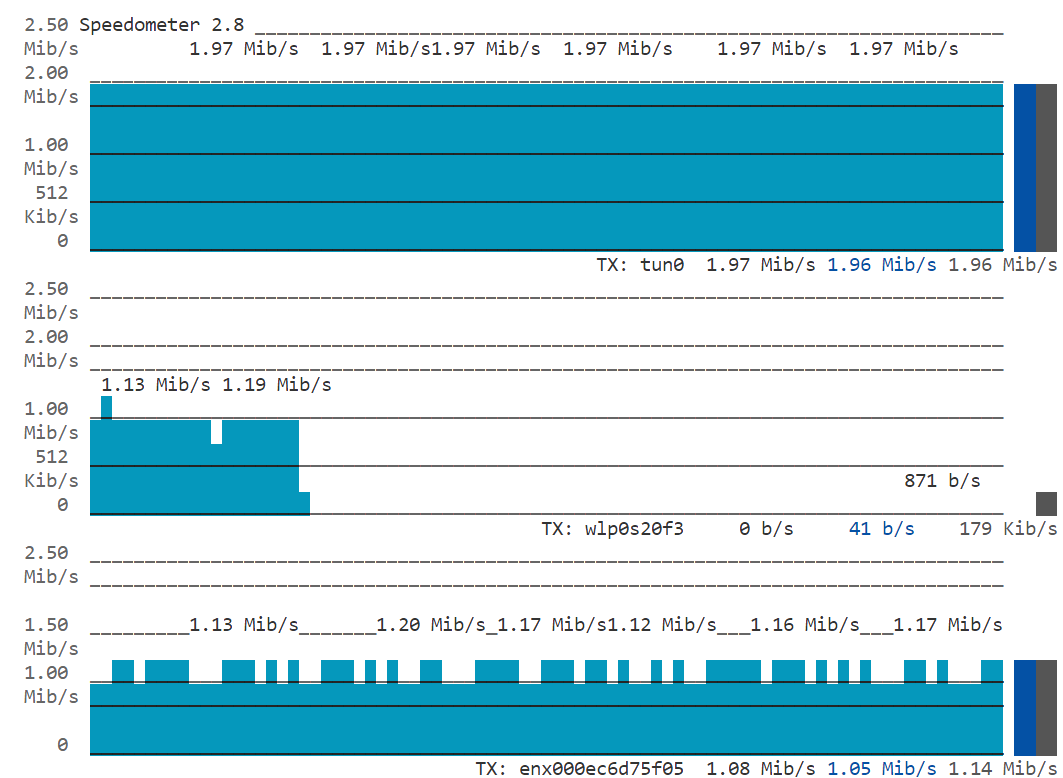
Figure 13: Real Time Transmission Status on Speedometer
Step 5: Uninstall the Application
-
Check installed modules with the following command:
cd /home/smartedge-open/multi-access-with-private-5g
./edgesoftware list
Figure 14: Installed Modules List
-
Run the command below to uninstall all the modules:
./edgesoftware uninstall -a -
Run the command below to uninstall the reference implementation:
./edgesoftware uninstall <gma-id>
Figure 15: Uninstalled Modules
Local Build Instructions
After you have installed Intel® Smart Edge Private Wireless Experience Kit, you can build your own Multi-Access with Private 5G image using the following instructions. You can proceed with the steps presented using either edgesoftware sources or GitHub* sources.
Setup
Change the directory to repository path with one of the following options.
For Edgesoftware:
cd /home/smartedge-open/multi-access-with-private-5g/MultiAccess_with_Private_5G_Reference_Implementation_1.0.0/MultiAccess_with_Private_5G
For GitHub:
git clone <gma-repo>
cd /home/smartedge-open/applications.services.esh.multi-access-with-private-5g/
Use your preferred text editor to make the following file updates.
In the next steps, the tag <REPOSITORY_PATH> indicates the path to the repository.
In the Change examples, replace the line indicated by - with the line indicated by +
-
<REPOSITORY_PATH>/GMA/gmaserver/dockerbuild.sh- update the tag and version for the image.Change example: - -t docker build -f ./dockerfile . -t generic-multi-access-network-virtualization:1.0 + -t docker build -f ./dockerfile . -t <local_tag>/generic-multi-access-network-virtualization:<version> -
<REPOSITORY_PATH>/GMA/deploy/gma/templates/deployment.yaml- update image deployment tag.Change example: - image: "smartedge/{{ .Values.image.repository }}:{{ .Values.image.Version }}" + image: "<local_tag>/{{ .Values.image.repository }}:{{ .Values.image.Version }}" -
<REPOSITORY_PATH>/GMA/deploy/gma/values.yaml- update version.Change example: - Version: "1.0" + Version: "<version>"
Build and Install
Build the Docker image with the following commands:
cd <REPOSITORY_PATH>/GMA/gmaserver
./dockerbuild.sh   # The local Docker image will be built on the Ubuntu machine.
Install Helm* with the following commands:
-
Apply the Network Attachment Definition:
cd <REPOSITORY_PATH>/GMA/deploy kubectl apply -f gma5g-net.yaml kubectl apply -f gmawifi-net.yaml -
Apply the network policy:
kubectl apply -f gmanet-policy.yaml -
Run the following Helm installation command:
helm install gma ./gma
After step 3 completes, run the GMA client application on client machine to test the connectivity.
Summary and Next Steps
This RI demonstrates how a device can be simultaneously connected to multiple networks, for example, Wi-Fi, LTE, 5G, and DSL. Seamlessly combining the connectivity over these networks below the transport layer is shown to improve quality of experience for applications that do not have built-in multi-path capabilities. This RI demonstrates a new control protocol to manage traffic steering, splitting, and duplicating across multiple connections.
As a next step, you can experiment with traffic management provided by the Generic Multi-Access (GMA) RI to make edge client connections much more stable. You can also enable functions like seamless handover, simultaneous Wi-Fi and cellular during download, and uplink (downlink) redundancy to improve performance.
Learn More
To continue learning, see the following guides and software resources:
- Intel® Smart Edge Private Wireless Experience Kit
- UDP-based Generic Multi-Access (GMA) Control Protocol - IETF Draft
- Multi-access Traffic Management at the Edge - Blog Post
Troubleshooting
Setting packet loss rate of Wi-Fi and cellular interface
If the loss rate can't be added and you see this error:
tc qdisc add dev <wifi-interface> root netem loss 50%
Error: Exclusivity flag on, cannot modify.
Use the following command instead:
tc qdisc change dev <wifi-interface> root netem loss 50%
Support Forum
If you're unable to resolve your issues, contact the Support Forum.