1. UE 4 VRS Introduction
Variable Rate Shading Tier 1 is a new graphics feature introduced with Intel’s 11th Generation Integrated 4GPUs (Codenamed Ice Lake). Variable Rate Shading allows game developers to precisely target performance by smartly controlling rasterization at runtime with a competitive trade-off in quality when compared to similar techniques like render scaling.
Variable Rate Shading has been developed with Microsoft’s DirectX 12 API and integrated into Unreal Engine 4 We have introduced several use-cases that allow developers to implement workloads using Variable Rate Shading in a variety of ways. In this paper we’ll discuss two approaches.
First, a coarse-grained Mesh-Pass approach allows you to control rasterization for a subset of render passes in both the forward and deferred rendering pipeline of Unreal Engine. Second, a more nuanced, Per-Material approach allows assigning of shading rates to materials which can then be used in a variety of use-cases.
1.1. VRS Basics
Variable Rate Shading Tier 1 was introduced into the Microsoft DirectX 12 API in 2019. Traditionally when rendering, rasterization has a 1:1 ratio with pixel shader invocation and pixels rendered to the render target. However, Variable Rate Shading allows us to de-couple pixel shader invocation from rasterization using a range of shading rates. These shading rates include 1x1, 1x2, 2x1, 2x2, 2x4, 4x2, and 4x4. Shading rates of 1x1, 1x2, 2x1, and 2x2 are considered the minimum hardware specification to support Tier 1, however, additional shading rates of 2x4, 4x2, and 4x4 are supported on Intel Integrated Graphics.
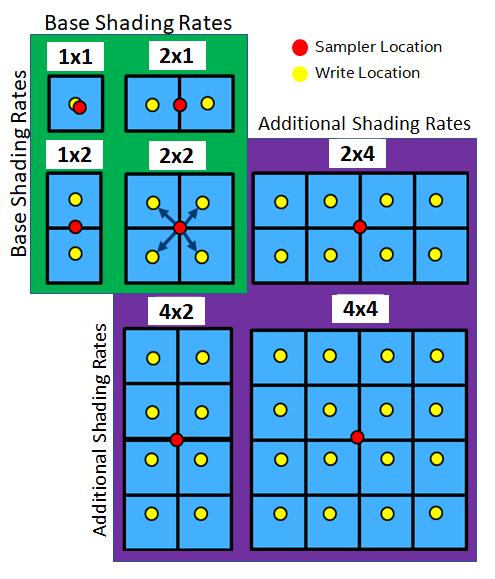
Figure 1.1.1: Examples of Base Shading Rates and Additional Shading Rates (1x1, 1x2, 2x1, 2x2, 2x4, 4x2, 4x4) supported by Intel Integrated Graphics.
The mechanism by which Variable Rate Shading controls rasterization is through pixel shader invocations. Typically, when rendering at a shading rate of 1x1 there is a direct correlation between Pixel Shader Invocations and the total number of pixels rendered for an image. By controlling the shading rate in this way, the number of pixel shader invocations required to render a full resolution image can be reduced. The number of pixel shader invocations for a given triangle are approximately proportional to the total number of 1x1 pixels and the shading rate selected. For instance, with a shading rate of 2x2 we can perform a single pixel shader invocation to write to the four memory locations of the four adjacent pixels. Likewise, with a shading rate of 4x4, the GPU can perform a single pixel shader invocation and write to 16 memory locations for the 16 adjacent pixels.
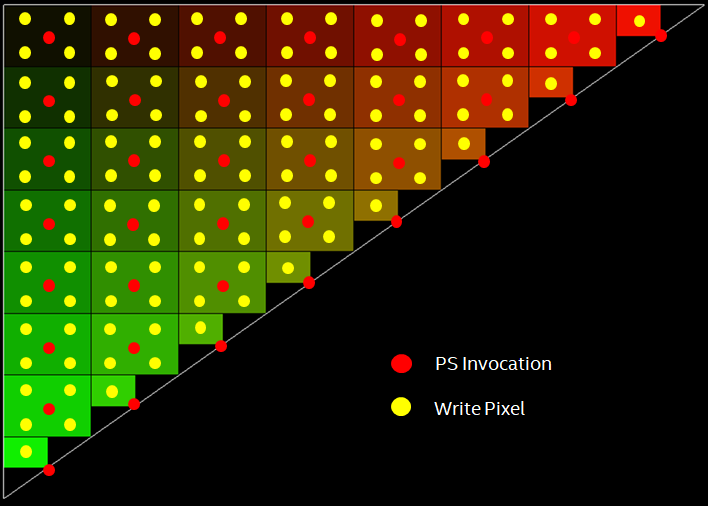
Figure 1.1.2: An example of a 16x16 triangle rendered with a shading rate of 2x2. 120 pixels covered with 36 pixel shader invocations and 120 pixel writes.
One of the key benefits of Variable Rate Shading is that it can preserve triangle edges while similar techniques such as resolution scaling do not. This allows Variable Rate Shading to achieve higher quality than a comparable render scale percentage. For instance, comparing a shading rate of 2x2 to a render scale of 50% or a shading rate of 4x4 to a render scale of 25%. Furthermore, render scaling impacts an entire image at multiple stages in the rendering pipeline, whereas Variable Rate Shading Tier I allows more fine-grained control over which parts of the scene are being rendered at a lower frequency. In this way, quality can be retained in specific parts of a scene while improving performance in others.
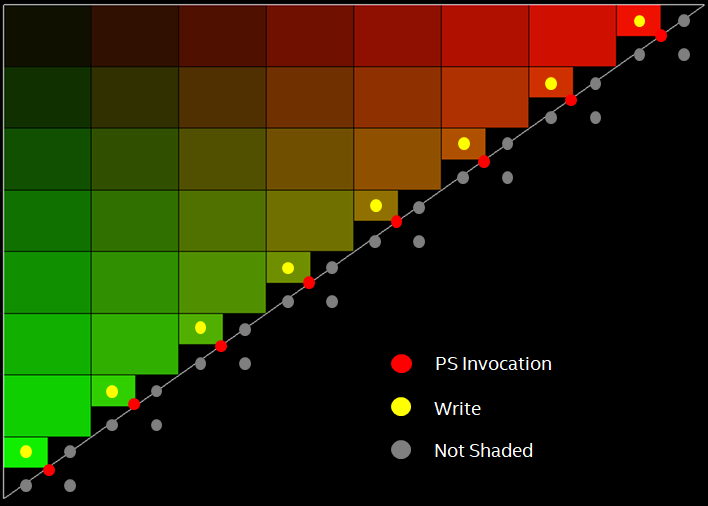
Figure 1.1.3: An example of a 16x16 triangle rendered with a shading rate of 2x2. Edge Pixels are shaded at a shading rate of 1x1 to preserve triangle edge fidelity.
Microsoft introduced Variable Rate Shading Tier 1 as part of the DirectX 12 specification in 2019. There are several new APIs that allow both querying and modifying shading rates at runtime. First, when starting the application, hardware support for Variable Rate Shading Tier 1 will need to be verified by querying the D3D12_FEATURE_DATA_D3D12_OPTIONS6 struct with the ID3D12Device::CheckFeatureSupport function. The D3D12_FEATURE_DATA_D3D12_OPTIONS6 data structure has a property D3D12_FEATURE_DATA_D3D12_OPTIONS6::VariableShadingRateTier which can be compared to values from the D3D12_VARIABLE_SHADING_RATE_TIER enumeration to determine which Tier is supported. Examine the D3D12_FEATURE_DATA_D3D12_OPTIONS6::AdditionalShadingRatesSupported property to see if support for 2x4, 4x2, and 4x4 exists on the current system.
// Create D3D12_FEATURE_DATA_D3D12_OPTIONS6 data structure.
D3D12_FEATURE_DATA_D3D12_OPTIONS6 d3d12_features;

// Use ID3D12Device::CheckFeatureSupport to populate D3D12_FEATURE_DATA_D3d12_OPTIONS6 data structure.
device->CheckFeatureSupport(D3D12_FEATURE_D3D12_OPTIONS6, &d3d12_features, sizeof(d3d12_features));

// Check for VRS Tier 1 Support using the D3D12_VARIABLE_SHADING_RATE_TIER enumeration.
bool VRSTier1Supported = (d3d12_features.VariableShadingRateTier >= D3D12_VARIABLE_SHADING_RATE_TIER_1);
Once support has been verified, set the shading rate using the ID3D12GraphicsCommandList5::RSSetShadingRate function. It is required to use ID3D12GraphicsCommandList5 interface which can be casted to from an ID3D12GraphicsCommandList interface using QueryInterface.
// Declare ID3D12GraphicsCommandList and ID3D12GraphicsCommandList5 pointers.
ComPtr<ID3D12GraphicsCommandList> commandList;
ComPtr<ID3D12GraphicsCommandList5> commandList5;
// Instantiate ID3D12GraphicsCommandList.
device->CreateCommandList(0, D3D12_COMMAND_LIST_TYPE_DIRECT, commandAllocator.Get(), PSO.Get(), IID_PPV_ARGS(&commandList));

// Use QueryInterface on ID3D12GraphicsCommandList to Query the ID3D12GraphicsCommandList5 Interface.
commandList->QueryInterface(IID_PPV_ARGS(&commandList5));
// Set Shading Rate to 2x2 using ID3D12GraphicsCommandList5.
commandList5->RSSetShadingRate(D3D12_SHADING_RATE_2X2, nullptr);
1.2. UE 4 RHI & Command Context Integration
Variable Rate Shading Tier 1 has been integrated into Intel’s branch of Unreal Engine 4 available via GitHub. This integration includes the requisite ID3D12Device::CheckFeatureSupport and ID3D12GraphicsCommandList5::RSSetShadingRate functions in the Unreal Engine Render Hardware Interface (RHI) abstraction for DirectX 12. To call the underlying API in the Deferred and Forward Renderers we need create the Command List/Command Context dependency graph to access the underlying DirectX 12 API.
An FRHICommandListImmediate object can be used to call the appropriate Variable Rate Shading Tier I commands in Unreal Engine. The FRHICommandListImmediate class inherits from FRHICommandList which defines a SetVRSValues function. The SetVRSValues function takes a FVRSValues reference and passes it through the dependency chain to FD3D12CommandContext and into the FD3D12DynamicRHI member variable named OwningRHI.
The OwningRHI handles the implementation details for the underlying DirectX 12 API. It defines two functions, RHICheckVRSSupport and RHISetVRSValues, for accessing the functionality needed to enable Variable Rate Shading Tier I.
In the RHI implementation we define an enumeration named EVRSShadingRate with values for shading rates that map directly to the D3D12_SHADING_RATE enumeration defined in d3d12.h. This enumeration is included as a convenience as the d3d12.h header is not included in RHIDefinitions.h.
enum EVRSShadingRates
{
    VRS_1X1 = 0,
    VRS_1X2 = 0x1,
    VRS_2X1 = 0x4,
    VRS_2X2 = 0x5,
    VRS_2X4 = 0x6,
    VRS_4X2 = 0x9,
    VRS_4X4 = 0xa
};
To pass values into the RHI command context the FVRSValues control structure is defined in RHIDefinitions.h. The FVRSValues type is currently defined with a single value but could be extended to support additional features in future implementations.
struct FVRSValues
{
    EVRSShadingRates ShadingRate;
};
RHI.h defines three global variables that indicate if Variable Rate Shading is supported by the RHI device. GRHISupportsVRSTier1 is a Boolean variable that is set to true if Tier 1 is supported, otherwise it will be false. GRHISupportsVRSTier2 is also a Boolean variable that is set to true if Tier 2 is supported, otherwise it will be false. Tier 1 support is set to true if Tier 2 is also true. However, our implementation only supports Tier 1 features.
/** Whether or not the RHI support Variable Rate Shading Tier 1 on current hardware. */
extern RHI_API bool GRHISupportsVRSTier1;

/** Whether or not the RHI support Variable Rate Shading Tier 2 on current hardware. */
extern RHI_API bool GRHISupportsVRSTier2;
Finally, GRHISupportsVRSAdditionalRates is a Boolean value that indicates if additional shading rates such as 2x4, 4x2, and 4x4 are supported by the RHI device. This value is only set to true if GRHISupportsVRSTier1 is also set to true and the device query returns support for additional shading rates.
/** Whether or not the RHI support 2x4, 4x2, and 4x4 Variable Rate Shading on current hardware. */
extern RHI_API bool GRHISupportsVRSAdditionalRates;
Two functions have been introduced in the FD3D12DynamicRHI class in D3D12RHI.cpp RHICheckVRSSupport and RHISetVRSValues.
RHICheckVRSSupport reads D3D12_FEATURE_DATA_D3D12_OPTIONS6 to set the values of GRHISupportsVRSTier1, GRHISupportsVRSTier2, and GRHISupportsVRSAdditionalRates. RHICheckVRSSupport is called once during startup in FD3D12DynamicRHI::Init().
void FD3D12DynamicRHI::RHICheckVRSSupport()
{
    ID3D12Device* device = GetAdapter().GetD3DDevice();

    // Declare struct to store feature data.
    D3D12_FEATURE_DATA_D3D12_OPTIONS6 Options;

    // Request Supported Features from D3D12 Device._
    if (SUCCEEDED(device->CheckFeatureSupport(D3D12_FEATURE_D3D12_OPTIONS6, &Options, sizeof(Options))))
    {
        switch (Options.VariableShadingRateTier)
        {
        /* Check for VRS Not Supported._*/
        case D3D12_VARIABLE_SHADING_RATE_TIER_NOT_SUPPORTED:
        {
            // Variable Rate Shading Tier 1 Unsupported_
       GRHISupportsVRSTier1 = false;
       UE_LOG(LogD3D12RHI, Log, TEXT("Variable Rate Shading Tier I Unsupported"));

       // Variable Rate Shading Tier 2 Unsupported_
       GRHISupportsVRSTier2 = false;
       UE_LOG(LogD3D12RHI, Log, TEXT("Variable Rate Shading Tier II Unsupported"));
        }
        break;

        /* Check for VRS Tier 1 Support._*/
        case D3D12_VARIABLE_SHADING_RATE_TIER_1:
        {
            // Variable Rate Shading Tier 1 (SetShadingRate: 1x1, 1x2, 2x1, 2x2) is Supported
       GRHISupportsVRSTier1 = true;
       UE_LOG(LogD3D12RHI, Log, TEXT("Variable Rate Shading Tier I Supported"));

       // Variable Rate Shading Tier 2 (Combiners & SetImage) is Unsupported
       GRHISupportsVRSTier2 = false;
       UE_LOG(LogD3D12RHI, Log, TEXT("Variable Rate Shading Tier II Unsupported"));
        }
        break;

        /* Check for VRS Tier 2 Support._*/
        case D3D12_VARIABLE_SHADING_RATE_TIER_2:
        {
            // Variable Rate Shading Tier 1 (SetShadingRate: 1x1, 1x2, 2x1, 2x2) is Supported
        GRHISupportsVRSTier1 = true;
        UE_LOG(LogD3D12RHI, Log, TEXT("Variable Rate Shading Tier I Supported"));

        // Variable Rate Shading Tier 2 (Combiners & SetImage) is Supported
        GRHISupportsVRSTier2 = true;
        UE_LOG(LogD3D12RHI, Log, TEXT("Variable Rate Shading Tier II Supported"));
        }
    break;

        }

        if (GRHISupportsVRSTier1)
        {
       // Additional Shading Rate Check
       if (Options.AdditionalShadingRatesSupported)
            {
           // Additional Shading Rates 2x4, 4x2, 4x4 are Supported
           GRHISupportsVRSAdditionalRates = true;
           UE_LOG(LogD3D12RHI, Log, TEXT("Variable Rate Shading Additional Rates Supported"));
       }
       else
       {
           // Additional Shading Rates 2x4, 4x2, 4x4 are Not Supported
           GRHISupportsVRSAdditionalRates = false;
           UE_LOG(LogD3D12RHI, Log, TEXT("Variable Rate Shading Additional Rates Unsupported"));
            }
        }
    }
    else
    {
        // Device Failed to return SUCCESS HRESULT from CheckFeatureSupport
        UE_LOG(LogD3D12RHI, Error, TEXT("VRS CheckFeatureSupport(D3D12_FEATURE_D3D12_OPTIONS6) Failed"));

        // Variable Rate Shading Tier 1 Unsupported_
        GRHISupportsVRSTier1 = false;
        UE_LOG(LogD3D12RHI, Error, TEXT("Variable Rate Shading Tier 1 Unsupported"));

        // Variable Rate Shading Tier 2 Unsupported_
        GRHISupportsVRSTier2 = false;
        UE_LOG(LogD3D12RHI, Error, TEXT("Variable Rate Shading Tier 2 Unsupported"));

        GRHISupportsVRSAdditionalRates = false;
        UE_LOG(LogD3D12RHI, Error, TEXT("Variable Rate Shading Additional Rates Unsupported"));
    }
}
RHISetVRSValues takes an FD3D12CommandListHandle which references an ID3D12GraphicsCommandList5 pointer named VRSCommandList. We also pass an FVRSValues reference from the FD3D12CommandContext whose values are then used to call the ID3D12GraphicsCommandList5 implementation of RSSetShadingValues.
void FD3D12DynamicRHI::RHISetVRSValues(FD3D12CommandListHandle CmdList, const FVRSValues& VRSValues)
{
    auto VRSCmdList = CommandListHandle.VRSCommandList();
    if (VRSCmdList != nullptr)
    {
        switch ((D3D12_SHADING_RATE)VRSValues.ShadingRates)
    {

    /* Basic Shading Rates */
    case D3D12_SHADING_RATE_1X1:
    case D3D12_SHADING_RATE_1X2:
    case D3D12_SHADING_RATE_2X1:
    case D3D12_SHADING_RATE_2X2:
        if (GRHISupportsVRSTier1)
        {
            VRSCmdList->RSSetShadingRate((D3D12_SHADING_RATE)VRSValues.ShadingRate, nullptr);
        }
    break;

    /* Additional Shading Rate */
    case D3D12_SHADING_RATE_2X4:
    case D3D12_SHADING_RATE_4X2:
    case D3D12_SHADING_RATE_4X4:
        if (GRHISupportsVRSAdditionalRates)
        {
            VRSCmdList->RSSetShadingRate((D3D12_SHADING_RATE)VRSValues.ShadingRate, nullptr);
        }
    break;

    }
    }
}
The VRSCommandList is implemented in the FD3D12CommandListHandle class. When the FD3D12CommandListHandle is initialized we check to see if the command list type is D3D12_COMMAND_LIST_TYPE_DIRECT. We then call the QueryInterface function from ID3D12GraphicsCommandList also defined in Owning RHI to instantiate our ID3D12GraphicsCommandList5 pointer correctly.
if (InCommandListType == D3D12_COMMAND_LIST_TYPE_DIRECT)
{
    VERIFYD3D12RESULT(CommandList->QueryInterface(IID_PPV_ARGS(VRSCommandList.GetInitReference())));
}
2. UE 4 VRS Mesh-Passes
The renderer in Unreal Engine 4 has several stages in the rendering pipeline for both Forward and Deferred rendering. The entry point for both renderers is defined by the FDeferredShadingSceneRenderer::Render function in DeferredShadingRenderer.cpp. Meshes are split into different passes based on the material properties associated with each mesh. Each of these Mesh-Passes are defined in the EMeshPass enumeration.
/** Mesh pass types supported. */
namespace EMeshPass
{
    enum Type
    {
        //..
        BasePass,
        //..
        TranslucencyStandard,
        TranslucencyAfterDOF,
TranslucencyAll, /** Drawing all translucency, regardless of separate or standard.  Used when drawing translucency outside of the main renderer, eg FRendererModule::DrawTile. */
        //..
    };
}
Based on our performance and quality analysis many of the passes defined in the EMeshPass enumeration are not applicable for use with Variable Rate Shading Tier I. Based on the naming conventions, many are defined for use in debugging or with the Unreal Editor. Passes like EMeshPass::DepthPass may not be good candidates for Variable Rate Shading since modified shading rates will negatively impact per-pixel depth and alpha blended transparencies. However, there are a few passes here that are good candidates varied shading rates, such as EMeshPass::BasePass or EMeshPass::TranslucencyStandard and EMeshPass::TranslucencyAfterDOF.
2.1. VRS Base Pass
Shading rates can be applied uniformly to all meshes drawn during the base pass phase of both the forward and deferred renderer. In a typical scene opaque geometry and materials are rendered during the base pass. Figure 2.1.1, shows both a fully lit scene from the Sun Temple project from the Epic store.
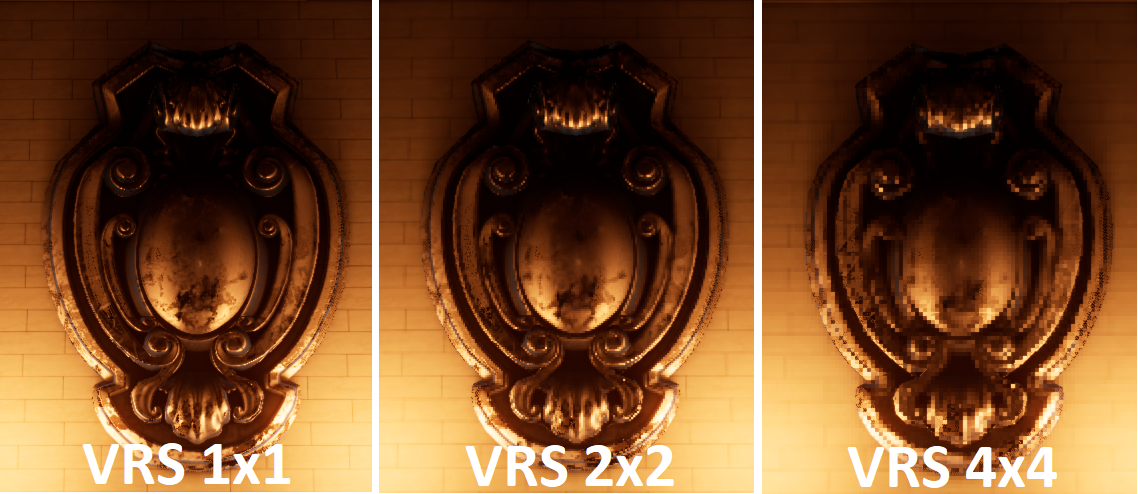
Figure 2.1.1: SunTemple fully lit Base Pass examples of Shading Rate of 1x1 (left), Shading Rate 2x2 (middle), Shading Rate 4x4 (right).
Figure 2.1.2, shows the same scene but only shows the diffuse colors of the opaque geometry.
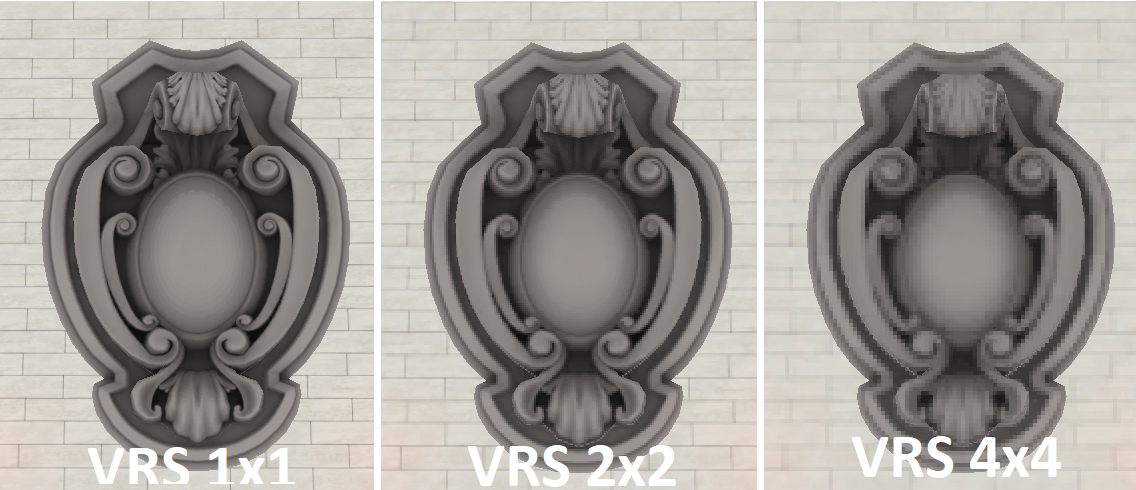
Figure 2.1.2: SunTemple diffuse only Base Pass examples of Shading Rate of 1x1 (left), Shading Rate 2x2 (middle), Shading Rate 4x4 (right).
The outer edges for each of these images are preserved, while each of the coarse pixels are screen space aligned. Base Pass shading rates are controlled through a console variable named D3D12.VRS.BasePass and can be modified at runtime. The base pass console variable has 6 possible value, 0 = 1x1, 1 = 1x2, 2 = 2x1, 3 = 2x2, 4 = 2x4, 5 = 4x2, and 6 = 4x4.
2.2. VRS Translucency Passes
Meshes with translucent materials are rendered in multiple phases. These phases are EMeshPass::TranslucencyStandard, and EMeshPass::TranslucencyAfterDOF, there is also a catch all EMeshPass::TranslucencyAll that can be enabled which includes all translucencies from EMeshPass::TranslucencyStandard and EMeshPass::TranslucencyAfterDOF.

Figure 2.2.1: SunTemple Translucency Pass examples of Shading Rate of 1x1 (left), Shading Rate 2x2 (middle), Shading Rate 4x4 (right).
Figure 2.2.2, shows a different scene with a translucent flame rendered during the Translucency After DOF pass.

Figure 2.2.2: SunTemple Translucency After DOF Pass examples of Shading Rate of 1x1 (left), Shading Rate 2x2 (middle), Shading Rate 4x4 (right).
3. UE 4 VRS Material System
The Unreal Engine material system has been configured to allow per-material shading rates. Meaning, for each material, a shading rate of 1x1, 1x2, 2x1, 2x2, 2x4, 4x2, or 4x4 can be specified in the Unreal Editor.
The UMaterial class now has a ShadingRate property and GetShadingRate accessor.
// UMaterial::ShadingRate Property in Material.h
UPROPERTY(EditAnywhere, Category=Material, AssetRegistrySearchable)
TEnumAsByte<enum EMaterialShadingRate> ShadingRate;
// UMaterial::GetShadingRate Accessor function definition in Material.h
ENGINE_API virtual EMaterialShadingRate GetShadingRate() const override;

// UMaterial::GetShadingRate function in Material.cpp
EMaterialShadingRate UMaterial::GetShadingRate() const
{
return ShadingRate;
}
In the function FMeshDrawCommand::SubmitDraw in MeshPashProcessor.cpp materials can be read from the MeshDrawCommand.DebugData property.
#if MESH_DRAW_COMMAND_DEBUG_DATA
    const FMaterial* Material = MeshDrawCommand.DebugData.Material;
#endif
In the same FMeshDrawCommand::SubmitDraw function we can then use the material data to apply a shading rate. MESH_DRAW_COMMAND_DEBUG_DATA will need to be enabled in your build and the D3D12.VRS.Materials CVar will need to be set to 1 to enable functionality.
#if RHI_VRS && MESH_DRAW_COMMAND_DEBUG_DATA
    // Read D3D12.VRS.Materials CVar Value
static auto UseVRSMaterials = IConsoleManager::Get().FindTConsoleVariableDataInt(TEXT("D3D12.VRS.Materials"));

    // Compare D3D12.VRS.Materials to enable VRS Material Shading Rates.
    if (UseVRSMaterials->GetValueOnRenderThread() == 1)
    {
        // Set the VRS Tier 1 Shading rate using UMaterial::GetShadingRate()
        VRSValues.ShadingRate = (EVRSShadingRates)Material->GetShadingRate();
        RHICmdList.SetVRSValues(VRSValues);
    }
#endif

// …
// Draw Primitive
// …

#if RHI_VRS && MESH_DRAW_COMMAND_DEBUG_DATA
    // Reset Shading Rate to 1x1 on the RHICmdList after drawing a primitive.
    if (UseVRSMaterials->GetValueOnRenderThread() == 1)
    {
        VRSValues.ShadingRate = VRS_1X1;
        RHICmdList.SetVRSValues(VRSValues);
    }
#endif
After a primitive is rendered the shading rate is reset to 1x1 to prevent shading rates from being re-used on other primitives.
3.1. Material Shading Rates
Applying a shading rate to a material can be done using the Unreal Editor. In the Content browser create a new material by right-clicking and selecting Material under the Create Basic Asset section.
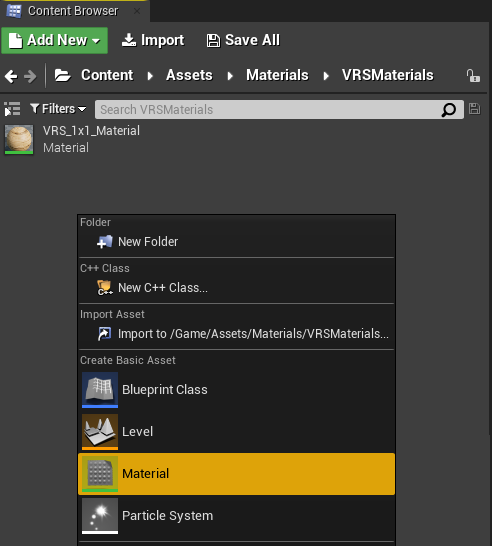
Figure 3.1.1: Creating a material with the content browser
Next, open the new material in the material editor. By default, the shading rate will be set to 1x1.
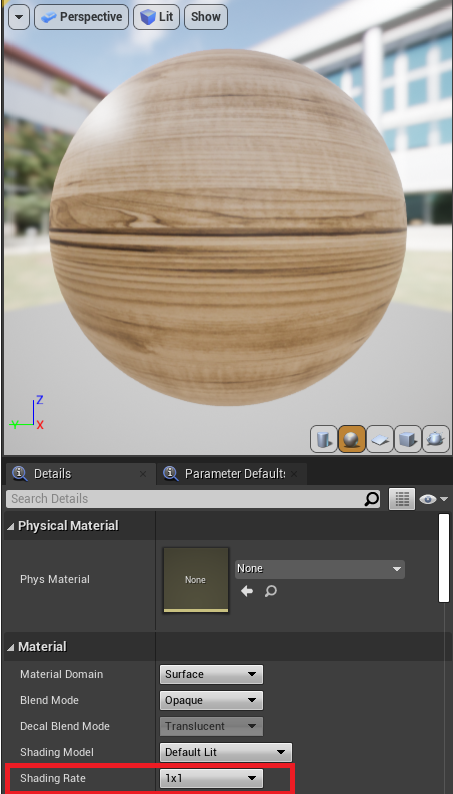
Figure 3.1.2: Editing a material with the material editor
In the Material Details panel there is a new dropdown field which allows selecting a new shading rate at runtime. As the shading rate is modified, the preview window will update to reflect changes.
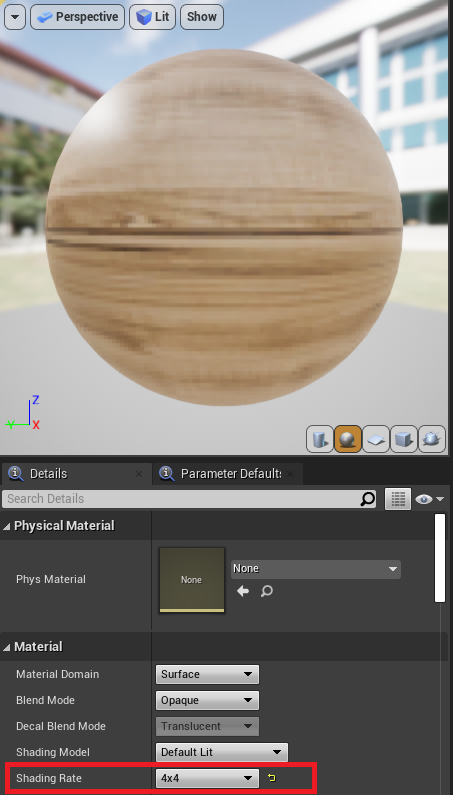
Figure 3.1.3: Applying a 4x4 shading rate to a new material
Multiple materials can be created using a variety of shading rates to suit the artistic and performance needs of the project. Once the new VRS materials have been created, they can be applied to a static mesh using the details panel in the scene viewer.
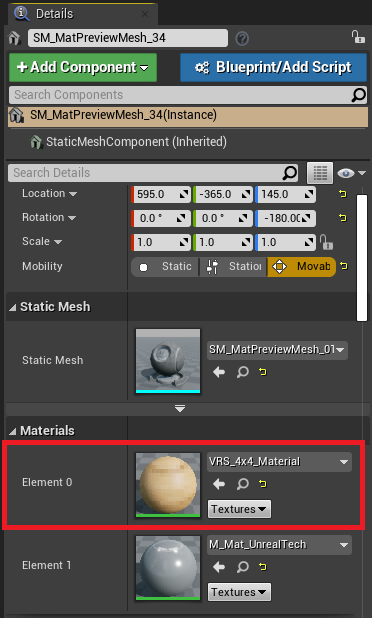
Figure 3.1.4: Applying a 4x4 shading rate to a static mesh using Element 0 of the materials panel in the details window.
The new material is then applied to the static mesh in the scene.
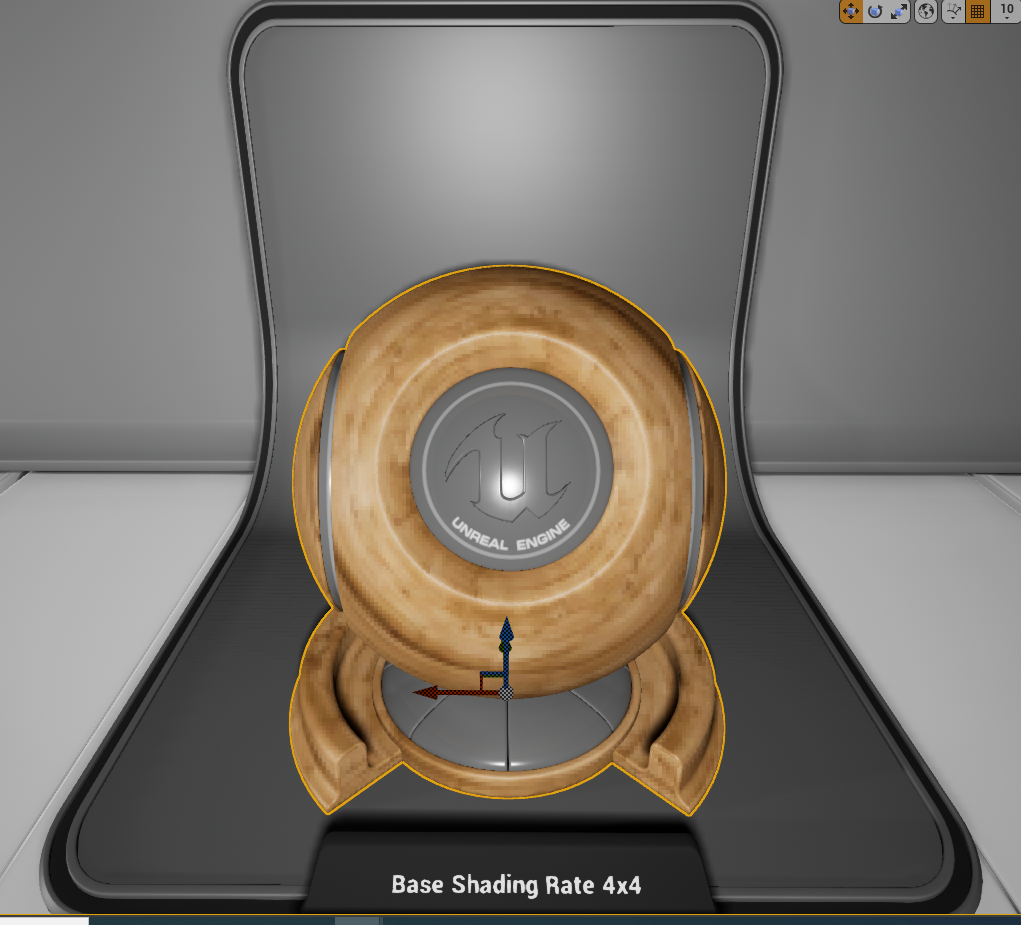
Figure 3.1.5: An example of a 4x4 Shading Rate applied to a static mesh
The UE 4VRS Tier 1 material system is as simple as setting up a new material and applying it to scene objects such as static meshes.
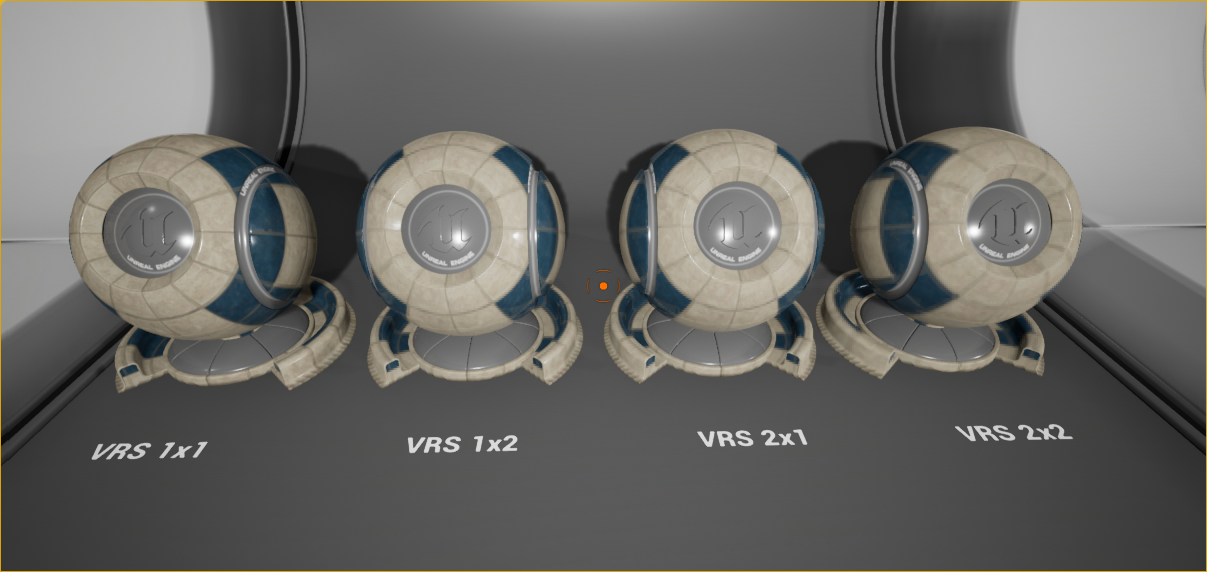
Figure 3.1.6: Base Shading Rates 1x1, 1x2, 2x1, and 2x2 applied to a static mesh.
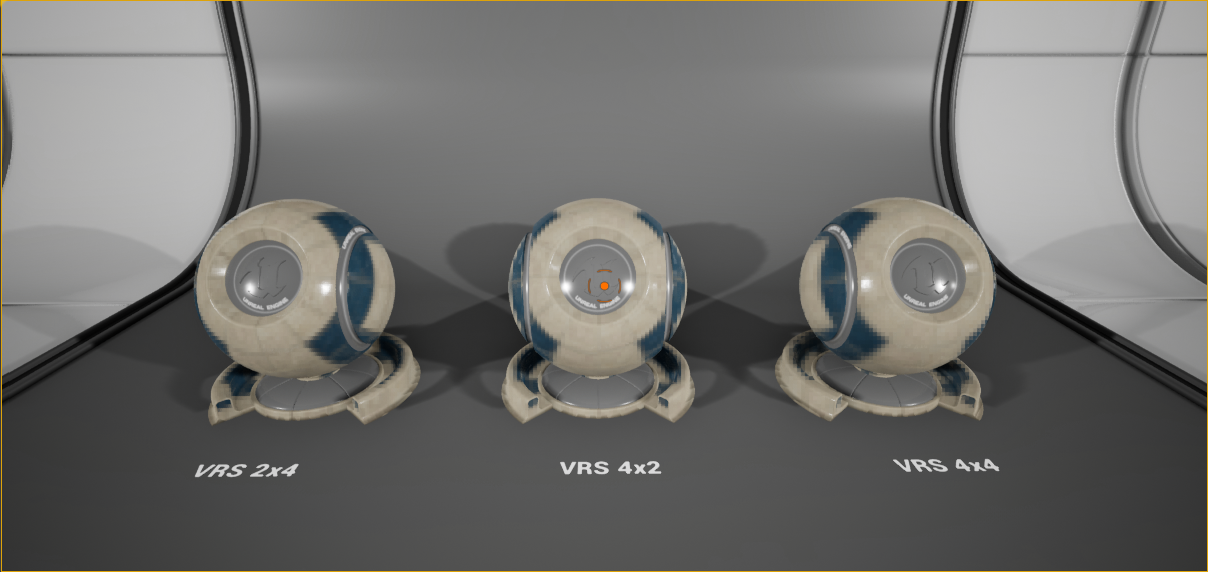
Figure 3.1.7: Additional Shading Rates 2x4, 4x2, and 4x4 applied to a static mesh.
3.2. Material Instances
In the content browser, right click on an existing material to act as a parent material, choose Create Material Instance.
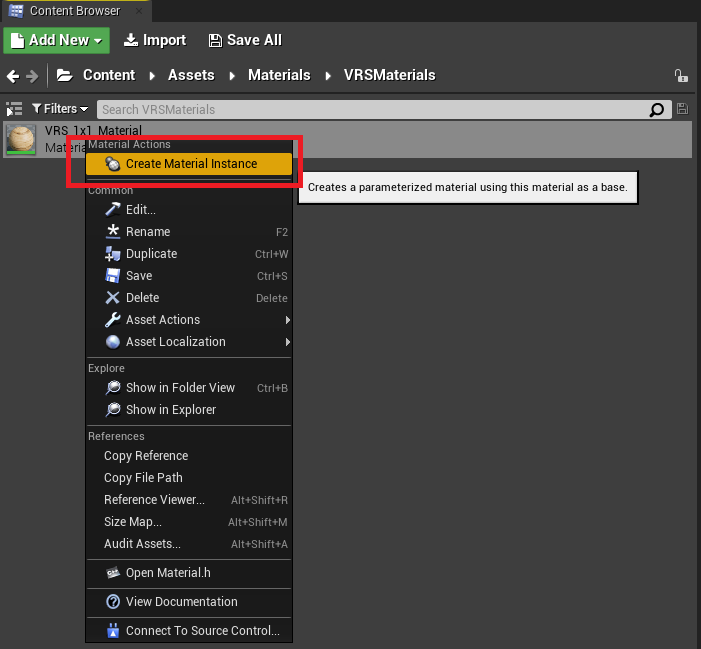
Figure 3.2.1: Creating a material instance in the Unreal Editor content browser.
Next, choose a unique name for the new material instance.
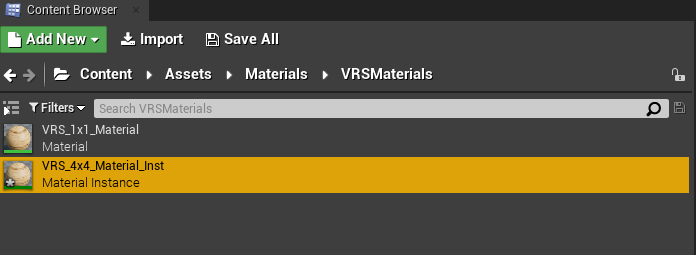
Figure 3.2.2: Creating a unique name for a material instance in the Unreal Editor content browser.
Finally, open the new material instance in the material editor. In the details panel there is now a Material Property Override for Shading Rate. Check the Shading Rate box and apply the appropriate shading rate to override the parent shading rate.
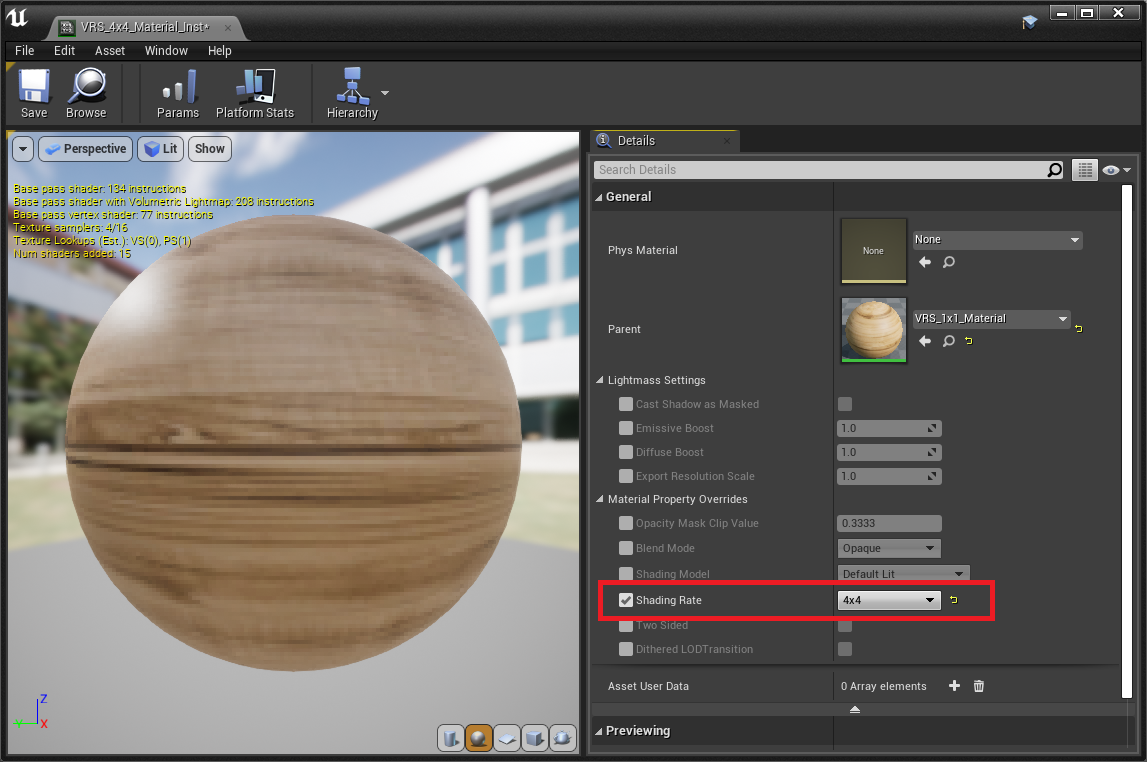
Figure 3.2.3: Applying a shading rate override of 4x4 to a material instance in the Material Editor.
Finally, the new material instance can be applied to a static mesh in a scene.
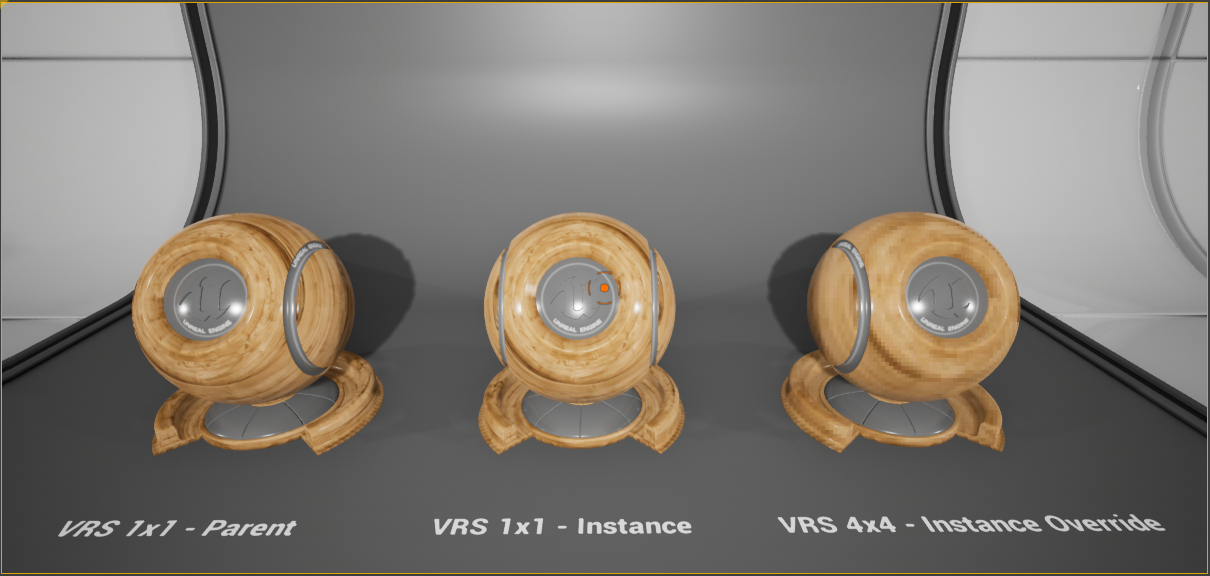
Figure 3.2.4: Applying material instances with shading rates of 1x1 and 4x4 to a static mesh.
4. UE 4 VRS Material Uses
The VRS material system can be applied in several different use-cases. On a single mesh, multiple shading rates can be applied using different materials in combination. Shading Rates can be applied when an object is in motion, or the camera position changes. The LOD system can also be configured to use different VRS shading rates at each LOD stop. Shading Rates can also be applied to objects intersecting with a bounding volume. Finally, VRS Materials can be applied to both Cascade or Niagara particle systems.
4.1. VRS Mix & Match
To mix & match shading rates, first create a new static mesh object by dragging a cube from the modes panel.
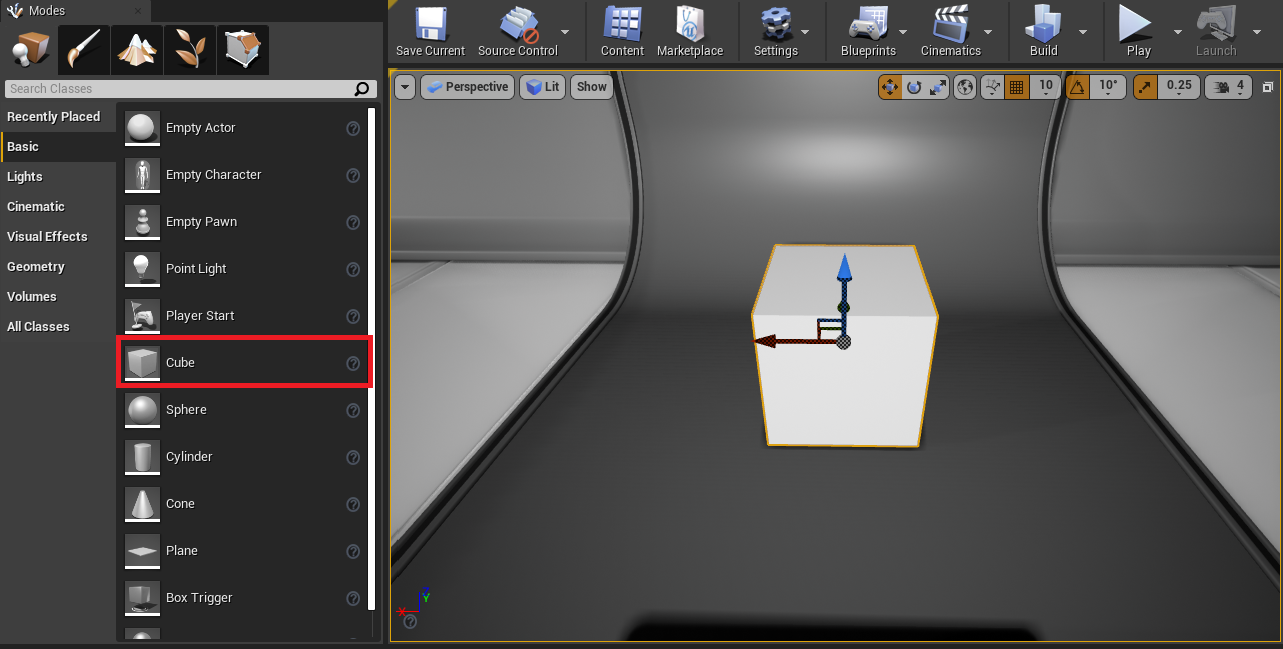
Figure 4.1.1: Creating a cube with the Modes Panel
Next, select the new cube in the World Outliner panel. In the Details Panel select a new static mesh object with multiple material elements.
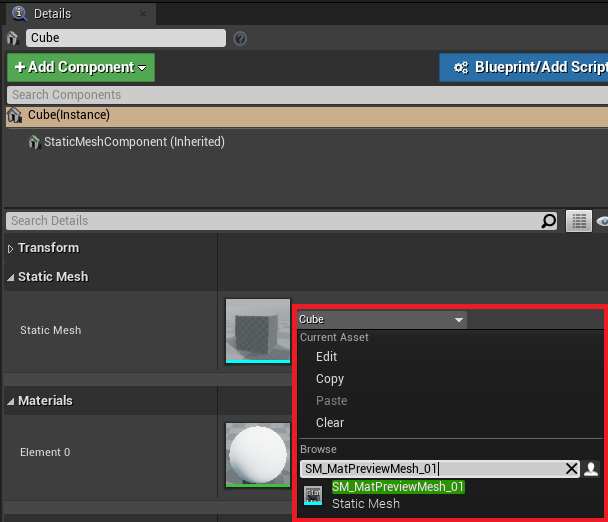
Figure 4.1.2: Selecting the SM_MatPreviewMesh_01 static mesh in the Details Panel.
The SM_MatPreviewMesh_01 is selected to demonstrate two material slots.
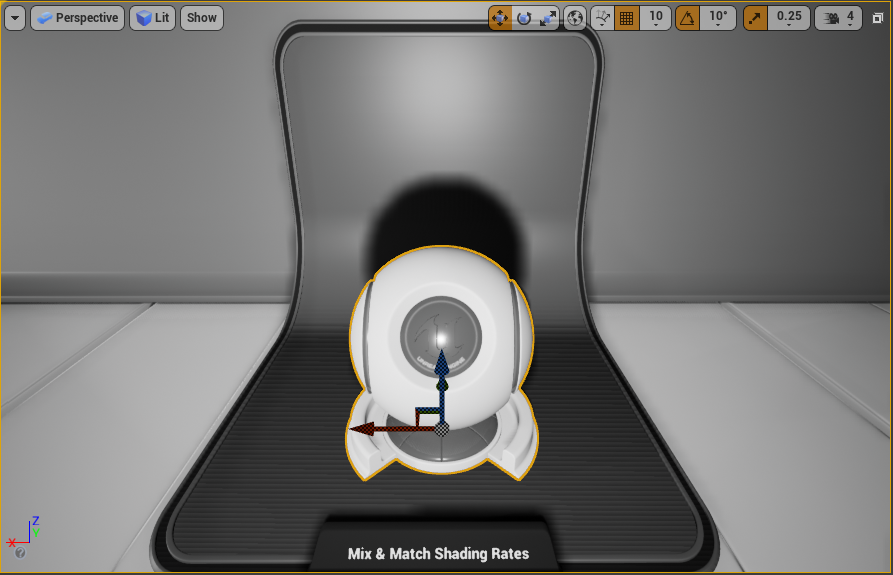
Figure 4.1.3: The SM_MatPreviewMesh_01 static in the Unreal Editor viewport.
In the dropdown for material element 0 select the material or material instance with the appropriate shading rate.
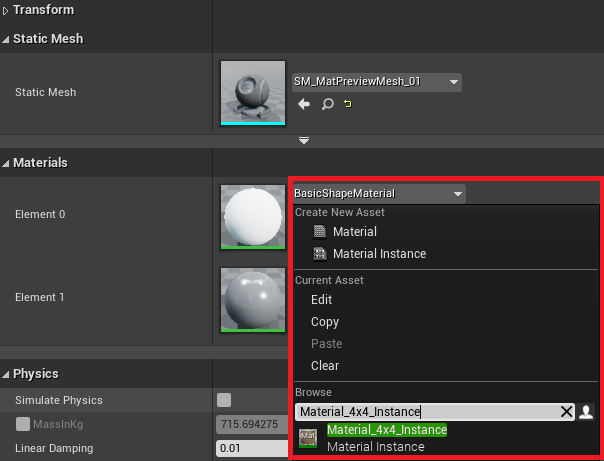
Figure 4.1.3: Selecting a 4x4 Material Instance for Material in the Element 0 slot.
Finally, we can apply a different material with another shading rate in Element 1 of the Static Mesh Actors Materials.
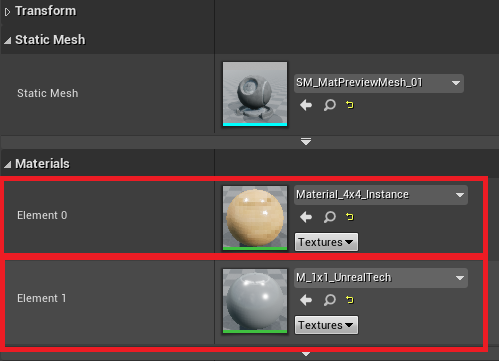
Figure 4.1.4: Applying element 0 material shading rate of 4x4 and element 1 material shading rate of 1x1 in Unreal Editor.
In the viewport, the new 4x4 and 1x1 materials will be applied to the static mesh actor.
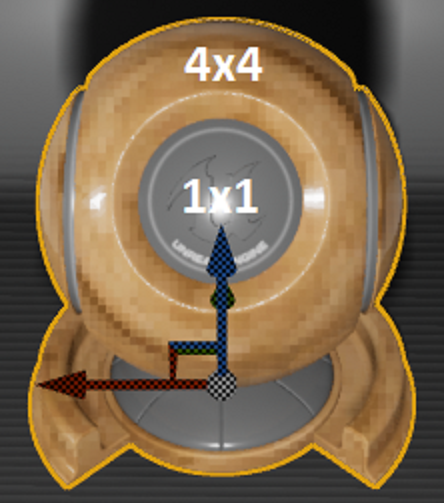
Figure 4.1.5: Example of a Static Mesh Actor with a 4x4 Material and a 1x1 Material applied.
4.2. VRS Physics
When an object is in motion, a material with a lower shading rate can be applied. Motion Blur temporal Anti-Aliasing can help reduce the perceived quality loss of an object in motion.
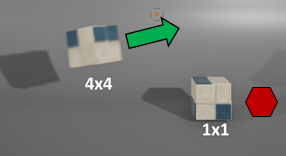
Figure 4.2.1: Example of a 4x4 Shading Rate applied to an object in motion.
In the Tick Event, the velocity of the actor can be determined with the GetVelocity and VectorLength nodes. The velocity is then compared to a threshold value, which is 0 in this example but could be any value. If the condition is true, meaning the object is in motion, a 4x4 material can be applied using SetMaterial. If the object is not in motion, a 1x1 material can be applied with SetMaterial.

Figure 4.2.2: An actor tick event that applied a 4x4 material when an actor has a velocity greater than zero.
Similarly, we can take the difference of the Static Mesh Actor’s velocity and the Player Character’s velocity and apply a different shading rate when the player or actor move.
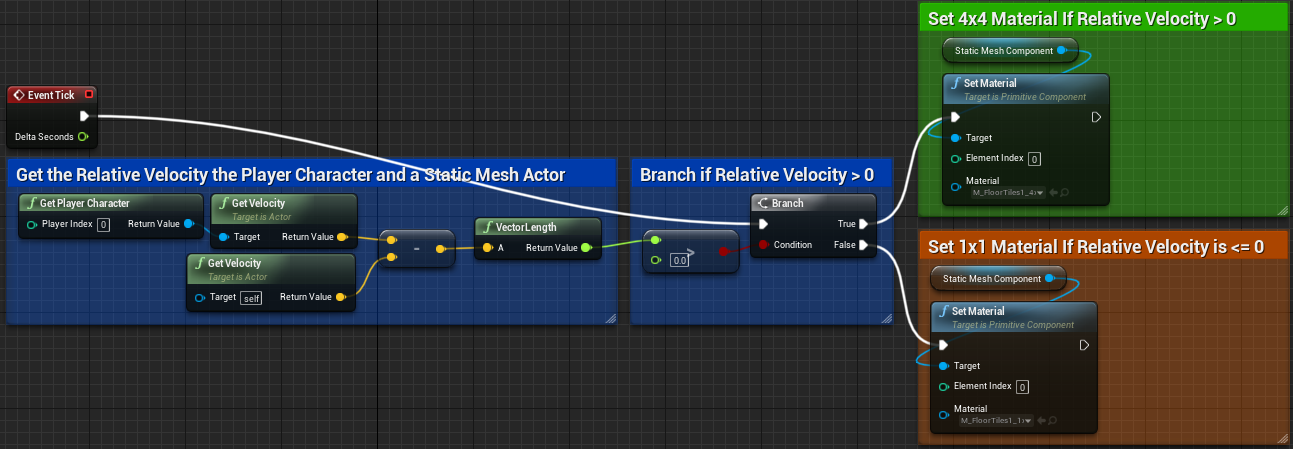
Figure 4.2.3: An actor tick event that applies a 4x4 material when an the actor has a relative velocity compared to the player character velocity.
A VRS material can also be applied when the camera is under rotation.
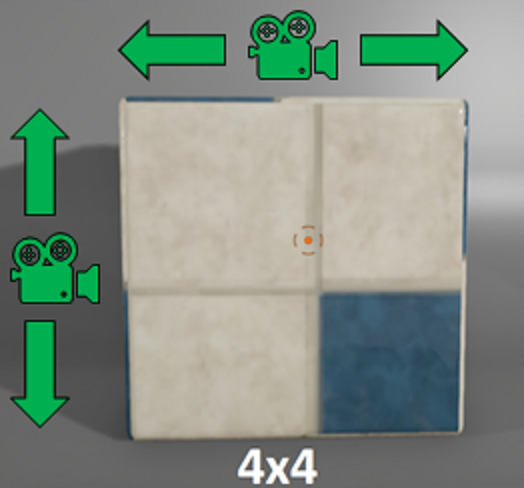
Figure 4.2.4: Example of a 4x4 Shading Rate applied when the camera is rotated.
Using the EventBeginPlay event of an actor the initial camera rotation can be determined using GetPlayerCameraManager and stored in a local variable named Last Rotation.
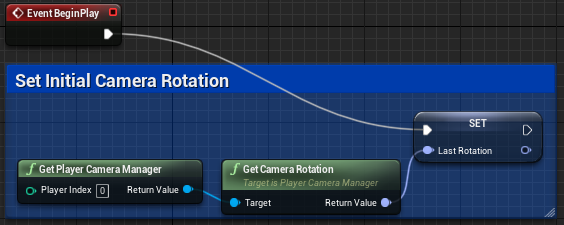
Figure 4.2.5: Saving the Initial Camera Rotation in an Actor Blueprint
In the EventTick of an Actor, the current camera position can be determined using the PlayerCameraManager. The current rotation is then compared to the rotation from the previous frame. If the camera has rotated a 4x4 material is set. When the camera has not rotated the 1x1 material is set. The current camera rotation is saved to the Last Rotation variable for use in the next frame.
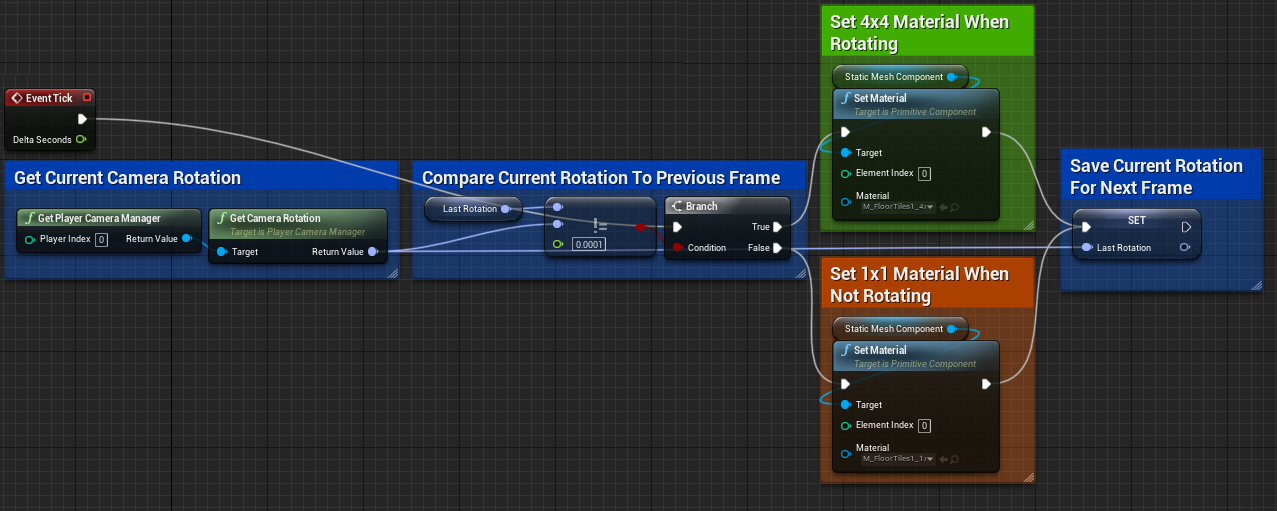
Figure 4.2.6: Actor EventTick demonstrating VRS Materials applied when camera is under rotation.
Camera Rotation and Relative Velocity can be combined into a single blueprint.
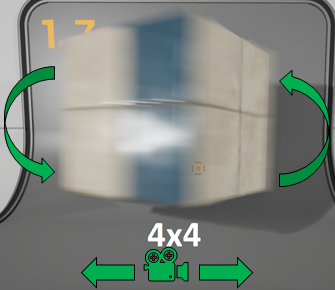
Figure 4.2.7: A 4x4 material applied to a cube with Camera Rotation & Relative Velocity.
Combining camera rotation with relative velocity can accomplished by performing a logical OR on the outputs of the camera rotation comparison and the relative velocity comparison from the previous examples.
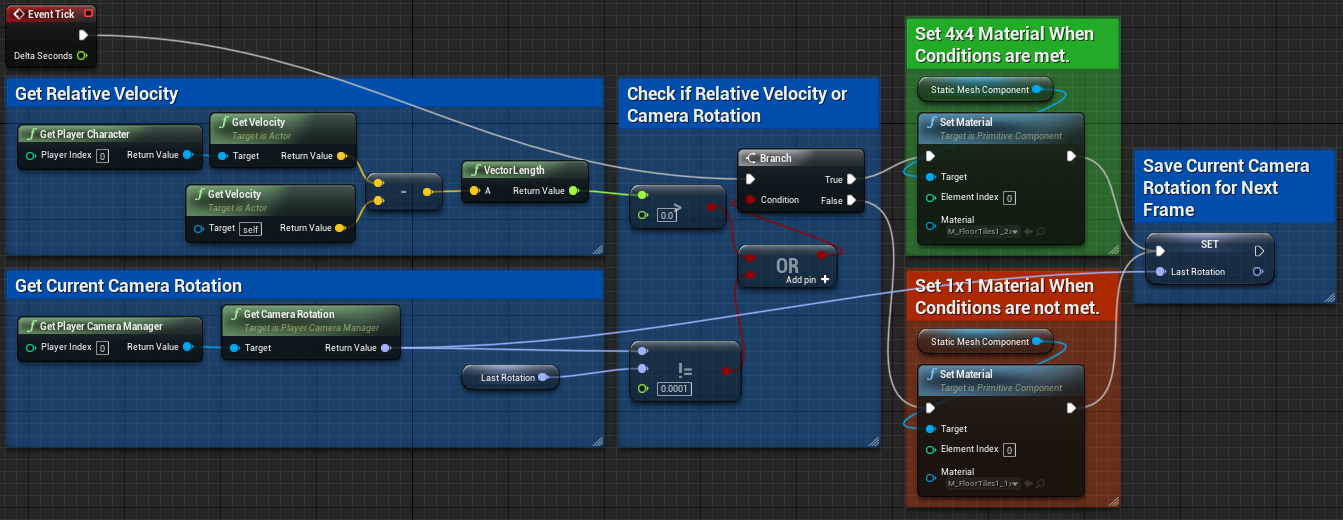
Figure 4.2.8: Combining Relative Velocity & Camera Rotation with logical OR
4.3. VRS LODs
The Unreal Engine LOD system can take advantage of VRS materials. In the content browser create VRS materials for each LOD stop with a unique shading rate. We define NEAR (1x1), MID (1x2), FAR (2x2) in the example in Figure 4.3.1. For a more aggressive VRS LOD, consider creating other combinations such as NEAR (1x1), MID (2x2), and FAR (4x4).
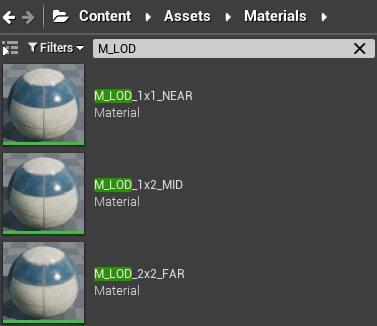
Figure 4.3.1: Creating 3 VRS materials for LODs, Near (1x1), Middle (1x2), Far (2x2).
Next, select a static mesh actor in the scene, edit the static mesh object by double clicking in the details panel. In the static mesh editor window use the details panel to add the new VRS LOD materials. In the example below, NEAR (1x1) is added to the Element 0 slot, MID (1x2) is added as Element 2, and FAR (2x2) is added to Element 3.
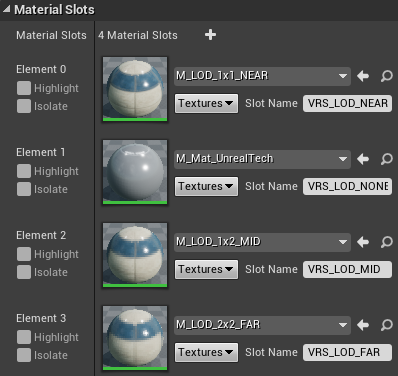
Figure 4.3.2: Adding VRS LOD Materials in the Static Mesh Editor Details Panel.
In the LOD Settings section of the mesh editor details panel enter the number of LOD stops, three are added here for NEAR (1x1), MID (1x2), and FAR (2x2). Click Apply changes to add the additional LODs.
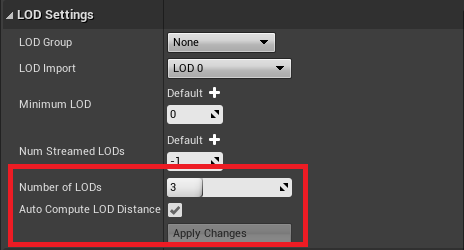
Figure 4.3.3: Creating 3 custom LODs for a static mesh.
Next, click the Custom checkbox in the LOD picker and ensure each LOD checkbox is checked.
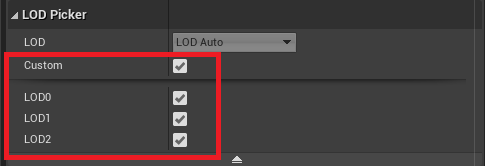
Figure 4.3.3: Enabling custom LODs in the mesh editor details panel.
In each LOD slot apply LOD materials from each material slot. In this example we assign NEAR (1x1) to LOD 0, MID (1x2) to LOD 1, and FAR (2x2) to LOD 2.
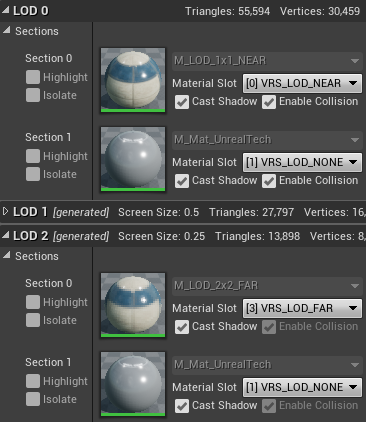
Figure 4.3.4: VRS LOD materials applied to custom LODs in the mesh editor details panel.
In the Unreal Editor there are up to 7 LOD slots. Any combination of shading rates are possible. However, consider grouping VRS materials into discrete ranges such as LOD 0-1 as Near (1x1), LOD 2-4 as Mid (2x2), and LOD 5-7 as Far (4x4) for example.
4.4. VRS Regions
VRS Regions can be created with a simple box collider attached to an empty actor object. These regions can be used to apply a different shading rate for objects within. First, drag an empty actor from the Modes panel into the scene. Edit the blueprint for the new actor and add a box collider component. The box collider will define the outer boundaries of the region.

Figure 4.4.1: An empty Actor with a Box Collider in the Unreal Editor Details Panel.
Create a new static mesh actors that will interact with the VRS Volume and place them into the scene.
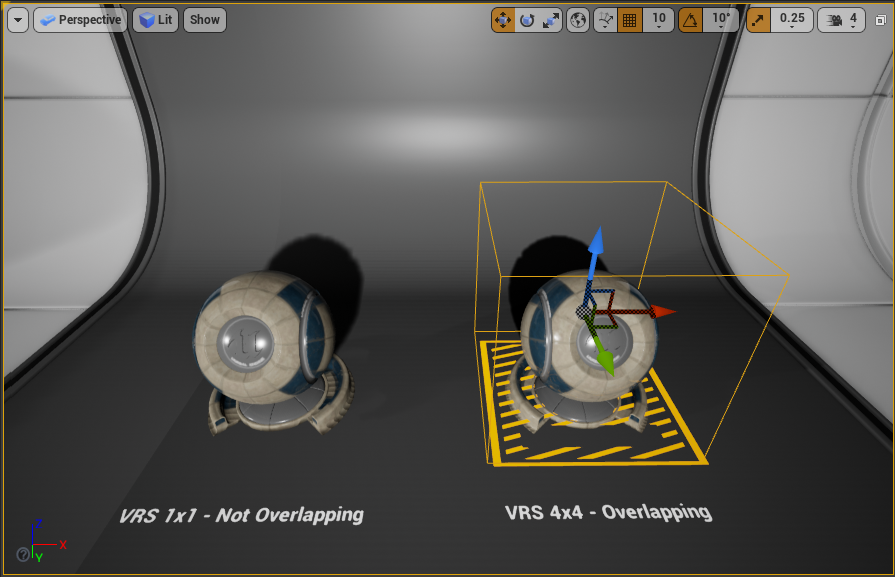
Figure 4.4.2: Example scene with a VRS region created with a box collider.
Open the Level Blueprint and add an EventTick node. Using an IsOverlappingActor function compare the VRS Volume actor to the static mesh actor. If the static mesh actor overlaps the region apply a new material with the appropriate shading rate using SetMaterial. Otherwise, apply the default material using SetMaterial.
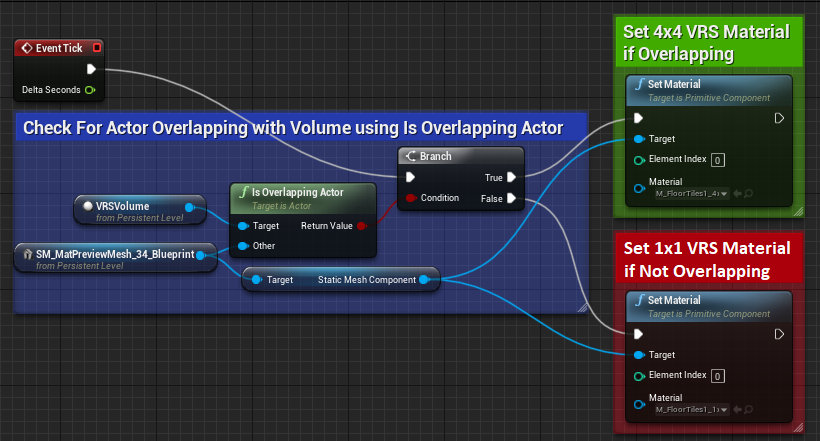
Figure 4.4.3: Level Blueprint with IsOverlappingActor test to set VRS materials.
Finally, use preview mode to test the overlapping region.
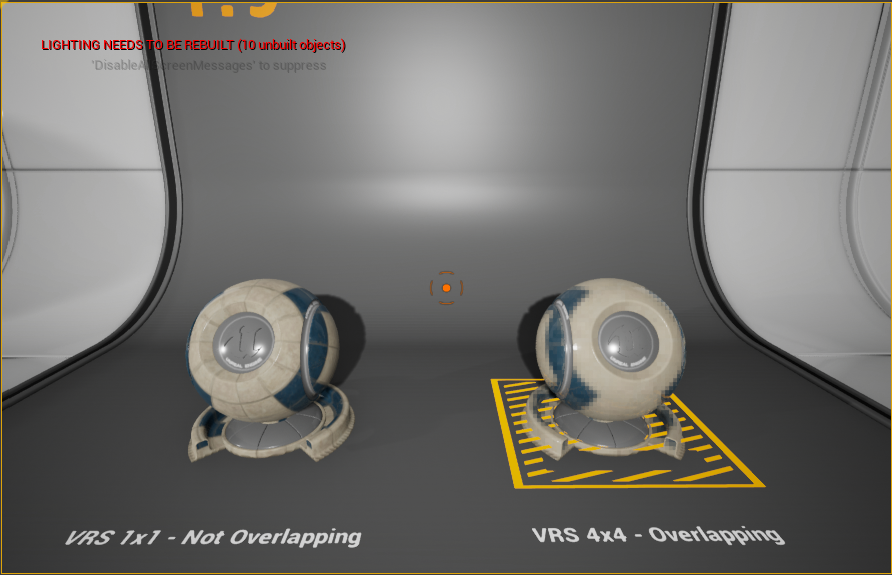
Figure 4.4.4: Scene Preview with VRS Volume and overlapping static mesh actor.
This concept can be extended further by adding a particle system to the region to obscure quality loss from a lower shading rate applied to the static mesh actor.
Figure 4.4.5: Example of a VRS Volume using a particle system to obscure lower shading rates.
5.0 Conclusion
As the previous sections demonstrate; Variable Rate Shading Tier 1 is a versatile technique that can be applied in numerous ways using Unreal Engine. Ranging from the more brute-force method of Mesh-Passes to dynamically applying shading rates to actors using the material system. Anywhere materials can be used in the Unreal Editor is an opportunity for additional use-cases. Consider creative ways to modify shading rates based on gameplay or user interaction that go beyond the techniques demonstrated in this article.