Introduction
For users who are already familiar with user space network stacks, this guide provides recommendations for configuring hardware and software that will provide the best performance in most situations. However, you should carefully consider these settings for your specific scenarios, since they can be deployed in multiple ways.
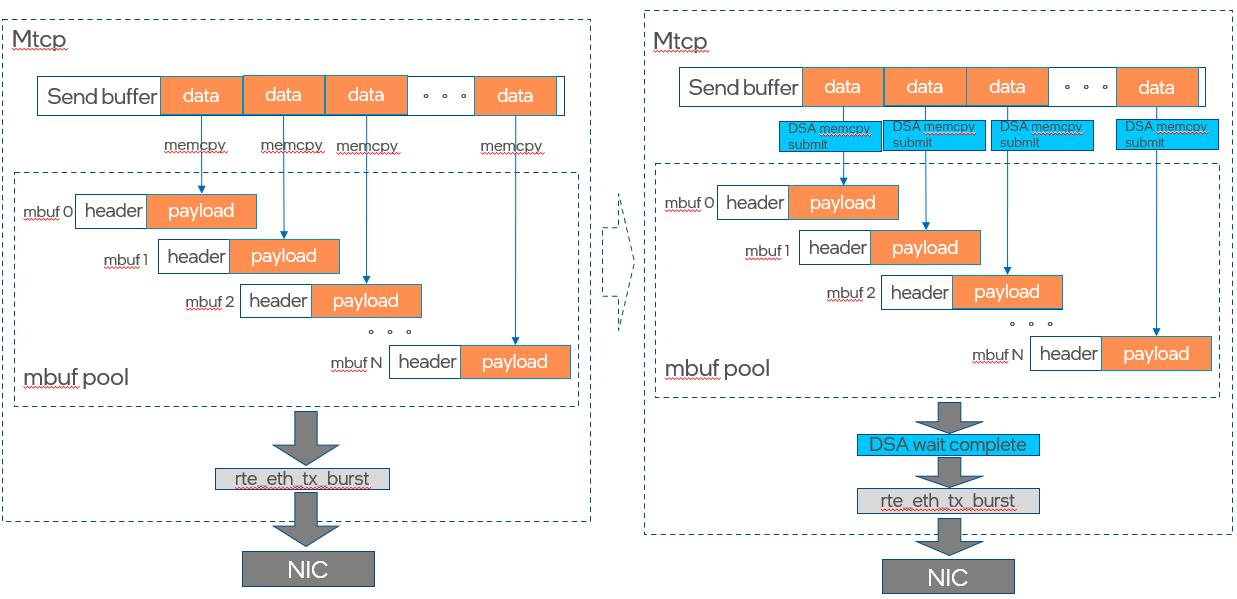
Internet data center data planes always have a large number and frequently data needs to be processes. The typical scenario is user space network stack based on DPDK* from Intel. The zero-copy concept is a well-known concept to achieve the best performance, but it also comes with the disadvantage that applications are coupled with user space network stack because the user data buffer and network stack data buffer should both come from DPDK mbuf pool. This requires modifying many currently deployed workloads such as HTTPd. This increases software product release and cost, so instead, many user-space stack implementations copy the data from an application to stack an in-network API.
The 4th gen Intel® Xeon® Scalable processors deliver workload-optimized performance with built-in acceleration for AI, encryption, HPC, storage, database systems, and networking. They feature unique security technologies to help protect data on-premises or in the cloud.
The 4th generation Intel Xeon Scalable processors enable optimizations to the user-space network through features that include:
- Intel® Data Streaming Accelerator (Intel® DSA)
- Intel® Vector Data Streaming Library
Intel DSA is suitable for memory-copy scenarios of user-space network stacks. The Intel Vector Data Streaming Library implements a user-space library to enable users to use Intel DSA for memory movement and take mTCP as the user-space stack implementation example to show the benefit. We implement different modes to satisfy different user scenario requirements: single mode, async mode, and vector mode. We also further optimize TCP unpacking with mTCP. This work is discussed later in this article.
Server Configuration
Hardware
The configuration described in this article is based on the 4th generation Intel Xeon processor. The server platform, memory, hard drives, and network interface cards (NIC) can be determined according to your usage requirements.
|
Hardware |
Model |
|
CPU |
4th generation Intel Xeon Scalable processor, base frequency 1.9 GHz |
|
BIOS |
EGSDCRB1.86B.0080.D21.2205151325 |
|
Memory |
224 GB (14x16 GB DDR5 4800 MT/s) |
|
Storage/Disks |
Intel SSDSC2KB960G8 |
|
NIC |
Intel® Ethernet Network Adapter E810, 100 GbE |
Software
|
Software |
Version |
|
Operating System |
CentOS* Stream release 8 |
|
Kernel |
v6.0 or later |
|
Workload |
mTCP acceleration with an Intel DSA example in the Intel Vector Data Streaming Library |
|
GNU Compiler Collection (GCC)* |
v10.2.0 |
|
accel-config |
v3.4.4+ |
|
Intel DSA Configuration |
1 instance, 4x engine, 1x work-queue dedicated mode |
Hardware Tuning
This guide targets the usage of a user-space network stack on 4th gen Intel Xeon Scalable processors with Intel DSA.
The Intel DSA v1.0 technical specification was publicly disclosed and published on February 2022. The spec passed all technical and Business Unit approvals and is being processed for further publication on Software Developer Manuals.
Intel DSA Architecture Specification
BIOS Settings
Some BIOS configuration items:
|
Configuration Item |
Recommended Value |
|
EDKII Menu> Socket Configuration > IIO Configuration > Intel VT for directed IO (VT -d) > Intel VT for directed IO |
Enable |
|
EDKII Menu > Socket Configuration > IIO Configuration > PCI ENQCMD/ENQCMDS |
Enable |
|
EDKII Menu > Socket Configuration > Uncore Configuration > Uncore Dfx Configuration: Cache entries for non-atomics |
120 |
|
EDKII Menu > Socket Configuration > Uncore Configuration > Uncore Dfx Configuration: Cache entries for atomics |
8 |
|
EDKII Menu > Socket Configuration > Uncore Configuration > Uncore Dfx Configuration: CTAG entry avail mask |
255 |
Intel DSA Setting
Enable one Intel DSA device, four engines, and one dedicated work queue. They are configured by a script tool in following Software Tuning section.
Memory Configuration and Settings
No specific workload setting.
Storage, Disk Configuration, and Settings
No specific workload setting.
Network Configuration and Setting
Acquire two server machines:
- One with an Intel 4th generation Intel Xeon Scalable processor
- Another with a 3rd generation Intel Xeon Scalable processor or another server CPU.
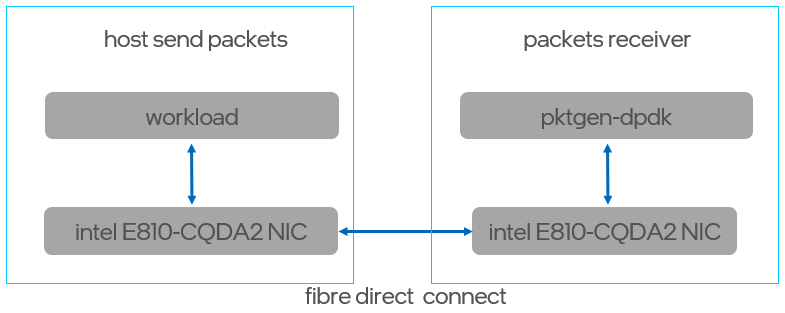
Insert a 100 GbE E810 network interface card (NIC) from Intel into each machine, and then connect the two machines with fiber directly.

Figure1.
Software Tuning
Software configuration tuning is essential. From the operating system to the workload configuration settings, they are all designed for general-purpose applications. Default settings are almost never tuned for best performance.
Linux* Kernel Optimization Settings
Typically, CentOS 8 Stream is used for the Proof of concept (PoC) environment, because Intel DSA is enabled. This requires an update to the kernel to v6.0 or later from the Linux* kernel community. Before compiling the kernel, check whether configurations that are related to Intel DSA are supported:
CONFIG_INTEL_IDXD=m

CONFIG_INTEL_IDXD_BUS=y

CONFIG_INTEL_IDXD_COMPAT=y

CONFIG_INTEL_IDXD_PERFMON=y

CONFIG_INTEL_IDXD_SVM=y

CONFIG_VFIO_MDEV_IDXD=m

CONFIG_IRQ_REMAP=y

CONFIG_INTEL_IOMMU=y

CONFIG_INTEL_IOMMU_SVM=y

CONFIG_IMS_MSI=y

CONFIG_IMS_MSI_ARRAY=y

CONFIG_IRQ_REMAP=y

CONFIG_PCI_ATS=y

CONFIG_PCI_PRI=y

CONFIG_PCI_PASID=y

CONFIG_DMA_ENGINE=m

CONFIG_DMATEST=m
Build with make command. Use the make install command to install the new kernel version. Use the Grub command to set the boot option for newly installed kernel version.
Use the uname command to check the kernel version after rebooting.
User-Space Network Stack with Intel DSA Acceleration Architecture
Intel DSA accelerate the memory copy from application to network stack:

Figure 2.
Intel DSA accelerate the memory copy from application to network stack:

Figure 3.
Tune a User Space Network Stack
Download Source Code
git clone https://github.com/intel/Intel-Vector-Data-Streaming-Library.git
Intel DSA Configuration
accel-config is a user-space tool for controlling and configuring Intel DSA hardware devices.
To install the accel-config tool, see idxd-config.
These instructions were written using the tag ** 6bd68e68 **. Before compiling and installing, run:
git checkout 6bd68e68
Use the following command to enable one Intel DSA device, four engines, and one dedicated work queue:
cd Intel-Vector-Data-Streaming-Library/DSAZoo/dsa_userlib/config_dsa

#Configure with script tool
./setup_dsa.sh -d dsa0 -w 1 -m d -e 4
Memory Configuration and Settings
Build PoC
#Enter mtcp directory
cd Intel-Vector-Data-Streaming-Library/DSAZoo
cd example_mtcp

#Run script pre_dpdk2203.sh to git clone dpdk v22.03, and then build and install it
./pre_dpdk2203.sh ~/dpdk2203

#Run script pre_compile.sh to prepare the environment before you building this project:
./pre_compile.sh

#Set env
export RTE_SDK=`echo $PWD`/dpdk
export PKG_CONFIG_PATH=${PKG_CONFIG_PATH}:~/dpdk2203/lib64/pkgconfig
export LD_LIBRARY_PATH=${LD_LIBRARY_PATH}:~/dpdk2203/lib64
export LD_LIBRARY_PATH=${LD_LIBRARY_PATH}:./

#Run make command to build the project.
make
Configure a DPDK* Environment
Build and install igb_uio.ko:
git clone http://dpdk.org/git/dpdk-kmods

cd dpdk-kmods/linux/igb_uio/

make

modprobe uio

insmod igb_uio.ko
Set up huge-page mappings:
mkdir -p /mnt/huge
mount -t hugetlbfs nodev /mnt/huge

#Set 4x1G hugepages each numa node
echo 4 > /sys/devices/system/node/node0/hugepages/hugepages-1048576kB/nr_hugepages
echo 4 > /sys/devices/system/node/node1/hugepages/hugepages-1048576kB/nr_hugepages
Bind a NIC to uio
#Down nic interface in kernel driver
ifconfig ensXX down

#Bind nic to uio,RTE_SDK is dpdk22.03 install path, PCI_PATH is nic PCI Fcntion Address
${RTE_SDK}/bin/dpdk-devbind.py -b igb_uio $PCI_PATH
Set Up a Packet Receiver Server
For details, see Get Started with Pktgen
- Build and install DPDK on your packet receiver machine.
- Clone the pktgen-dpdk repository, and then build it:
git clone http://dpdk.org/git/apps/pktgen-dpdk
Use the make command to build it. For more information, see Build DPDK and Pktgen.
- Set DPDK, allocate huge pages, and then bind NIC to DPDK.
- Launch the pktgen-dpdk tool:
./usr/local/bin/pktgen -c 0x3 -n 2 -- -P -m "1.0"
- To send packets, in the Pktgen command line, enter the following command:
#mac address for 4th Generation Intel® Xeon® Scalable machine NIC

set 0 dst mac 40:a6:b7:67:19:f0


set 0 proto tcp


set 0 size 5000


set 0 rate 0.01


start 0


#if you want pause, you can enter:

stop 0
Performance Measurement
You can observe packets per second (PPS) and bandwidth from Pkts/s and MBits/s in the Pktgen console.
mTCP APP Configuration File
cd Intel-Vector-Data-Streaming-Library/DSAZoo/example_mtcp/apps/example

vim epping.conf


#modify port to your NIC PCIE number, for example:

port = 0000:29:00.0 (your NIC PCIE number)
Implementation and Performance of a CPU & Intel DSA Async Mode
Benchmark with a CPU
cd Intel-Vector-Data-Streaming-Library/DSAZoo/example_mtcp/apps/example

# 4K
./epping -f epping.conf -l 4k -n 32768

# 8K
./epping -f epping.conf -l 8k -n 16384

# 32K
./epping -f epping.conf -l 32k -n 4096

# 256K
./epping -f epping.conf -l 256k -n 512

# 1M
./epping -f epping.conf -l 1m -n 128

# 2M
./epping -f epping.conf -l 2m -n 64
Benchmark with the Intel DSA Async Mode
cd Intel-Vector-Data-Streaming-Library/DSAZoo/example_mtcp/apps/example

# 4K
./epping -f epping.conf -l 4k -n 32768 -d

# 8K
./epping -f epping.conf -l 8k -n 16384 -d

# 32K
./epping -f epping.conf -l 32k -n 4096 -d

# 256K
./epping -f epping.conf -l 256k -n 512 -d

# 1M
./epping -f epping.conf -l 1m -n 128 -d

# 2M
./epping -f epping.conf -l 2m -n 64 -d
Implementation and Performance of CPU & Intel DSA Unpacking
Benchmark with CPU Unpacking
# unpacking to 64 Bytes packet
./epping -f epping.conf -d -m 64

# unpacking to 128 Bytes packet
./epping -f epping.conf -d -m 128

# unpacking to 256 Bytes packet
./epping -f epping.conf -d -m 256

# unpacking to 512 Bytes packet
./epping -f epping.conf -d -m 512

# unpacking to 1024 Bytes packet
./epping -f epping.conf -d -m 1024

# unpacking to 1460 Bytes packet
./epping -f epping.conf -d -m 1460

# unpacking to 4096 Bytes packet
./epping -f epping.conf -d -m 4096

# unpacking to 8192 Bytes packet
./epping -f epping.conf -d -m 8192
Benchmark with Intel DSA Unpacking
# unpacking to 64 Bytes packet
./epping -f epping.conf -du -m 64

# unpacking to 128 Bytes packet
./epping -f epping.conf -du -m 128

# unpacking to 256 Bytes packet
./epping -f epping.conf -du -m 256

# unpacking to 512 Bytes packet
./epping -f epping.conf -du -m 512

# unpacking to 1024 Bytes packet
./epping -f epping.conf -du -m 1024

# unpacking to 1460 Bytes packet
./epping -f epping.conf -du -m 1460

# unpacking to 4096 Bytes packet
./epping -f epping.conf -du -m 4096

# unpacking to 8192 Bytes packet
./epping -f epping.conf -du -m 8192
Related Tools and Information
mTCP is a high-performance user-level TCP stack for multicore systems. Scaling the performance of short TCP connections is fundamentally challenging due to inefficiencies in the kernel. mTCP addresses these inefficiencies from the ground up—from packet I/O and TCP connection management all the way to the application interface. For more details, see mTCP.
Pktgen is a traffic generator powered by DPDK that generates network traffic with 64-byte frames. For source code and details, see The Pktgen Application.
Conclusion
This article described how to deploy the user-space network stack acceleration with an Intel DSA test environment. With these instructions, you can obtain throughput data with different data sizes and packet sizes.
Feedback
We value your feedback. If you have comments (positive or negative) on this guide or are seeking something that is not part of this guide, reach out and let us know what you think.