Scope
This paper helps developers get started with Microsoft Azure* Confidential Computing (ACC) using the Open Enclave software development kit (SDK). Topics include the scope of support for the ACC public preview, step-by-step ACC virtual machine (VM) configuration, deployment, building, and running the Open Enclave SDK sample applications.
Introduction
Microsoft Azure Confidential Computing (ACC) is a new data security capability that utilizes trusted execution environments (TEEs) to protect sensitive code and data while in use and at rest in the public cloud. The underlying TEE is called an enclave, and its security is hardened by Intel® Software Guard Extensions (Intel® SGX). ACC is deployed as DC-series virtual machines (VMs), which are supported by Intel® SGX-enabled server platforms. This capability is currently in public preview (beta).
ACC provides several advantages over other cloud security technologies:
- It removes the cloud service provider from the trusted compute boundary (TCB), making sensitive code and data in the enclave opaque to the service provider.
- The enclave’s identity and integrity, and the platform on which it’s executing, can be verified through remote attestation.
- Data contained in the enclave is always encrypted in memory by Intel SGX, increasing the confidence in sensitive workloads that are hosted in the public cloud.
For more information see documentation on Microsoft Azure* Confidential Computing.
Getting Started with ACC Virtual Machines
Before jumping into the configuration and deployment of ACC virtual machines, it is important to know what the public preview offers for data center availability, target OS support, VM sizing, and SDKs for enclave development.
DC-series virtual machine data center availability
The DC-Series virtual machines are a new class of VM that deploy on Intel® Xeon® platforms enabled with Intel SGX. Since this VM type has a dependency on the underlying Intel SGX hardware features, ACC is currently only available in the following Microsoft Azure data centers:
- EAST US
- WEST EUROPE
Regional data center availability may have an impact on overall design and deployment of the ACC based solution, but for development purposes these data centers should be more than adequate.
Operating system support
Currently two operating systems are supported for DC-series virtual machines:
- Windows* Server 2016
- Ubuntu* 16.04 LTS
Additional OS offerings may be supported once the ACC program transitions from public preview to general availability.
Virtual machine sizing
The ACC public preview provides two VM sizing options for the DC-Series VMs:
- Standard_DC2s with 2 vCPUs and 8 GB of memory
- Standard_DC4s with 4 vCPUs and 16 GB of memory
Note that during public preview, there’s a limit to how many virtual CPUs can be deployed per Microsoft Azure subscription. See detailed information on DC-series VM Sizes.
Software Development Kit (SDK) and runtime environment support
Building solutions based on ACC requires the use of an SDK to support the development of application enclaves. During the ACC VM configuration process, developers will have the option to pre-install the Open Enclave SDK, its runtime environment dependencies, and supporting development tools. Select this option if you wish to develop new application enclaves using the Open Enclave SDK or if you wish to port your existing Intel SGX SDK developed application to the Open Enclave runtime environment.
Both the Open Enclave SDK and the Intel SGX SDK can co-exist on the same platform. The Open Enclave runtime environment has the flexibility to support enclaves developed with either SDK, but feature and capability gaps exist between the Open Enclave and Intel SGX SDK.
If you intend to deploy a previously developed Intel SGX SDK-based application on ACC VMs, select “no” to installation of Open Enclave SDK. This will ensure that the ACC VM is clean and ready for manual installation of the Intel SGX Driver, platform software (runtime environment), and SDK. And, it will allow your application to run as if it was deployed on standalone hardware.
Learn more about:
Open Enclave SDK
Intel® SGX SDK
Confidential Compute Virtual Machine Configuration and Deployment
This section describes how to configure and deploy a new ACC virtual machine. An Azure account login is required. These instructions will help deploy an Ubuntu Server 16.04 LTS virtual machine. (Microsoft Visual Studio* subscribers may already have Microsoft Azure credits as part of their subscription.) If needed, create a free account.
Azure marketplace
Confidential Compute DC-series virtual machines can be found in the directory in the Azure Marketplace or by searching the Azure Portal Marketplace for “Confidential Compute.”
- Click Get it now, and then Continue.
- If not already logged in, you will be asked to log in to your Azure account.
- Once logged in, you will be re-directed to the “Confidential Compute VM Deployment” wizard.
Confidential compute VM configuration and deployment
As the basis for this example, configure and deploy a standalone Ubuntu 16.04 LTS virtual machine. Note that for ACC public preview, “Resource Manager” is the only deployment model available.
- Click Create to access the configuration wizard.
- Select the VM operating system Image.”
- For this example, select Ubuntu Server 16.04 LTS.
- Provide the VM a hostname in the Name field.
- For example, “ACC-Ubuntu1604-01.”
- Enter the Username for the privileged user account of the VM.
- For example, “vm_admin.”
- Select how to authenticate the privileged user when connecting to the VM.
- For this example, select Password. For stronger authentication, select SSH public key.
- Enter the privileged user’s strong password twice.
- The password must be between 12 and 72 characters and include one upper-case character, one lower-case character, a number, and/or a special character.
- Verify that Open Enclave SDK will be included with this VM deployment.
- Verify which Microsoft Azure subscription will be used to deploy the VM. If you have more than one, select the most appropriate subscription.
- For public preview, the wizard will only allow deployment to an empty resource group. Create one during VM deployment as follows:
- Under “Resource group,” click Create new.
- In the dialog box, name the new resource group and click OK.
- For example, “ACC-PubPreview-Ubuntu-RG01.”
- Select the Microsoft Azure data enter location to which you want to deploy.
- Select East US or West Europe. Any selection other than these two locations will fail validation checks.
- Verify that your configuration settings match the following:
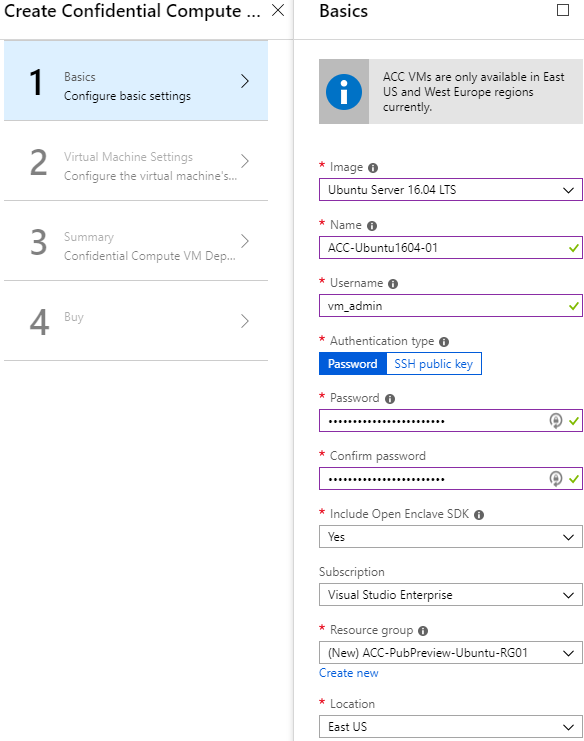
- Click OK to continue to Virtual Machine Settings.
Virtual machine settings
The next configuration steps are the VM settings, which include VM size, storage type, and virtual network details.
- ACC public preview VMs come in two sizes; select the appropriate size for your situation.
- For example, Standard_DC2s.
- Select your preferred storage type.
- Configure the VMs’ virtual network details. For simplicity, this example will use the default settings.
- Configure the subnet. Again, this example will use the defaults provided. Go to the configuration sub-menu (click on the red exclamation point) and click OK to accept the default values.
- Use caution in choosing to enable public inbound ports (SSH/RDP) from the VM Settings page. If enabled here, the ports will be open for all public inbound traffic from the Internet, posing a serious security issue. It is recommended that you select none; after the VM has been created and deployed, configure the VM’s networking inbound port rules to open the required port for a specific IP Address range or enable the Microsoft Azure Security Center Just-in-time VM access.
- Verify that your VM Settings resembles the following:
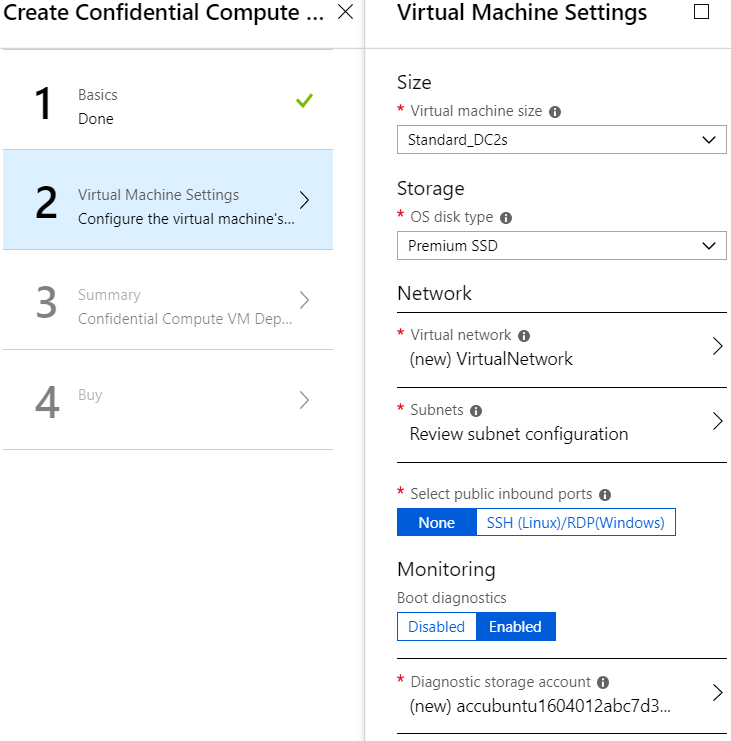
- Click OK to continue.
Summary page
Validation of your configuration settings will occur on the summary page. Microsoft Azure subscriptions taking part in the ACC public preview have limits on how many virtual cores can be allocated to each subscription. Over-subscription will receive an error during the validation process. To receive additional ACC resources beyond what is provided, contact the ACC product team. If validation has passed, review your configuration and click OK to continue.
Create page
Before creating and deploying your newly configured VM, carefully read the terms of use and understand any costs associated with the use of Microsoft Azure resources. When you are ready to deploy the VM, click Create. The completion process will take approximately 10 minutes, at which time you will see a new message in the Microsoft Azure portal notifications tab.
Post VM deployment - network configuration
If you opted not to open any public-facing network ports (SSH, RDP) during VM configuration, you may want to do that now, enabling remote login to the newly created virtual machine. It is strongly recommended that you restrict access to the port to a specific IP Address or range of IP addresses. Contact your IT organization for specific security policies regarding network configuration and virtual machine hardening.
Continuing with the Ubuntu 16.04 virtual machine example, configure the VM to allow SSH (Port 22) from a specific IP address.
- In Microsoft Azure Portal, navigate to Home > Virtual machines > “ACC-Ubuntu1604-01” > Networking.
- Under “Inbound Port Rule,” click Add.
- Select source as IP Address.
- Enter the source IP address that should be allowed access to port 22.
- Enter 22 as the Destination Port ranges.
- Select TCP as the protocol.
- Enter Port 22 in the Name field.
- Click Add.
- Using your SSH client of choice (e.g., PuTTY), test your connection to the VM using the administrator credentials provided at configuration. The public IP address of the VM can be found on the VM Networking page.
- Depending on your IT organization, you may need to configure a proxy in the SSH client to connect to the virtual machine.
Building the Open Enclave SDK Sample Applications
Once you have successfully logged into your virtual machine, start compiling the Open Enclave SDK sample applications. Studying and compiling the code samples will help you understand how to develop enclaves using the SDK. Refer to the Open Enclave SDK for a detailed explanation of each code sample.
The following build steps assume “Open Enclave SDK” was selected to be installed during VM configuration. By selecting this option, all the prerequisite build tools were also installed on your behalf. If this option was not selected, follow the instructions in the Open Enclave SDK installation reference.
After successfully installing the Open Enclave SDK, runtime environment, and tools, proceed with the following steps:
-
$ cd ~ -
$ sudo cp -r /opt/openenclave/share/openenclave/samples/ .- Copy the sample code to your home directory.
-
$ sudo chown -R vm_admin:vm_admin samples/- Change the owner of the samples directory from root to vm_admin.
-
$ source /opt/openenclave/share/openenclaverc- Initialize the Open Enclave Build Environment.
-
$ cd samples -
$ make build- This will build all the samples. Alternatively, go into each subfolder and build only the individual project.
-
$ make run- This will execute all the built sample applications.
- Verify that all sample applications ran successfully.
- Enjoy your exploration of Microsoft Azure Confidential Computing and the Open Enclave SDK.
Summary
You now have the tools and knowledge to create and deploy standalone Microsoft Azure Confidential Computing virtual machines. Use the Open Enclave SDK to develop new application security capabilities not previously available in the public cloud. In the words of Robert Noyce, “Don’t be encumbered by history, just go out and do something wonderful.”