Get Started with Intel MLPerf v6.0 Inference Submission with Intel Optimized Docker Images
MLPerf is a benchmark for measuring the performance of machine learning systems. It provides a set of performance metrics for a variety of machine learning tasks, including image classification, object detection, machine translation, and others. The benchmark is representative of real-world workloads and as a fair and useful way to compare the performance of different machine learning systems.
In this document, we'll show how to run Intel MLPerf v6.0 submission with Intel optimized Docker images and the prepared scripts.
Verified HW configuration:
Xeon
| System Info | Configuration detail |
|---|---|
| CPU | The Intel® Xeon® 6980P, 6987P, 6972P and 6787P Processor (GNR) |
| Memory | 2304GB (24x96GB [8800MT/s]) |
| Disk | 1.6 TB NVMe |
BIOS settings:
Xeon
| BIOS setting | Recommended value |
|---|---|
| Hyperthreading | Disabled |
| Turbo Boost | Enabled |
| Core Prefetchers | Hardware,Adjacent Cache,DCU Streamer,DCU IP |
| LLC Prefetch | Disable |
| CPU Power and Perf Policy | Performance |
| NUMA-based Cluster | SNC Enabled |
| Hardware P State | Native (based on OS guidance) |
| Energy Perf Bias | OS Controls EPB |
| Energy Efficient Turbo | Disabled |
Note : for NUMA-based Cluster, suggest to set SNC3 for 6980P and 6987P, and SNC2 for other SKUs.
Please also refer to Intel® Xeon® 6 Processors - Birch Stream Platform Performance and Power Optimization Guide for more details.
Verified OS configurations:
Xeon
| System Info | Configuration detail |
|---|---|
| OS | CentOS Stream 8 |
| Kernel | 6.6.8-1.el8.elrepo.x86_64 |
Check System Health Using PerfSpect:
PerfSpect is a Linux OS utility for assessing the state and health of Intel Xeon computers. It is suggested to use PerfSpect first to check any system configuration issue before running any benchmark.
Follow the Quick Start Guide for downloading and installation, and get the system configuration reports by using perfspect report
Xeon
The following are several key factors effecting the model performance for Xeon.
CPU
Couple CPU features impact MLPerf performance via related BIOS knobs, so please double check the CPU features with your BIOS knobs.
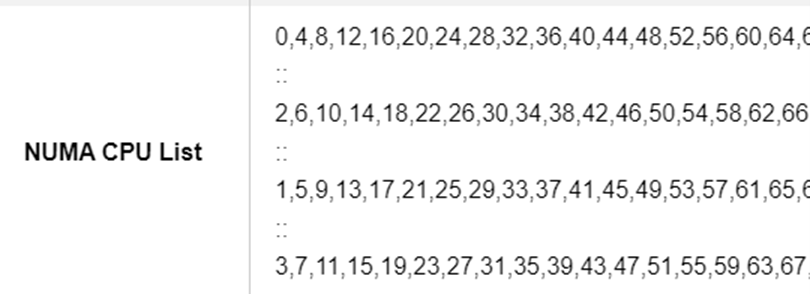
Some important CPU features are Hyperthreading, number of NUMA nodes, Prefetchers and Intel Turbo Boost.

Please also check your CPU tempertures. The CPU temperture should not be higher than 50 degrees C.
Overheating will drop the CPU frequency and degrade the MLPerf performance.
Memory
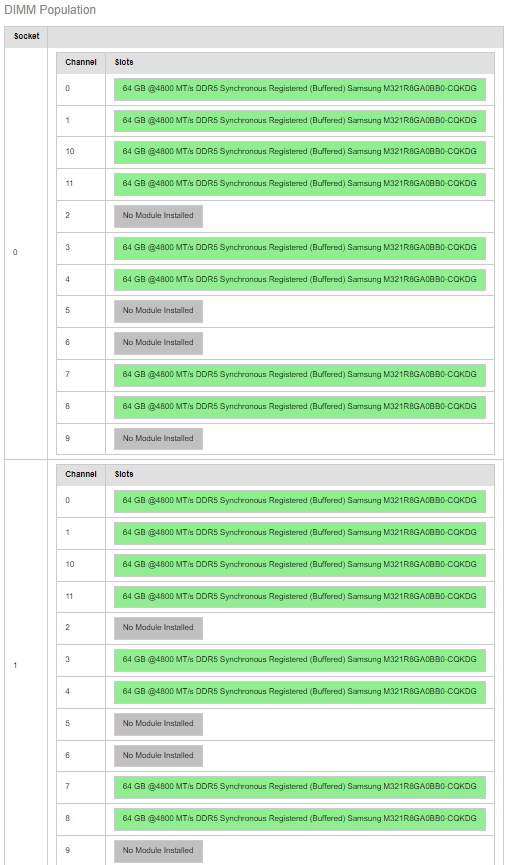
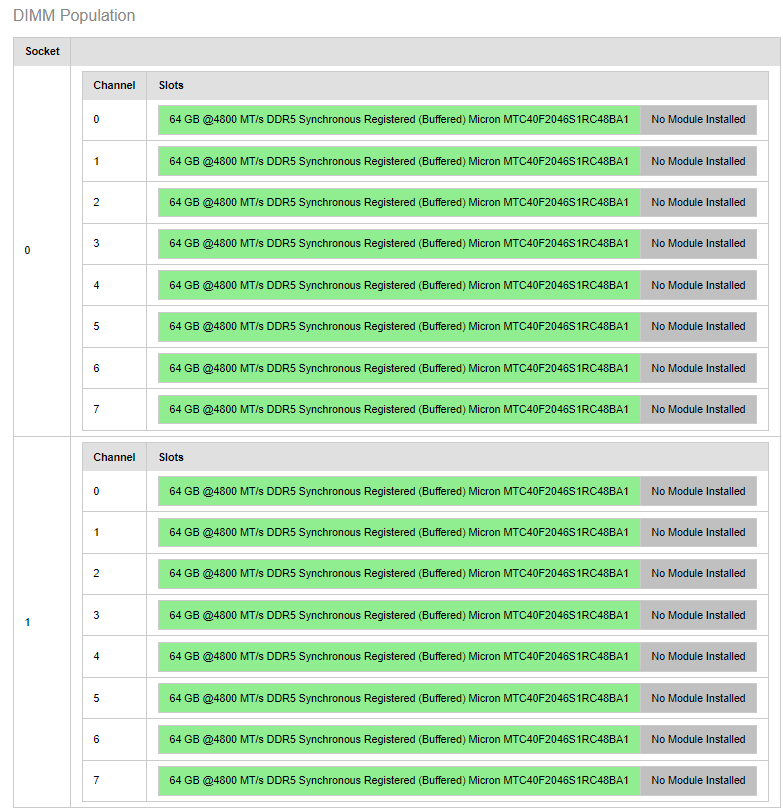
One important system configuration is balanced DIMM population, which is suggested to set as balanced to get optimized performance.
Populate as many channels per socket as possible prior to adding additional DIMMs to the channel.
It might impact the memory bandwidth if two dimm share one channel.
Please also refer to Chapter 4 in Eagle Stream Platform Performance & Power Optimization Guide for more details.
From the results of svr-info, an example of unbalanced DIMM population is shown as follows,
An exmaple of Balanced DIMM population is shown as follows,
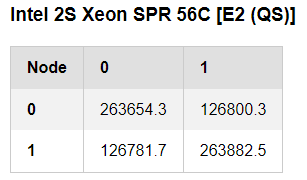
You should also see good numbers for memory NUMA bandwidth if you also benchmark memory via svr-info.
Here are some reference numbers from a 2S SPR system.
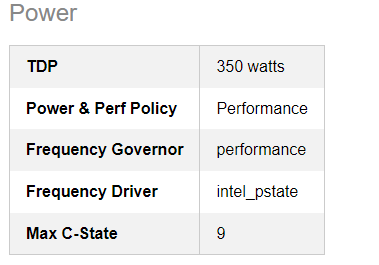
Power
We recommend the intel_pstate Frequency Driver.
For best performance, set the Frequency Governor and Power and Perf Policy to performance.
Here are related recommended power settings from svr-info.
Running Models with Intel Optimized Docker Image
Set Directories
Set the directories on the host system where model, dataset, and log files will reside. These locations will retain model and data content between Docker sessions.
export DATA_DIR=${PWD}/data
export MODEL_DIR=${PWD}/model
export LOG_DIR=${PWD}/logs
Launch the Docker Image
In the Host OS environment, run the following after setting the proper Docker image. If the Docker image is not on the system already, it will be retrieved from the registry. If retrieving the model or dataset, ensure any necessary proxy settings are run inside the container.
Xeon
Here is a table of the currently supported models and release versions. It is recommended to use the latest release for each model.
| Models |
|---|
| llama3.18bcpu, whisper_cpu, rgat, retinanet |
export DOCKER_IMAGE="intel/intel-optimized-pytorch:mlperf-inference-6.0-<model>"
# Please choose <model> from model={llama3.1_8b_cpu, whisper_cpu, rgat, retinanet}
e.g.:
export DOCKER_IMAGE="intel/intel-optimized-pytorch:mlperf-inference-6.0-llama3.1_8b_cpu"
docker run --privileged -it --rm \
        --ipc=host --net=host --cap-add=ALL \
        -e http_proxy=${http_proxy} \
        -e https_proxy=${https_proxy} \
        -e HTTP_PROXY=${http_proxy} \
        -e HTTPS_PROXY=${https_proxy} \
        -e no_proxy=${no_proxy} \
        -v ${DATA_DIR}:/data \
        -v ${MODEL_DIR}:/model \
        -v ${LOG_DIR}:/logs \
        --workdir  /workspace \
        ${DOCKER_IMAGE} /bin/bash
Download the Model [one-time operation]
Run this step inside the Docker container. This is a one-time operation which will preserve the model on the host system using the volume mapping above.
bash scripts/download_model.sh
Note : For Llama3.1 8b model, users can also follow MLcomm instructions instead.
Download the Dataset [one-time operation]
Run this step inside the Docker container. This is a one-time operation which will preserve the dataset on the host system using the volume mapping above.
bash scripts/download_dataset.sh
Note : For Llama3.1 8b model, users need to follow MLcomm instructions instead.
Calibrate the Model [one-time operation]
Xeon
Run this step inside the Docker container. This is a one-time operation, and the resulting calibrated model will be stored along with the original model file.
bash scripts/run_calibration.sh
Run Benchmark
Run this step inside the Docker container. Select the appropriate scenario. If this is the first time running this workload, the original model file will be calibrated to INT8 and stored alongside the original model file (one-time operation).
Performance
SCENARIO=Offline MODE=Performance bash run_mlperf.sh
SCENARIO=Server  MODE=Performance bash run_mlperf.sh
NOTE: To change target QPS for offline or server run, export OFFLINEQPS=xxxxxx for Offline run and export SERVERQPS=xxxxx for Xeon server run. To update Gaudi3 QPS, update the Server QPS in /workspace/systems/user.conf.GAUDI3_8C
Accuracy
SCENARIO=Offline MODE=Accuracy  bash run_mlperf.sh
SCENARIO=Server  MODE=Accuracy  bash run_mlperf.sh
# 3D-UNet workload does not have Server mode
Run Compliance Tests
NOTE: Please bypass this step for GPT-J model. Compliance tests are not required https://github.com/mlcommons/policies/blob/master/submission_rules.adoc#5132-inference.
Run this step inside the Docker container. After the benchmark scenarios have been run and results exist in {LOGDIR}/results, run this step to complete compliance runs. Compliance output will be found in '{LOGDIR}/compliance'.
SCENARIO=Offline MODE=Compliance  bash run_mlperf.sh
SCENARIO=Server  MODE=Compliance  bash run_mlperf.sh
After the compliance test, the logs will reside in /logs/compliance.
Validate Submission Checker
For submissions only: There are several files you should modify before running the submission checker. Here are the changes:
- In the systems folder, there are JSON files. Pick the right json file for your platform and change the following fields as needed: submitter, system_name, and hw_notes.
Run this step inside the Docker container. The following script will perform accuracy log truncation and run the submission checker on the contents of {LOGDIR}. The source scripts are distributed as MLPerf Inference reference tools. Ensure the submission content has been populated before running. The script output is transient and destroyed after running. The original content of ${LOGDIR} is not modified.
NOTE: Please change the system to 1-node-2S-GNR_128C if you use Intel® Xeon® 6980P Processor or 1-node-8C-GAUDI3.json for 8 Gaudi3 cards.
VENDOR=Intel SYSTEM=1-node-2S-GNR_86C bash scripts/prepare_submission.sh
Previous MLPerf v5.1, v5.0, v4.1, v4.0, v3.1 and v3.0 Inference Submission
Intel has participated in Mleprf submissions since the very beginning of the foundation of MLcommons. In December 2018 Intel published the first Mlperf training benchmark suite together with Goodle and Nvidia. So far, there have been more than 100 results were submitted on Xeon. This session will show how to run Intel MLPerf v5.1, v5.0, v4.1, v4.0, v3.1 and v3.0 submission with Intel optimized Docker images.
Get Started with Intel MLPerf v5.1 Submission with Intel Optimized Docker Images
Get Started with Intel MLPerf v5.1 Inference Submission with Intel Optimized Docker Images
MLPerf is a benchmark for measuring the performance of machine learning systems. It provides a set of performance metrics for a variety of machine learning tasks, including image classification, object detection, machine translation, and others. The benchmark is representative of real-world workloads and as a fair and useful way to compare the performance of different machine learning systems.
In this document, we'll show how to run Intel MLPerf v5.1 submission with Intel optimized Docker images and the prepared scripts.
Publications
MLPerf 5.1 on Dell_PowerRedge R770 with 6th Xeon Processors
MLPerf 5.1 on Lenovo ThinkSystem SR650 V4 with 6th Xeon Processors
Verified HW configuration:
Xeon
| System Info | Configuration detail |
|---|---|
| CPU | The Intel® Xeon® 6980P, 6987P, 6972P and 6787P Processor (GNR) |
| Memory | 2304GB (24x96GB [8800MT/s]) |
| Disk | 1.6 TB NVMe |
BIOS settings:
Xeon
| BIOS setting | Recommended value |
|---|---|
| Hyperthreading | Disabled |
| Turbo Boost | Enabled |
| Core Prefetchers | Hardware,Adjacent Cache,DCU Streamer,DCU IP |
| LLC Prefetch | Disable |
| CPU Power and Perf Policy | Performance |
| NUMA-based Cluster | SNC Enabled |
| Hardware P State | Native (based on OS guidance) |
| Energy Perf Bias | OS Controls EPB |
| Energy Efficient Turbo | Disabled |
Note : for NUMA-based Cluster, suggest to set SNC3 for 6980P and 6987P, and SNC2 for other SKUs.
Please also refer to Intel® Xeon® 6 Processors - Birch Stream Platform Performance and Power Optimization Guide for more details.
Verified OS configurations:
Xeon
| System Info | Configuration detail |
|---|---|
| OS | CentOS Stream 8 |
| Kernel | 6.6.8-1.el8.elrepo.x86_64 |
Check System Health Using PerfSpect:
PerfSpect is a Linux OS utility for assessing the state and health of Intel Xeon computers. It is suggested to use PerfSpect first to check any system configuration issue before running any benchmark.
Follow the Quick Start Guide for downloading and installation, and get the system configuration reports by using perfspect report
Xeon
The following are several key factors effecting the model performance for Xeon.
CPU
Couple CPU features impact MLPerf performance via related BIOS knobs, so please double check the CPU features with your BIOS knobs.
Some important CPU features are Hyperthreading, number of NUMA nodes, Prefetchers and Intel Turbo Boost.
Please also check your CPU tempertures. The CPU temperture should not be higher than 50 degrees C.
Overheating will drop the CPU frequency and degrade the MLPerf performance.
Memory
One important system configuration is balanced DIMM population, which is suggested to set as balanced to get optimized performance.
Populate as many channels per socket as possible prior to adding additional DIMMs to the channel.
It might impact the memory bandwidth if two dimm share one channel.
Please also refer to Chapter 4 in Eagle Stream Platform Performance & Power Optimization Guide for more details.
From the results of svr-info, an example of unbalanced DIMM population is shown as follows,
An exmaple of Balanced DIMM population is shown as follows,
You should also see good numbers for memory NUMA bandwidth if you also benchmark memory via svr-info.
Here are some reference numbers from a 2S SPR system.
Power
We recommend the intel_pstate Frequency Driver.
For best performance, set the Frequency Governor and Power and Perf Policy to performance.
Here are related recommended power settings from svr-info.
Running Models with Intel Optimized Docker Image
Set Directories
Set the directories on the host system where model, dataset, and log files will reside. These locations will retain model and data content between Docker sessions.
export DATA_DIR=${PWD}/data
export MODEL_DIR=${PWD}/model
export LOG_DIR=${PWD}/logs
Launch the Docker Image
In the Host OS environment, run the following after setting the proper Docker image. If the Docker image is not on the system already, it will be retrieved from the registry. If retrieving the model or dataset, ensure any necessary proxy settings are run inside the container.
Xeon
Here is a table of the currently supported models and release versions. It is recommended to use the latest release for each model.
| Models |
|---|
| dlrmv2, retinanet, llama3.18bcpu, whisper, rgat |
export DOCKER_IMAGE="intel/intel-optimized-pytorch:mlperf-inference-5.1-<model>"
# Please choose <model> from model={retinanet,dlrmv2, rgat, whisper, llama3.1_8b_cpu}
e.g.
export DOCKER_IMAGE="intel/intel-optimized-pytorch:mlperf-inference-5.1-retinanet"
docker run --privileged -it --rm \
        --ipc=host --net=host --cap-add=ALL \
        -e http_proxy=${http_proxy} \
        -e https_proxy=${https_proxy} \
        -e HTTP_PROXY=${http_proxy} \
        -e HTTPS_PROXY=${https_proxy} \
        -e no_proxy=${no_proxy} \
        -v ${DATA_DIR}:/data \
        -v ${MODEL_DIR}:/model \
        -v ${LOG_DIR}:/logs \
        --workdir  /workspace \
        ${DOCKER_IMAGE} /bin/bash
Download the Model [one-time operation]
Run this step inside the Docker container. This is a one-time operation which will preserve the model on the host system using the volume mapping above.
bash scripts/download_model.sh
Note : For Llama3.1 8b model, users can also follow MLcomm instructions instead.
Download the Dataset [one-time operation]
Run this step inside the Docker container. This is a one-time operation which will preserve the dataset on the host system using the volume mapping above.
bash scripts/download_dataset.sh
Note : For Llama3.1 8b model, users need to follow MLcomm instructions instead.
Calibrate the Model [one-time operation]
Xeon
Run this step inside the Docker container. This is a one-time operation, and the resulting calibrated model will be stored along with the original model file.
bash scripts/run_calibration.sh
Run Benchmark
Run this step inside the Docker container. Select the appropriate scenario. If this is the first time running this workload, the original model file will be calibrated to INT8 and stored alongside the original model file (one-time operation).
Performance
SCENARIO=Offline MODE=Performance bash run_mlperf.sh
SCENARIO=Server  MODE=Performance bash run_mlperf.sh
NOTE: To change target QPS for offline or server run, export OFFLINEQPS=xxxxxx for Offline run and export SERVERQPS=xxxxx for Xeon server run. To update Gaudi3 QPS, update the Server QPS in /workspace/systems/user.conf.GAUDI3_8C
Accuracy
SCENARIO=Offline MODE=Accuracy  bash run_mlperf.sh
SCENARIO=Server  MODE=Accuracy  bash run_mlperf.sh
# 3D-UNet workload does not have Server mode
Run Compliance Tests
NOTE: Please bypass this step for GPT-J model. Compliance tests are not required https://github.com/mlcommons/policies/blob/master/submission_rules.adoc#5132-inference.
Run this step inside the Docker container. After the benchmark scenarios have been run and results exist in {LOGDIR}/results, run this step to complete compliance runs. Compliance output will be found in '{LOGDIR}/compliance'.
SCENARIO=Offline MODE=Compliance  bash run_mlperf.sh
SCENARIO=Server  MODE=Compliance  bash run_mlperf.sh
After the compliance test, the logs will reside in /logs/compliance.
Validate Submission Checker
For submissions only: There are several files you should modify before running the submission checker. Here are the changes:
- In the systems folder, there are JSON files. Pick the right json file for your platform and change the following fields as needed: submitter, system_name, and hw_notes.
Run this step inside the Docker container. The following script will perform accuracy log truncation and run the submission checker on the contents of {LOGDIR}. The source scripts are distributed as MLPerf Inference reference tools. Ensure the submission content has been populated before running. The script output is transient and destroyed after running. The original content of ${LOGDIR} is not modified.
NOTE: Please change the system to 1-node-2S-GNR_128C if you use Intel® Xeon® 6980P Processor or 1-node-8C-GAUDI3.json for 8 Gaudi3 cards.
VENDOR=Intel SYSTEM=1-node-2S-GNR_86C bash scripts/prepare_submission.sh
Get Started with Intel MLPerf v5.0 Submission with Intel Optimized Docker Images
Get Started with Intel MLPerf v5.0 Inference Submission with Intel Optimized Docker Images
MLPerf is a benchmark for measuring the performance of machine learning systems. It provides a set of performance metrics for a variety of machine learning tasks, including image classification, object detection, machine translation, and others. The benchmark is representative of real-world workloads and as a fair and useful way to compare the performance of different machine learning systems.
In this document, we'll show how to run Intel MLPerf v5.0 submission with Intel optimized Docker images and the prepared scripts.
Publications
MLPerf 5.0 on Dell Poweredge R670
MLPerf 5.0 on Cisco UCS C240
Verified HW configuration:
Xeon
| System Info | Configuration detail |
|---|---|
| CPU | The Intel® Xeon® 6980P and 6787P Processor (GNR) |
| Memory | 2304GB (24x96GB [8800MT/s]) |
| Disk | 1TB NVMe |
BIOS settings:
Xeon
| BIOS setting | Recommended value |
|---|---|
| Hyperthreading | Disabled |
| Turbo Boost | Enabled |
| Core Prefetchers | Hardware,Adjacent Cache,DCU Streamer,DCU IP |
| LLC Prefetch | Disable |
| CPU Power and Perf Policy | Performance |
| NUMA-based Cluster | SNC Enabled |
| Hardware P State | Native (based on OS guidance) |
| Energy Perf Bias | OS Controls EPB |
| Energy Efficient Turbo | Disabled |
Please also refer to Intel® Xeon® 6 Processors - Birch Stream Platform Performance and Power Optimization Guide for more details.
Verified OS configurations:
Xeon
| System Info | Configuration detail |
|---|---|
| OS | CentOS Stream 8 |
| Kernel | 6.6.8-1.el8.elrepo.x86_64 |
Check System Health Using PerfSpect:
PerfSpect is a Linux OS utility for assessing the state and health of Intel Xeon computers. It is suggested to use PerfSpect first to check any system configuration issue before running any benchmark.
Follow the Quick Start Guide for downloading and installation, and get the system configuration reports by using perfspect report
Xeon
The following are several key factors effecting the model performance for Xeon.
CPU
Couple CPU features impact MLPerf performance via related BIOS knobs, so please double check the CPU features with your BIOS knobs.
Some important CPU features are Hyperthreading, number of NUMA nodes, Prefetchers and Intel Turbo Boost.
Please also check your CPU tempertures. The CPU temperture should not be higher than 50 degrees C.
Overheating will drop the CPU frequency and degrade the MLPerf performance.
Memory
One important system configuration is balanced DIMM population, which is suggested to set as balanced to get optimized performance.
Populate as many channels per socket as possible prior to adding additional DIMMs to the channel.
It might impact the memory bandwidth if two dimm share one channel.
Please also refer to Chapter 4 in Eagle Stream Platform Performance & Power Optimization Guide for more details.
From the results of svr-info, an example of unbalanced DIMM population is shown as follows,
An exmaple of Balanced DIMM population is shown as follows,
You should also see good numbers for memory NUMA bandwidth if you also benchmark memory via svr-info.
Here are some reference numbers from a 2S SPR system.
Power
We recommend the intel_pstate Frequency Driver.
For best performance, set the Frequency Governor and Power and Perf Policy to performance.
Here are related recommended power settings from svr-info.
Running Models with Intel Optimized Docker Image
Set Directories
Set the directories on the host system where model, dataset, and log files will reside. These locations will retain model and data content between Docker sessions.
export DATA_DIR=${PWD}/data
export MODEL_DIR=${PWD}/model
export LOG_DIR=${PWD}/logs
Launch the Docker Image
In the Host OS environment, run the following after setting the proper Docker image. If the Docker image is not on the system already, it will be retrieved from the registry. If retrieving the model or dataset, ensure any necessary proxy settings are run inside the container.
Xeon
Here is a table of the currently supported models and release versions. It is recommended to use the latest release for each model.
| Models |
|---|
| resnet50, dlrmv2, retinanet, 3dunet, gptj, rgat |
export DOCKER_IMAGE="intel/intel-optimized-pytorch:mlperf-inference-5.0-<model>"
# Please choose <model> from model={resnet50,retinanet,3dunet,dlrmv2,gptj}
e.g.
export DOCKER_IMAGE="intel/intel-optimized-pytorch:mlperf-inference-5.0-resnet50"
docker run --privileged -it --rm \
        --ipc=host --net=host --cap-add=ALL \
        -e http_proxy=${http_proxy} \
        -e https_proxy=${https_proxy} \
        -v ${DATA_DIR}:/data \
        -v ${MODEL_DIR}:/model \
        -v ${LOG_DIR}:/logs \
        --workdir  /workspace \
        ${DOCKER_IMAGE} /bin/bash
Download the Model [one-time operation]
Run this step inside the Docker container. This is a one-time operation which will preserve the model on the host system using the volume mapping above.
bash scripts/download_model.sh
Download the Dataset [one-time operation]
Run this step inside the Docker container. This is a one-time operation which will preserve the dataset on the host system using the volume mapping above.
bash scripts/download_dataset.sh
Calibrate the Model [one-time operation]
Xeon
Run this step inside the Docker container. This is a one-time operation, and the resulting calibrated model will be stored along with the original model file.
bash scripts/run_calibration.sh
Run Benchmark
Run this step inside the Docker container. Select the appropriate scenario. If this is the first time running this workload, the original model file will be calibrated to INT8 and stored alongside the original model file (one-time operation).
Performance
SCENARIO=Offline MODE=Performance bash run_mlperf.sh
SCENARIO=Server  MODE=Performance bash run_mlperf.sh
NOTE: To change target QPS for offline or server run, export OFFLINEQPS=xxxxxx for Offline run and export SERVERQPS=xxxxx for Xeon server run. To update Gaudi3 QPS, update the Server QPS in /workspace/systems/user.conf.GAUDI3_8C
Accuracy
SCENARIO=Offline MODE=Accuracy  bash run_mlperf.sh
SCENARIO=Server  MODE=Accuracy  bash run_mlperf.sh
# 3D-UNet workload does not have Server mode
Run Compliance Tests
NOTE: Please bypass this step for GPT-J model. Compliance tests are not required https://github.com/mlcommons/policies/blob/master/submission_rules.adoc#5132-inference.
Run this step inside the Docker container. After the benchmark scenarios have been run and results exist in {LOGDIR}/results, run this step to complete compliance runs. Compliance output will be found in '{LOGDIR}/compliance'.
SCENARIO=Offline MODE=Compliance  bash run_mlperf.sh
SCENARIO=Server  MODE=Compliance  bash run_mlperf.sh
After the compliance test, the logs will reside in /logs/compliance.
Validate Submission Checker
For submissions only: There are several files you should modify before running the submission checker. Here are the changes:
- In the systems folder, there are JSON files. Pick the right json file for your platform and change the following fields as needed: submitter, system_name, and hw_notes.
Run this step inside the Docker container. The following script will perform accuracy log truncation and run the submission checker on the contents of {LOGDIR}. The source scripts are distributed as MLPerf Inference reference tools. Ensure the submission content has been populated before running. The script output is transient and destroyed after running. The original content of ${LOGDIR} is not modified.
NOTE: Please change the system to 1-node-2S-GNR_128C if you use Intel® Xeon® 6980P Processor or 1-node-8C-GAUDI3.json for 8 Gaudi3 cards.
VENDOR=Intel SYSTEM=1-node-2S-GNR_86C bash scripts/prepare_submission.sh
Get Started with Intel MLPerf v4.1 Submission with Intel Optimized Docker Images
Get Started with Intel MLPerf v4.1 Inference Submission with Intel Optimized Docker Images
MLPerf is a benchmark for measuring the performance of machine learning systems. It provides a set of performance metrics for a variety of machine learning tasks, including image classification, object detection, machine translation, and others. The benchmark is representative of real-world workloads and as a fair and useful way to compare the performance of different machine learning systems.
In this document, we'll show how to run Intel MLPerf v4.1 submission with Intel optimized Docker images and the prepared scripts.
Verified HW configuration:
| System Info | Configuration detail |
|---|---|
| CPU | Intel 5th gen Xeon scalable server processor (EMR) |
| Memory | 1024GB (16x64GB 5600MT/s [5600MT/s]) |
| Disk | 1TB NVMe |
BIOS settings:
| BIOS setting | Recommended value |
|---|---|
| Hyperthreading | Enabled |
| Turbo Boost | Enabled |
| Core Prefetchers | Hardware,Adjacent Cache,DCU Streamer,DCU IP |
| LLC Prefetch | Disable |
| CPU Power and Perf Policy | Performance |
| NUMA-based Cluster | SNC Enabled |
| Hardware P State | Native (based on OS guidance) |
| Energy Perf Bias | OS Controls EPB |
| Energy Efficient Turbo | Disabled |
Please also refer to 5th Gen Intel® Xeon® Scalable Family (Emerald Rapids) Eagle Stream - Platform Performance and Power Optimization Guide for more details.
Verified OS configurations:
| System Info | Configuration detail |
|---|---|
| OS | CentOS Stream 8 |
| Kernel | 6.6.8-1.el8.elrepo.x86_64 |
Check System Health Using Intel® System Health Inspector:
Intel® System Health Inspector (aka svr-info) is a Linux OS utility for assessing the state and health of Intel Xeon computers. It is suggested to use svr-info first to check any system configuration issue before running any benchmark. Follow the Quick Start Guide for downloading and installation. The following are several key factors effecting the model performance.
CPU
Couple CPU features impact MLPerf performance via related BIOS knobs, so please double check the CPU features with your BIOS knobs.
Some important CPU features are Hyperthreading, number of NUMA nodes, Prefetchers and Intel Turbo Boost.
Please also check your CPU tempertures. The CPU temperture should not be higher than 50 degrees C.
Overheating will drop the CPU frequency and degrade the MLPerf performance.
Memory
One important system configuration is balanced DIMM population, which is suggested to set as balanced to get optimized performance.
Populate as many channels per socket as possible prior to adding additional DIMMs to the channel.
It might impact the memory bandwidth if two dimm share one channel.
Please also refer to Chapter 4 in Eagle Stream Platform Performance & Power Optimization Guide for more details.
From the results of svr-info, an example of unbalanced DIMM population is shown as follows,
An exmaple of Balanced DIMM population is shown as follows,
You should also see good numbers for memory NUMA bandwidth if you also benchmark memory via svr-info.
Here are some reference numbers from a 2S SPR system.
Power
We recommend the intel_pstate Frequency Driver.
For best performance, set the Frequency Governor and Power and Perf Policy to performance.
Here are related recommended power settings from svr-info.
Running Models with Intel Optimized Docker Image
Set Directories
Set the directories on the host system where model, dataset, and log files will reside. These locations will retain model and data content between Docker sessions.
export DATA_DIR=${PWD}/data
export MODEL_DIR=${PWD}/model
export LOG_DIR=${PWD}/logs
Launch the Docker Image
In the Host OS environment, run the following after setting the proper Docker image. If the Docker image is not on the system already, it will be retrieved from the registry. model={resnet50,gptj,retinanet,bert,3dunet,dlrmv2} If retrieving the model or dataset, ensure any necessary proxy settings are run inside the container.
export DOCKER_IMAGE="intel/intel-optimized-pytorch:mlperf-inference-4.1-<model>"
# Please choose <model> from model={resnet50,gptj,retinanet,bert,3dunet,dlrmv2}

docker run --privileged -it --rm \
        --ipc=host --net=host --cap-add=ALL \
        -e http_proxy=${http_proxy} \
        -e https_proxy=${https_proxy} \
        -v ${DATA_DIR}:/data \
        -v ${MODEL_DIR}:/model \
        -v ${LOG_DIR}:/logs \
        --workdir  /workspace \
        ${DOCKER_IMAGE} /bin/bash
Download the Model [one-time operation]
Run this step inside the Docker container. This is a one-time operation which will preserve the model on the host system using the volume mapping above.
bash download_model.sh
Download the Dataset [one-time operation]
Run this step inside the Docker container. This is a one-time operation which will preserve the dataset on the host system using the volume mapping above.
bash download_dataset.sh
Calibrate the Model [one-time operation]
Run this step inside the Docker container. This is a one-time operation, and the resulting calibrated model will be stored along with the original model file.
bash run_calibration.sh
Run Benchmark
Select the appropriate scenario. If this is the first time running this workload, the original model file will be calibrated to INT8 (INT4 for GPT-J) and stored alongside the original model file (one-time operation).
SCENARIO=Offline ACCURACY=false bash run_mlperf.sh
SCENARIO=Server  ACCURACY=false bash run_mlperf.sh
SCENARIO=Offline ACCURACY=true  bash run_mlperf.sh
SCENARIO=Server  ACCURACY=true  bash run_mlperf.sh
# 3D-UNet workload does not have Server mode
You can also choose to run all benchmarks with one script.
bash run_all_scenarios.sh
Run Compliance Tests
NOTE: Please bypass this step for GPT-J model. Compliance tests are not required https://github.com/mlcommons/policies/blob/master/submission_rules.adoc#5132-inference.
Run this step inside the Docker container. After the benchmark scenarios have been run and results exist in {LOGDIR}/results, run this step to complete compliance runs. Compliance output will be found in '{LOGDIR}/compliance'.
bash run_compliance.sh
After the compliance test, the logs will reside in /logs/compliance.
NOTE: If users want to use previous benchmark results for compliance test, please put the previous results under
/logs/results/${SYSTEM}/${WORKLOAD}/${SCENARIO},e.g., "/logs/results/1-node-2S-EMR-PyTorch/resnet50/" for resnet50), inside the docker container before runningrun_compliance.sh. The workload must match the name of the code folder for that particular model i.e. "3d-unet-99.9", not just "3d-unet".
Create Submission Content
Run this step inside the Docker container. The following script will compile and structure the MLPerf Inference submission content into {LOG_DIR}, including 'code', 'calibration', 'measurements', and 'systems'. Ensure the system and measurement description files contained in '/workspace/descriptions' are correct and aligned with your institute before preceding. Optionally pass 'CLEAR_CONTENT=true' to delete any existing 'code', 'calibration', and 'measurements' content before populating.
# Ensure the correctness of '/workspace/descriptions/systems'.
# Ensure the correctness of '/workspace/descriptions/measurements'.
bash populate_submission.sh

# [Optional] Alternatively, if you want to remove previously created contents:
# SYSTEMS_FILE=/logs/systems/1-node-2S-EMR-PyTorch.json CLEAR_CONTENT=true bash populate_submission.sh
Validate Submission Checker
For submissions only: There are several files you should modify before running the submission checker. Here are the changes:
- In the systems folder, there is a JSON file. Change the following fields as needed: submitter, system_name, and hw_notes.
- In default.conf, modify SYSTEM_DEFAULT as needed and ensure all paths in DEL_FILES_DEFAULT containers your company name rather than "OEM".
- In run_submission_checker.sh, change VENDOR from "OEM" to your company name.
Run this step inside the Docker container. The following script will perform accuracy log truncation and run the submission checker on the contents of {LOGDIR}. The source scripts are distributed as MLPerf Inference reference tools. Ensure the submission content has been populated before running. The script output is transient and removed after running. The original content of ${LOGDIR} is not modified.
bash run_submission_checker.sh
Get Started with Intel MLPerf v4.0 Submission with Intel Optimized Docker Images
Get Started with Intel MLPerf v4.0 Submission with Intel Optimized Docker Images
MLPerf is a benchmark for measuring the performance of machine learning systems. It provides a set of performance metrics for a variety of machine learning tasks, including image classification, object detection, machine translation, and others. The benchmark is representative of real-world workloads and as a fair and useful way to compare the performance of different machine learning systems.
In this document, we'll show how to run Intel MLPerf v4.0 submission with Intel optimized Docker images and the automation scripts.
HW configuration:
| System Info | Configuration detail |
|---|---|
| CPU | Intel 5th gen Xeon scalable server processor (EMR) |
| OS | CentOS Stream 8 |
| Kernel | 6.6.8-1.el8.elrepo.x86_64 |
| Memory | 1024GB (16x64GB 5600MT/s [5600MT/s]) |
| Disk | 1TB NVMe |
BIOS settings:
| BIOS setting | Recommended value |
|---|---|
| Hyperthreading | Enabled |
| Turbo Boost | Enabled |
| Core Prefetchers | Hardware,Adjacent Cache,DCU Streamer,DCU IP |
| LLC Prefetch | Disable |
| CPU Power and Perf Policy | Performance |
| NUMA-based Cluster | SNC Enabled |
| Hardware P State | Native (based on OS guidance) |
| Energy Perf Bias | OS Controls EPB |
| Energy Efficient Turbo | Disabled |
Check System Health Using Intel® System Health Inspector:
Intel® System Health Inspector (aka svr-info) is a Linux OS utility for assessing the state and health of Intel Xeon computers. It is suggested to use svr-info first to check any system configuration issue before running any benchmark. Follow the Quick Start Guide for downloading and installation. The following are several key factors effecting the model performance.
CPU
Couple CPU features impact MLPerf performance via related BIOS knobs, so please double check the CPU features with your BIOS knobs.
Some important CPU features are Hyperthreading, number of NUMA nodes, Prefetchers and Intel Turbo Boost.
Please also check your CPU tempartures. The CPU temparture should not be higher than 50 degrees C.
Overheating will drop the CPU frequency and degrade the MLPerf performance.
Memory
One important system configuration is balanced DIMM population, which is suggested to set as balanced to get optimized performance.
Populate as many channels per socket as possible prior to adding additional DIMMs to the channel.
It might impact the memory bandwidth if two dimm share one channel.
Please also refer to Chapter 4 in Eagle Stream Platform Performance & Power Optimization Guide for more details.
From the results of svr-info, an example of unbalanced DIMM population is shown as follows,
An exmaple of Balanced DIMM population is shown as follows,
You should also see good numbers for memory NUMA bandwidth if you also benchmark memory via svr-info.
Here are some reference numbers from a 2S SPR system.
Power
We recommend the intel_pstate Frequency Driver.
For best performance, set the Frequency Governor and Power and Perf Policy to performance.
Here are related recommended power settings from svr-info.
Published Performance Numbers
All performance numbers are published in https://mlcommons.org/benchmarks/inference-datacenter/ Here are submitted numbers on Intel 5th gen Xeon scalable server processor (EMR) from different organizations.
| 3d-unet-99.9 | bert-99 | dlrm-v2-99.9 | gptj-99 | resnet | retinanet | rnnt | ||||||||||
|---|---|---|---|---|---|---|---|---|---|---|---|---|---|---|---|---|
| Offline | Offline | Server | Offline | Server | Offline | Server | Offline | Server | Offline | Server | Offline | Server | ||||
| Organization | System Name (click + for details) | Host Processor Core Count | Processor | Samples/s | Samples/s | Queries/s | Samples/s | Queries/s | Samples/s | Queries/s | Samples/s | Queries/s | Samples/s | Queries/s | Samples/s | Queries/s |
| Intel | 1-node-2S-EMR-PyTorch | 64 | INTEL® XEON® PLATINUM 8592+ | 2.02 | 1,668.50 | 1,318.51 | 9,111.08 | 8,993.63 | 3.61 | 1.64 | 25,289.60 | 19,807.20 | 371.08 | 274.28 | 8,679.48 | 5,797.60 |
| Cisco | 1-node-2S-C240M7-EMR-PyTorch-INT8 | 64 | Intel® Xeon® Platinum 8592+ | 1,693.17 | 1,318.51 | 2.39 | 1.03 | 25,704.90 | 19,807.20 | 389.26 | 303.84 | 8,904.66 | 5,797.60 | |||
| Dell | Dell PowerEdge R760 | 64 | Intel® Xeon® Platinum 8592+ | 1.95 | 1,701.39 | 1,318.51 | 9,239.74 | 8,993.63 | 2.37 | 1.03 | 25,016.00 | 19,807.20 | 382.64 | 299.00 | 8,745.76 | 5,797.60 |
| QuantaCloudTechnology | 1-node-2S-EMR-PyTorch-INT8 | 64 | Intel® Xeon® Platinum 8592+ | 2.04 | 1,660.75 | 1,288.54 | 9,245.77 | 8,193.78 | 2.29 | 1.03 | 25,173.00 | 23,198.70 | 379.78 | 279.30 | 8,463.18 | 5,797.60 |
| Supermicro | 1-node-2S-EMR-PyTorch-INT8 | 56 | Intel® Xeon® Platinum 8592+ | 1.97 | 24,146.00 | 19,807.20 | ||||||||||
| Wiwynn | Wiwynn ES200G2 (1-node-1S-EMR-PyTorch) | 32 | INTEL® XEON® GOLD 6538Y+ | 0.67 | 467.94 | 328.85 | 0.64 | 0.26 | 7,402.87 | 4,951.10 | 109.10 | 61.23 | 2,195.42 | 1,448.78 |
Prerequisite
Get Intel MLPerf 4.0 Inferece package from MLCOMMONS
Users could get the Intel MLPerf 4.0 Inferece package from https://github.com/mlcommons/inferenceresultsv4.0 hosted by MLCOMMONS.
Please follow below command to get the whole MLPerf 4.0 Inference package
git clone https://github.com/mlcommons/inference_results_v4.0.git
The Intel MLPerf Inference package is under inferenceresultsv4.0/closed/Intel folder.
The model codes are under code folder, and we recommended users to use automation script to run all models.
Environment Setup for the automation scripts from Intel Inference package
We provides a kit to automate data ingestion, preprocessing, testing, log collection and submission checker. It requires the following software:
- python 3.9/3.10, pip, docker, wget, unzip, rclone, miniconda3/anaconda3
Note that the following approaches are supported for installing dependencies:
- Install directly
- Install in a conda environment
- Install in a python virtual environment
For the option #2 and #3, you need to create the environment and activate it first before installation.
Install the dependencies by:
cd inference_results_v4.0/closed/Intel/code/automation
pip3 install -r requirements.txt
If your servers are working behind network proxy, please ensure docker proxy and the following environment parameters are well configured:
- httpproxy, HTTPPROXY, httpsproxy, HTTPSPROXY, noproxy, NOPROXY, ftpproxy, FTPPROXY, socksproxy, SOCKSPROXY
Downloading data and models by using automation scripts
First, go to automation folder to automate the data and model downloading.
cd inference_results_v4.0/closed/Intel/code/automation
Conda is required for downloading datasets and models. Please install Conda before proceeding. Once Conda is installed, you can download the datasets and models using the following commands:
model={resnet50,retinanet,rnnt,3d-unet,bert,gpt-j,dlrm_2,stable_diffusion,all} output_dir=<DATA_PATH> conda_path=<CONDA_ROOT_PATH> bash download_data.sh
Parameters:
- model: specify a model name,
allmeans all models. - output_dir: the directory to persist data and model.
- conda_path: optional, ${HOME}/miniconda3 by default, root path of your conda, used by 3d-unet, retinanet and gpt-j only.
- dtype: optional, int8 by default, data preicision, currently unused
Download data for all models by using the following command:
model=all output_dir=<DATA_PATH> conda_path=<CONDA_ROOT_PATH> bash download_data.sh
For specific models, e.g. gpt-j, DLRMv2 and Stable Diffusion, Rclone is needed. If you don't have Rclone already installed, you can install it on Linux/MacOS with one simple command:
sudo -v ; curl https://rclone.org/install.sh | sudo bash
For specific worload, e.g. gpt-j int4, use the following command:
model=gpt-j output_dir=<DATA_PATH> conda_path=<CONDA_ROOT_PATH> dtype=int4 bash download_data.sh
Running Models by using automation scripts
First, go to automation folder to run models with scripts.
cd inference_results_v4.0/closed/Intel/code/automation
Customize your test by the following parameters:
DATA_DIR=<output_dir of download_data.sh>
OUTPUT_DIR=<The directory to save logs and results>
SUFFIX=<suffix to avoid duplicate container names>
Create output diretory if it does not exist:
mkdir -p ${OUTPUT_DIR}
Launch complete benchmark by using the following commands:
| Benchmark | Hardware | Precision | Command |
|---|---|---|---|
| 3d-unet-99.9 | CPU | int8 | python3 run.py -n 3d-unet-99.9 -d ${DATA_DIR} -m ${DATA_DIR} -t ${OUTPUT_DIR} -x ${SUFFIX} |
| bert-99 | CPU | int8 | python3 run.py -n bert-99 -d ${DATA_DIR}/bert/dataset -m ${DATA_DIR}/bert/model -t ${OUTPUT_DIR} -x ${SUFFIX} |
| dlrm-v2-99.9 | CPU | int8 | python3 run.py -n dlrm-v2-99.9 -i pytorch-cpu-int8 -d ${DATA_DIR}/dlrm_2/data -m ${DATA_DIR}/dlrm_2/model -t ${OUTPUT_DIR} -x ${SUFFIX} |
| gptj-99 | CPU | int4 | python3 run.py -n gptj-99 -d ${DATA_DIR}/gpt-j/data -m ${DATA_DIR}/gpt-j/data -t ${OUTPUT_DIR} -y int4 -x ${SUFFIX} |
| rnnt | CPU | mix | python3 run.py -n rnnt -d ${DATA_DIR}/rnnt/mlperf-rnnt-librispeech -m ${DATA_DIR}/rnnt/mlperf-rnnt-librispeech -t ${OUTPUT_DIR} -y mix -x ${SUFFIX} |
| resnet50 | CPU | int8 | python3 run.py -n resnet50 -d ${DATA_DIR}/resnet50 -m ${DATA_DIR}/resnet50 -t ${OUTPUT_DIR} -x ${SUFFIX} |
| retinanet | CPU | int8 | python3 run.py -n retinanet -d ${DATA_DIR}/retinanet/data -m ${DATA_DIR}/retinanet/data -t ${OUTPUT_DIR} -x ${SUFFIX} |
More options to customize your tests:
usage: run.py [-h] -n {rnnt,bert-99,3d-unet-99.9,resnet50,retinanet,dlrm-v2-99.9}
              [-i IMPLEMENTATION] [-y {int8,bf16,fp16,int4,fp32,mix}] -d DATASET -m MODEL_DIR
              -t OUTPUT -x CONTAINER_NAME_SUFFIX [-p] [-a] [-o] [-s] [-c] [-b] [-r] [-z]

options:
  -h, --help            show this help message and exit
  -n {rnnt,bert-99,3d-unet-99.9,resnet50,retinanet,dlrm-v2-99.9}, --model {rnnt,bert-99,3d-unet-99.9,resnet50,retinanet,dlrm-v2-99.9}
                        Benchmarking model
  -i IMPLEMENTATION, --implementation IMPLEMENTATION
                        Implementation id
  -y {int8,bf16,fp16,int4,fp32,mix}, --dtype {int8,bf16,fp16,int4,fp32,mix}
                        Precision
  -d DATASET, --dataset-dir DATASET_DIR
                        path of the datasets
  -m MODEL_DIR, --model-dir MODEL_DIR
                        path of the models
  -t OUTPUT, --output OUTPUT
                        path of the outputs
  -x CONTAINER_NAME_SUFFIX, --container-name-suffix CONTAINER_NAME_SUFFIX
                        The suffix of docker container name, used for avoiding name conflicts.
  -p, --performance-only
                        The option of running performance test only.
  -a, --accuracy-only   The option of running accuracy test only.
  -o, --offline-only    The option of running offline scenario only.
  -s, --server-only     The option of running server scenario only.
  -c, --compliance-only
                        The option of running compliance test only.
  -b, --skip-docker-build
                        The option of skipping building docker image.
  -u, --skip-create-container
                        The option of skipping docker build and container creation.
  -r, --skip-data-preprocess
                        The option of skipping data preprocessing.
  -z, --ci-run
                        The option of running ci testings
To save time, rerun a benchmark directly within a running container without rebuilding the Docker image, creating the container and data preprocessing. For example, to rerun the bert-99 benchmark, use this command:
python3 run.py -n bert-99 -d ${DATA_DIR}/bert/dataset -m ${DATA_DIR}/bert/model -t ${OUTPUT_DIR} -x ${SUFFIX} -u -r
You can run a specific test of a benchmark in a specific mode. E.g. run bert-99 accuracy test at Offline mode by using the following command:
python3 run.py -n bert-99 -d ${DATA_DIR}/bert/dataset -m ${DATA_DIR}/bert/model -t ${OUTPUT_DIR} -x ${SUFFIX} -o -a
Test outputs
- Runtime log:
mlperf.log - Preprocessing log:
${OUTPUT_DIR}/preproc_<benchmark>_<implementation>_<precision>.log - Results of Performance/Accuracy run:
${OUTPUT_DIR}/<division>/Intel/results/<system_desc_id>/<benchmark>/<scenario> - Results of compliance test:
${OUTPUT_DIR}/<division>/Intel/compliance/<system_desc_id>/<benchmark>/<scenario>/<test_id> - Measurments:
${OUTPUT_DIR}/<division>/Intel/measurements/<system_desc_id>/<benchmark>/<scenario> - Runtime environment:
${OUTPUT_DIR}/env_<benchmark>_<impl>_<dtype>.log
Performing Submission Checker
- Create
${OUTPUT_DIR}/<division>/<orgnization>/systemsdirectory, and within it, create the<system_desc_id>.jsonand<system_desc_id>_<implementation_id>_<scenario>.jsonfiles according to submission rules. - Perform submission checker by running:
cd inference_results_v4.0/closed/Intel/code/automation
export TRUNCATED_OUTPUT_DIR=<a new directory to save truncated logs>
python3 submission_checker.py -i ${OUTPUT_DIR} -o ${TRUNCATED_OUTPUT_DIR}
Please make sure you have read permission of ${OUTPUT_DIR}, and r/w permission for ${TRUNCATED_OUTPUT_DIR} and /tmp
Trouble Shooting
TypeError: __init__() missing 1 required positional argument: 'status'
Solution: start docker serivce before launching the kit.
Performance regaresssion due to "Round Robin" MADT core enumeration
Solution: change "Round Robin" scheduling to "Linear"
Get Started with Intel MLPerf v3.1 Submission with Intel Optimized Docker Images
Get the latest MLPerf 3.1 release
MLPerf is a benchmark for measuring the performance of machine learning systems. It provides a set of performance metrics for a variety of machine learning tasks, including image classification, object detection, machine translation, and others. The benchmark is representative of real-world workloads and as a fair and useful way to compare the performance of different machine learning systems.
In this document, we'll show how to use the publicly accessible codes and scritps on GitHub, which was published by Mlcommons, to run Intel MLPerf v3.1 submission with Intel optimized Docker images. The following contents will refer to this GitHub repository as
Intel Docker Images for MLPerf
The Intel optimized Docker images for MLPerf v3.1 can be built using the Dockerfiles. Example for building docker image with Dockerfile:
Notice : please contact aice.mlperf@intel.com or aice@intel.com to get the latest patches for Intel mlperf inference release from mlcomm github repo
# Get the mlperf v3.1 workloads scritps from GitHub
git clone https://github.com/mlcommons/inference_results_v3.1.git
cd <THIS_REPO>/

# Get the latest patch from Intel to update Dockerfiles
git am 0001-update-dockerfiles-from-4.0-version.patch

# Use resnet50 docker build as an example to build all docker images
cd <THIS_REPO>/closed/Intel/code/resnet50/pytorch-cpu/docker/
bash build_resnet50_contanier.sh
HW configuration:
| System Info | Configuration detail |
|---|---|
| CPU | SPR |
| OS | CentOS Stream 8 |
| Kernel | 6.1.11-1.el8.elrepo.x86_64 |
| Memory | 1024GB (16x64GB 4800MT/s [4800MT/s]) |
| Disk | 1TB NVMe |
Recommmended BIOS Knobs:
| BIOS Knobs | Recommended Value |
|---|---|
| Hyperthreading | Enabled |
| Turbo Boost | Enabled |
| Core Prefetchers | Hardware,Adjacent Cache,DCU Streamer,DCU IP |
| LLC Prefetch | Disable |
| CPU Power and Perf Policy | Performance |
| NUMA-based Cluster | Disabled |
| Energy Perf Bias | Performance |
| Energy Efficient Turbo | Disabled |
Please also refer to Eagle Stream Platform Performance & Power Optimization Guide for more details.
Check System Health Using Intel® System Health Inspector:
Intel® System Health Inspector (aka svr-info) is a Linux OS utility for assessing the state and health of Intel Xeon computers. It is suggested to use svr-info first to check any system configuration issue before running any benchmark. Follow the Quick Start Guide for downloading and installation. The following are several key factors effecting the model performance.
CPU
Couple CPU features impact MLPerf performance via related BIOS knobs, so please double check the CPU features with your BIOS knobs.
Some important CPU features are Hyperthreading, number of NUMA nodes, Prefetchers and Intel Turbo Boost.
Memory
One important system configuration is balanced DIMM population, which is suggested to set as balanced to get optimized performance.
Populate as many channels per socket as possible prior to adding additional DIMMs to the channel.
It might impact the memory bandwidth if two dimm share one channel.
Please also refer to Chapter 4 in Eagle Stream Platform Performance & Power Optimization Guide for more details.
From the results of svr-info, an example of unbalanced DIMM population is shown as follows,
An exmaple of Balanced DIMM population is shown as follows,
You should also see good numbers for memory NUMA bandwidth if you also benchmark memory via svr-info.
Here are some reference numbers from a 2S SPR system.
Power
We recommend the intel_pstate Frequency Driver.
For best performance, set the Frequency Governor and Power and Perf Policy to performance.
Here are related recommended power settings from svr-info.
Best Known Configurations:
sudo bash run_clean.sh
Known Issues
"Too many open files" error
If users see "Too many open files" error while they build the docker image, the system configuratoin for the max number of open file might be too small.
Users could check the current setting by below command.
sysctl -r fs.file-max
If users see a small value like 10000, users could set a large value such as 980000 by below command.
sysctl -w fs.file-max=980000
Benchmarking using automation scripts
For your convinience, we prepare a set of automation scritps to help you download data, create docker, do data and model preprocessing, run accuracy, performance and compliance test in a batch. Please refer to ./automation/README.md for details about the usage. Example on for using automation scripts:
# Get the mlperf v3.1 workloads scritps from GitHub
git clone https://github.com/mlcommons/inference_results_v3.1.git

# Go to directory of automation scripts
cd <THIS_REPO>/closed/Intel/code/automation/

# Download dataset
bash download_dataset.sh <model> <location>
# <model> can be resnet50, retinanet, rnnt, 3d-unet-99.9, bert-99, gptj-99, or dlrm2-99.9
# <location> is where you save the data, which can be /data/mlperf_data

# Test model performance
PerformanceOnly="True" bash run.sh <model> <location>

# Test model Auccuracy
# Suppose you have done running the performance test workload, you can skip launching docker container and processing the data
Skip_docker_build="True" Skip_data_proprocess="True" AccuracyOnly="True" bash run.sh <model> <location>
For more details, please refer to the instructions in https://github.com/mlcommons/inferenceresultsv3.1/blob/main/closed/Intel/code/automation/README.md.
If you prefer to understand what the automation scripts do for you, we also provide instructions on how to run model performance/accuracy benchmarking step-by-step in the following sections.
Running models step-by-step
In the following sections, we'll show you how to set up and run each of the seven models:
Note: All the codes and scripts are publicly accissible and can be downloaded from GitHub. The following sessions will refer this GitHub repository as
Get started with DLRM2
step-by-step
If you haven't already done so, build the Intel optimized Docker image for DLRM using:
cd <THIS_REPO>/closed/Intel/code/dlrm-99.9/pytorch-cpu-int8/docker
# Please firstly refer to the prerequisite file in the current directory to download the compiler before building the Docker image.
bash build_dlrm-99.9_container.sh
Prerequisites
Use these commands to prepare the Deep Learning Recommendation Model (DLRM) dataset and model on your host system:
cd /data/   # or path to where you want to store the data
mkdir -p /data/mlperf_data/dlrm_2/model/bf16
mkdir -p /data/mlperf_data/dlrm_2/data_npy

# Prepare DLRM dataset
# Create a directory (such as /data/mlperf_data/dlrm_2/data_npy) which contain:
#        day_23_dense.npy
#     day_23_sparse_multi_hot.npz
#     day_23_labels.npy
#
# Learn how to get the dataset from:
#     https://github.com/mlcommons/inference/tree/master/recommendation/dlrm_v2/pytorch

# Prepare pre-trained DLRM model
cd /data/mlperf_data/dlrm_2/model/bf16
wget https://cloud.mlcommons.org/index.php/s/XzfSeLgW8FYfR3S/download
unzip weights.zip

cd <THIS_REPO>/closed/Intel/code/dlrm-99.9/pytorch-cpu/
export MODEL_DIR=/data/mlperf_data/dlrm_2/model/bf16


# dump model from snapshot to torch
bash run_dump_torch_model.sh
Note: wget commands use IPv6 by default, if your system uses IPv4, please add -4 option into the wget command to force it to use IPv4.
Set Up Environment
Follow these steps to set up the docker instance.
Start a Container
Use docker run to start a container with the optimized Docker image we pulled earlier.
Replace /path/of/dlrm with the dlrm folder path created earlier (/data/dlrm for example):
docker run --name intel_inference_dlrm_int8 --privileged -itd --net=host --ipc=host \
  -v /path/of/dlrm:/data/dlrm_2_dataset mlperf_inference_dlrm2:3.1
Login to Docker Container
Login into a bashrc shell in the Docker instance.
docker exec -it intel_inference_dlrm_int8 bash
Preprocess model and dataset
If you need a proxy to access the internet, replace your host proxy with
the proxy server for your environment. If no proxy is needed, you can skip
this step:
export http_proxy="your host proxy"
export https_proxy="your host proxy"
Calibrate and dump int8 model
cd /opt/workdir/code/dlrm2-99.9/pytorch-cpu-int8
bash ./run_calibration.sh
Note: runcalibration script does not need to finish, once you see rocauc output you can
ctrl+zto stop
Export model and dataset directory
# export model directory to saved model path
export MODEL_DIR=/data/mlperf_data/dlrm_2/model/bf16

# export dataset directory to saved dataset path where .npy .npz are stored.
export DATA_DIR=/data/mlperf_data/dlrm_2/data_npy
Run the Benchmark
# offline performance
source setup_env_offline.sh
bash run_main.sh offline int8

# offline accuracy
source setup_env_offline.sh
bash run_main.sh offline accuracy int8

# server performance
source setup_env_server.sh
bash run_main.sh server int8

# server accuracy
source setup_env_server.sh
bash run_main.sh server accuracy int8
Get Started with GPT-J
step-by-step
Download and Prepare Dataset
export WORKLOAD_DATA=/data/mlperf_data/gpt-j
mkdir -p ${WORKLOAD_DATA}
- Download cnn-dailymail calibration set
cd <THIS_REPO>/closed/Intel/code/gptj-99/pytorch-cpu/
python download-calibration-dataset.py --calibration-list-file calibration-list.txt --output-dir ${WORKLOAD_DATA}/calibration-data
- Download cnn-dailymail validation set
python download-dataset.py --split validation --output-dir ${WORKLOAD_DATA}/validation-data
Download and prepare model
- Get finetuned checkpoint
CHECKPOINT_DIR=${WORKLOAD_DATA}/gpt-j-checkpoint
wget https://cloud.mlcommons.org/index.php/s/QAZ2oM94MkFtbQx/download -O gpt-j-checkpoint.zip
unzip gpt-j-checkpoint.zip
mv gpt-j/checkpoint-final/ ${CHECKPOINT_DIR}
Note: wget commands use IPv6 by default, if your system uses IPv4, please add -4 option into the wget command to force it to use IPv4.
Build & Run Docker container from Dockerfile
If you haven't already done so, build the Intel optimized Docker image for GPT-J using:
cd <THIS_REPO>/closed/Intel/code/gptj-99/pytorch-cpu/docker
bash build_gpt-j_container.sh

docker run --name intel_gptj --privileged -itd --net=host --ipc=host -v ${WORKLOAD_DATA}:/opt/workdir/code/gptj-99/pytorch-cpu/data mlperf_inference_gptj:3.1
docker exec -it intel_gptj bash

cd code/gptj-99/pytorch-cpu
Generate quantized INT8 model
source setup_env.sh
bash run_quantization.sh
Run Benchmarks
- Offline (Performance)
bash run_offline.sh
- Offline (Accuracy)
bash run_offline_accuracy.sh
- Server (Performance)
bash run_server.sh
- Server (Accuracy)
bash run_server_accuracy.sh
Get Started with 3DUNET
step-by-step
If you haven't already done so, build the Intel optimized Docker image for 3DUNET using:
cd <THIS_REPO>/closed/Intel/code/3d-unet-99.9/pytorch-cpu/docker
bash build_3dunet_container.sh
Prerequisites
Use these commands to prepare the 3DUNET dataset and model on your host system:
mkdir 3dunet
cd 3dunet
git clone https://github.com/neheller/kits19
cd kits19
pip3 install -r requirements.txt
python3 -m starter_code.get_imaging
cd ..
Set Up Environment
Follow these steps to set up the docker instance and preprocess the data.
Start a Container
Use docker run to start a container with the optimized Docker image we pulled earlier.
Replace /path/of/3dunet with the 3dunet folder path created earlier:
docker run --name intel_3dunet --privileged -itd -v /path/to/3dunet:/root/mlperf_data/3dunet-kits --net=host --ipc=host mlperf_inference_3dunet:3.1
Login to Docker Instance
Login into a bashrc shell in the Docker instance.
docker exec -it intel_3dunet bash
Preprocess Data
If you need a proxy to access the internet, replace your host proxy with
the proxy server for your environment. If no proxy is needed, you can skip
this step:
export http_proxy="your host proxy"
export https_proxy="your host proxy"
Preprocess the data and download the model using the provided script:
cd code/3d-unet-99.9/pytorch-cpu/
bash process_data_model.sh
Run the Benchmark
# 3dunet only has offline mode
bash run.sh perf # offline performance
bash run.sh acc  # offline accuracy
Get the Results
Check log file. Performance results are in
./output/mlperf_log_summary.txt. Verify that you seeresults is: valid.For offline mode performance, check the field
Samples per second:Accuracy results are in
./output/accuracy.txt. Check the fieldmean =.The performance result is controled by the value of "targetqps" in user.conf file. The scripts will automatically select userdefault.conf file to calculate corresponding "targetqps" according to the number of sockets on customer's platform. Customers can also manully change the value of "targetqps" in corresponding user.conf files.
Save these output log files elsewhere when each test is completed as they will be overwritten by the next test.
Get started with BERT
step-by-step
The docker container can be created either by building it using the Dockerfile or pulling the image from Dockerhub (if available).
Build & Run Docker container from Dockerfile
If you haven't already done so, build and run the Intel optimized Docker image for BERT using:
cd <THIS_REPO>/closed/Intel/code/bert-99/pytorch-cpu/docker/

bash build_bert-99_contanier.sh
Prerequisites
Use these commands to prepare the BERT dataset and model on your host system:
cd /data/mlperf_data   # or path to where you want to store the data
mkdir bert
cd bert
mkdir dataset
wget https://rajpurkar.github.io/SQuAD-explorer/dataset/dev-v1.1.json -O dataset/dev-v1.1.json
git clone https://huggingface.co/bert-large-uncased model
cd model
wget https://zenodo.org/record/4792496/files/pytorch_model.bin?download=1 -O pytorch_model.bin
Note: wget commands use IPv6 by default, if your system uses IPv4, please add -4 option into the wget command to force it to use IPv4.
Set Up Environment
Follow these steps to set up the docker instance and preprocess the data.
Start a Container
Use docker run to start a container with the optimized Docker image we pulled or built earlier.
Replace /path/of/bert with the bert folder path created earlier (i.e. /data/mlperf_data/bert):
docker run --name bert_3-1 --privileged -itd --net=host --ipc=host -v /path/of/bert:/data/mlperf_data/bert <bert docker image ID>
Login to Docker Instance
Login into a bashrc shell in the Docker instance.
docker exec -it bert_3-1 bash
Convert Dataset and Model
If you need a proxy to access the internet, replace your host proxy with
the proxy server for your environment. If no proxy is needed, you can skip
this step:
export http_proxy="your host proxy"
export https_proxy="your host proxy"
cd code/bert-99/pytorch-cpu
export DATA_PATH=/data/mlperf_data/bert
bash convert.sh
Run the Benchmark
bash run.sh                    #offline performance
bash run.sh --accuracy         #offline accuracy
bash run_server.sh             #server performance
bash run_server.sh --accuracy  #server accuracy
Get the Results
Check the performance log file ./test_log/mlperf_log_summary.txt:
- Verify you see
results is: valid. - For offline mode performance, check the field
Samples per second: - For server mode performance, check the field
Scheduled samples per second: - The performance result is controled by the value of "targetqps" in user.conf file. The scripts will automatically select userdefault.conf file to calculate corresponding "targetqps" according to the number of sockets on customer's platform. Customers can also manully change the value of "targetqps" in corresponding user.conf files.
Check the accuracy log file ./test_log/accuracy.txt.
- Check the field
f1
Save these output log files elsewhere when each test is completed as they will be overwritten by the next test.
Get Started with ResNet50
step-by-step
The docker container can be created either by building it using the Dockerfile or pulling the image from Dockerhub (if available). Please download the Imagenet dataset on the host system before starting the container.
Download Imagenet Dataset for Calibration
Download ImageNet (50000) dataset
bash download_imagenet.sh
Build & Run Docker container from Dockerfile
If you haven't already done so, build and run the Intel optimized Docker image for ResNet50 using:
cd <THIS_REPO>/closed/Intel/code/resnet50/pytorch-cpu/docker/

bash build_resnet50_contanier.sh

docker run -v </path/to/ILSVRC2012_img_val>:/opt/workdir/code/resnet50/pytorch-cpu/ILSVRC2012_img_val -it --privileged <resnet docker image ID> /bin/bash

cd code/resnet50/pytorch-cpu
Prepare Calibration Dataset & Download Model ( Inside Container )
If you need a proxy to access the internet, replace your host proxy with the proxy server for your environment. If no proxy is needed, you can skip this step:
export http_proxy="your host proxy"
export https_proxy="your host proxy"
Prepare calibration 500 images into folders
bash prepare_calibration_dataset.sh
Download the model
bash download_model.sh
The downloaded model will be saved as resnet50-fp32-model.pth
Quantize Torchscript Model and Check Accuracy
- Set the following paths:
export DATA_CAL_DIR=calibration_dataset
export CHECKPOINT=resnet50-fp32-model.pth
- Generate scales and models
bash generate_torch_model.sh
The start and end parts of the model are also saved (respectively named) in models
Run Benchmark (Common for Docker & Baremetal)
export DATA_DIR=${PWD}/ILSVRC2012_img_val
export RN50_START=models/resnet50-start-int8-model.pth
export RN50_END=models/resnet50-end-int8-model.pth
export RN50_FULL=models/resnet50-full.pth
Performance
- Offline
bash run_offline.sh <batch_size>
Note:
- Server
bash run_server.sh
Accuracy
- Offline
bash run_offline_accuracy.sh <batch_size>
- Server
bash run_server_accuracy.sh
Get the Results
Check the ./mlperf_log_summary.txt log file:
- Verify you see
results is: valid. - For offline mode performance, check the field
Samples per second: - For server mode performance, check the field
Scheduled samples per second: - The performance result is controled by the value of "targetqps" in user.conf file. The scripts will automatically select userdefault.conf file to calculate corresponding "targetqps" according to the number of sockets on customer's platform. Customers can also manully change the value of "targetqps" in corresponding user.conf files.
Check the ./offline_accuracy.txt or ./server_accuracy.txt log file:
- Check the field
accuracy
Save these output log files elsewhere when each test is completed as they will be overwritten by the next test.
Get Started with Retinanet
step-by-step
The docker container can be created either by building it using the Dockerfile or pulling the image from Dockerhub (if available). Please download the Imagenet dataset on the host system before starting the container.
Download the dataset
- Install dependencies (python3.9 or above)
pip3 install --upgrade pip --user
pip3 install opencv-python-headless==4.5.3.56 pycocotools==2.0.2 fiftyone==0.16.5
- Setup env vars
CUR_DIR=$(pwd)
export WORKLOAD_DATA=${CUR_DIR}/data
mkdir -p ${WORKLOAD_DATA}

export ENV_DEPS_DIR=${CUR_DIR}/retinanet-env
- Download OpenImages (264) dataset
bash openimages_mlperf.sh --dataset-path ${WORKLOAD_DATA}/openimages
Images are downloaded to ${WORKLOAD_DATA}/openimages
- Download Calibration images
bash openimages_calibration_mlperf.sh --dataset-path ${WORKLOAD_DATA}/openimages-calibration
Calibration dataset downloaded to ${WORKLOAD_DATA}/openimages-calibration
Download Model
wget --no-check-certificate 'https://zenodo.org/record/6617981/files/resnext50_32x4d_fpn.pth' -O 'retinanet-model.pth'
mv 'retinanet-model.pth' ${WORKLOAD_DATA}/
Note: wget commands use IPv6 by default, if your system uses IPv4, please add -4 option into the wget command to force it to use IPv4.
Build & Run Docker container from Dockerfile
If you haven't already done so, build and run the Intel optimized Docker image for Retinanet using:
cd <THIS_REPO>/closed/Intel/code/retinanet/pytorch-cpu/docker/

bash build_retinanet_contanier.sh

docker run --name intel_retinanet --privileged -itd --net=host --ipc=host -v ${WORKLOAD_DATA}:/opt/workdir/code/retinanet/pytorch-cpu/data <resnet docker image ID>

docker exec -it intel_retinanet bash

cd code/retinanet/pytorch-cpu/
Calibrate and generate torchscript model
Run Calibration
CUR_DIR=$(pwd)
export WORKLOAD_DATA=${CUR_DIR}/data
export CALIBRATION_DATA_DIR=${WORKLOAD_DATA}/openimages-calibration/train/data
export MODEL_CHECKPOINT=${WORKLOAD_DATA}/retinanet-model.pth
export CALIBRATION_ANNOTATIONS=${WORKLOAD_DATA}/openimages-calibration/annotations/openimages-mlperf-calibration.json
bash run_calibration.sh
Set Up Environment
If you need a proxy to access the internet, replace your host proxy with the proxy server for your environment. If no proxy is needed, you can skip this step:
export http_proxy="your host proxy"
export https_proxy="your host proxy"
Export the environment settings
source setup_env.sh
Run the Benchmark
# Run one of these performance or accuracy scripts at a time
# since the log files will be overwritten on each run

# for offline performance
bash run_offline.sh

# for server performance
bash run_server.sh

# for offline accuracy
bash run_offline_accuracy.sh

# for server accuracy
bash run_server_accuracy.sh
Get the results
Check the ./mlperf_log_summary.txt log file:
- Verify you see
results is: valid. - For offline mode performance, check the field
Samples per second: - For server mode performance, check the field
Scheduled samples per second: - The performance result is controled by the value of "targetqps" in user.conf file. The scripts will automatically select userdefault.conf file to calculate corresponding "targetqps" according to the number of sockets on customer's platform. Customers can also manully change the value of "targetqps" in corresponding user.conf files.
Check the ./accuracy.txt log file:
- Check the field
mAP
Save these output log files elsewhere when each test is completed as they will be overwritten by the next test.
Get Started with RNNT
step-by-step
If you haven't already done so, build the Intel optimized Docker image for RNNT using:
cd <THIS_REPO>/closed/Intel/code/rnnt/pytorch-cpu/docker/
bash build_rnnt-99_container.sh
Set Up Environment
Follow these steps to set up the docker instance.
Start a Container
Use docker run to start a container with the optimized Docker image we built earlier.
docker run --name intel_rnnt --privileged -itd -v /data/mlperf_data:/data/mlperf_data --net=host --ipc=host mlperf_inference_rnnt:3.1
Login to Docker Container
Get the Docker container ID and login into a bashrc shell in the Docker instance using docker exec.
docker ps -a #get container "id"
docker exec -it <id> bash
cd /opt/workdir/code/rnnt/pytorch-cpu
- Setup env vars
export LD_LIBRARY_PATH=/opt/workdir/code/rnnt/pytorch-cpu/third_party/lib:$LD_LIBRARY_PATH
If you need a proxy to access the internet, replace your host proxy with the proxy server for your environment. If no proxy is needed, you can skip this step:
export http_proxy="your host proxy"
export https_proxy="your host proxy"
Run the Benchmark
The provided run.sh script abstracts the end-to-end process for RNNT:
| STAGE | STEP |
|---|---|
| 0 | Download model |
| 1 | Download dataset |
| 2 | Pre-process dataset |
| 3 | Calibration |
| 4 | Build model |
| 5 | Run Offline/Server accuracy & benchmark |
Run run.sh with STAGE=0 to invoke all the steps requried to run the benchmark (i.e download the model & dataset, preprocess the data, calibrate and build the model):
SKIP_BUILD=1 STAGE=0 bash run.sh
or to skip to stage 5 without previous steps: Offline/Server accuracy and benchmark:
SKIP_BUILD=1 STAGE=5 bash run.sh
Get the Results
Check the appropriate offline or server performance log files, either
./logs/Server/performance/.../mlperf_log_summary.txt or
./logs/Offline/performance/.../mlperf_log_summary.txt:
- Verify you see
results is: valid. - For offline mode performance, check the field
Samples per second: - For server mode performance, check the field
Scheduled samples per second: - The performance result is controled by the value of "targetqps" in user.conf file. The scripts will automatically select userdefault.conf file to calculate corresponding "targetqps" according to the number of sockets on customer's platform. Customers can also manully change the value of "targetqps" in corresponding user.conf files.
Check the appropriate offline or server accuracy log file, either
./logs/Server/accuracy/.../mlperf_log_summary.txt or
./logs/Offline/accuracy/.../mlperf_log_summary.txt:
Save these output log files elsewhere when each test is completed as they will be overwritten by the next test.
Check the appropriate offline or server accuracy log file, either
./logs/Server/accuracy/.../mlperf_log_summary.txt or
./logs/Offline/accuracy/.../mlperf_log_summary.txt:
Save these output log files elsewhere when each test is completed as they will be overwritten by the next test.
Complinace Test
To run compliance test please follow https://github.com/mlcommons/inference/tree/master/compliance/nvidia or use automation script introduced in next section.
Get Started with Intel MLPerf v3.0 Submission with Intel Optimized Docker Images
Get the latest MLPerf 3.0 release
Please follow the below commands to get the latest mlperf 3.0 release.
git clone https://github.com/mlcommons/inference_results_v3.0.git
cd inference_results_v3.0
wget https://raw.githubusercontent.com/intel-ai-tce/ai-documents/mlperf_patches/AEM/mlperf/patches/0001-updates-for-3.0-submission.patch
git am 0001-updates-for-3.0-submission.patch
Intel Docker Images for MLPerf
The Intel optimized Docker images for MLPerf v3.0 can be built using the
Dockerfiles.
Please refer to "Build & Run Docker container from Dockerfile" sub-section in each model section.
Example for building docker image with Dockerfile:
cd inference_results_v3.0/closed/Intel/code/resnet50/pytorch-cpu/docker/

bash build_resnet50_contanier.sh
Validated HW configuration:
| System Info | Configuration detail |
|---|---|
| CPU | SPR |
| OS | CentOS Stream 8 |
| Kernel | 6.1.11-1.el8.elrepo.x86_64 |
| Memory | 1024GB (16x64GB 4800MT/s [4800MT/s]) |
| Disk | 1TB NVMe |
Recommmended BIOS Knobs:
| BIOS Knobs | Recommended Value |
|---|---|
| Hyperthreading | Enabled |
| Turbo Boost | Enabled |
| Core Prefetchers | Hardware,Adjacent Cache,DCU Streamer,DCU IP |
| LLC Prefetch | Disable |
| CPU Power and Perf Policy | Performance |
| NUMA-based Cluster | Disabled |
| Energy Perf Bias | Performance |
| Energy Efficient Turbo | Disabled |
Please also refer to Eagle Stream Platform Performance & Power Optimization Guide for more details.
Check System Health Using Intel® System Health Inspector:
Intel® System Health Inspector (aka svr-info) is a Linux OS utility for assessing the state and health of Intel Xeon computers. It is suggested to use svr-info first to check any system configuration issue before running any benchmark. Follow the Quick Start Guide for downloading and installation. The following are several key factors effecting the model performance.
CPU
Couple CPU features impact MLPerf performance via related BIOS knobs, so please double check the CPU features with your BIOS knobs.
Some important CPU features are Hyperthreading, number of NUMA nodes, Prefetchers and Intel Turbo Boost.
Please also check your CPU tempartures. The CPU temparture should not be higher than 50 degrees C.
Overheating will drop the CPU frequency and degrade the MLPerf performance.
Memory
One important system configuration is balanced DIMM population, which is suggested to set as balanced to get optimized performance.
Populate as many channels per socket as possible prior to adding additional DIMMs to the channel.
It might impact the memory bandwidth if two dimm share one channel.
Please also refer to Chapter 4 in Eagle Stream Platform Performance & Power Optimization Guide for more details.
From the results of svr-info, an example of unbalanced DIMM population is shown as follows,
An exmaple of Balanced DIMM population is shown as follows,
You should also see good numbers for memory NUMA bandwidth if you also benchmark memory via svr-info.
Here are some reference numbers from a 2S SPR system.
Power
We recommend the intel_pstate Frequency Driver.
For best performance, set the Frequency Governor and Power and Perf Policy to performance.
Here are related recommended power settings from svr-info.
Best Known Configurations:
sudo bash run_clean.sh
Running models:
In the following sections, we'll show you how to set up and run each of the six models:
Get Started with 3DUNET
Build & Run Docker container from Dockerfile
If you haven't already done so, build the Intel optimized Docker image for 3DUNET using:
cd inference_results_v3.0/closed/Intel/code/3d-unet-99.9/pytorch-cpu/docker
bash build_3dunet_container.sh
Prerequisites
Use these commands to prepare the 3DUNET dataset and model on your host system:
mkdir 3dunet
cd 3dunet
git clone https://github.com/neheller/kits19
cd kits19
pip3 install -r requirements.txt
python3 -m starter_code.get_imaging
cd ..
Set Up Environment
Follow these steps to set up the docker instance and preprocess the data.
Start a Container
Use docker run to start a container with the optimized Docker image we pulled earlier.
Replace /path/of/3dunet with the 3dunet folder path created earlier:
docker run --name intel_3dunet --privileged -itd -v /path/to/3dunet:/root/mlperf_data/3dunet-kits --net=host --ipc=host mlperf_inference_3dunet:3.0
Login to Docker Instance
Login into a bashrc shell in the Docker instance.
docker exec -it intel_3dunet bash
Preprocess Data
If you need a proxy to access the internet, replace your host proxy with
the proxy server for your environment. If no proxy is needed, you can skip
this step:
export http_proxy="your host proxy"
export https_proxy="your host proxy"
Preprocess the data and download the model using the provided script:
pip install numpy==1.23.5
cd code/3d-unet-99.9/pytorch-cpu/
bash process_data_model.sh
Run the Benchmark
# 3dunet only has offline mode
bash run.sh perf # offline performance
bash run.sh acc  # offline accuracy
Get the Results
Check log file. Performance results are in
./output/mlperf_log_summary.txt. Verify that you seeresults is: valid.For offline mode performance, check the field
Samples per second:Accuracy results are in
./output/accuracy.txt. Check the fieldmean =.The performance result is controled by the value of "targetqps" in user
socket.conf file. The scripts will automatically select user socket.conf file according to the number of sockets on customer's platform. Customers can also manully change the value of "targetqps" in corresponding user socket.conf files.
Save these output log files elsewhere when each test is completed as they will be overwritten by the next test.
Get started with BERT
The docker container can be created either by building it using the Dockerfile or pulling the image from Dockerhub (if available).
Build & Run Docker container from Dockerfile
If you haven't already done so, build and run the Intel optimized Docker image for BERT using:
cd inference_results_v3.0/closed/Intel/code/bert-99/pytorch-cpu/docker/

bash build_bert-99_contanier.sh
Prerequisites
Use these commands to prepare the BERT dataset and model on your host system:
cd /data/mlperf_data   # or path to where you want to store the data
mkdir bert
cd bert
mkdir dataset
wget https://rajpurkar.github.io/SQuAD-explorer/dataset/dev-v1.1.json -O dataset/dev-v1.1.json
git clone https://huggingface.co/bert-large-uncased model
cd model
wget https://zenodo.org/record/4792496/files/pytorch_model.bin?download=1 -O pytorch_model.bin
Set Up Environment
Follow these steps to set up the docker instance and preprocess the data.
Start a Container
Use docker run to start a container with the optimized Docker image we pulled or built earlier.
Replace /path/of/bert with the bert folder path created earlier (i.e. /data/mlperf_data/bert):
docker run --name bert_3-0 --privileged -itd --net=host --ipc=host \
  -v /path/of/bert:/data/mlperf_data/bert <bert docker image ID>
Login to Docker Instance
Login into a bashrc shell in the Docker instance.
docker exec -it bert_3-0 bash
Convert Dataset and Model
If you need a proxy to access the internet, replace your host proxy with
the proxy server for your environment. If no proxy is needed, you can skip
this step:
export http_proxy="your host proxy"
export https_proxy="your host proxy"
cd code/bert-99/pytorch-cpu
export DATA_PATH=/data/mlperf_data/bert
bash convert.sh
Run the Benchmark
bash run.sh                    #offline performance
bash run.sh --accuracy         #offline accuracy
bash run_server.sh             #server performance
bash run_server.sh --accuracy  #server accuracy
Get the Results
Check the performance log file ./test_log/mlperf_log_summary.txt:
- Verify you see
results is: valid. - For offline mode performance, check the field
Samples per second: - For server mode performance, check the field
Scheduled samples per second: - The performance results are controled by the value of "targetqps" in user
socket.conf file. The scripts will automatically select user socket.conf file according to the number of sockets on customer's platform. Customers can also manully change the value of "targetqps" in corresponding user socket.conf files.
Check the accuracy log file ./test_log/accuracy.txt.
- Check the field
f1
Save these output log files elsewhere when each test is completed as they will be overwritten by the next test.
Get started with DLRM
Build & Run Docker container from Dockerfile
If you haven't already done so, build the Intel optimized Docker image for DLRM using:
# Please get compiler first.
cd inference_results_v3.0/closed/Intel/code/dlrm-99.9
wget https://registrationcenter-download.intel.com/akdlm/irc_nas/18679/l_HPCKit_p_2022.2.0.191.sh

# Build docker image
cd inference_results_v3.0/closed/Intel/code/dlrm-99.9/pytorch-cpu/docker
bash build_dlrm-99.9_container.sh
Prerequisites
Use these commands to prepare the Deep Learning Recommendation Model (DLRM) dataset and model on your host system:
cd /data/   # or path to where you want to store the data
mkdir -p /data/dlrm/model
mkdir -p /data/dlrm/terabyte_input

# download dataset
# Create a directory (such as /data/dlrm/terabyte_input) which contain:
#        day_fea_count.npz
#        terabyte_processed_test.bin
#
# Learn how to get the dataset from:
#     https://github.com/facebookresearch/dlrm
# You can also copy it using:
#     scp -r mlperf@10.112.230.156:/home/mlperf/dlrm_data/* /data/dlrm/terabyte_input
#
# download model
# Create a directory (such as /data/dlrm/model):
cd /data/dlrm/model
wget https://dlrm.s3-us-west-1.amazonaws.com/models/tb00_40M.pt -O dlrm_terabyte.pytorch
Set Up Environment
Follow these steps to set up the docker instance.
Start a Container
Use docker run to start a container with the optimized Docker image we pulled earlier.
Replace /path/of/dlrm with the dlrm folder path created earlier (/data/dlrm for example):
docker run --name intel_inference_dlrm --privileged -itd --net=host --ipc=host \
  -v /path/of/dlrm:/data/mlperf_data/raw_dlrm mlperf_inference_dlrm:3.0
Login to Docker Container
Login into a bashrc shell in the Docker instance.
docker exec -it intel_inference_dlrm bash
Preprocess model and dataset
If you need a proxy to access the internet, replace your host proxy with
the proxy server for your environment. If no proxy is needed, you can skip
this step:
export http_proxy="your host proxy"
export https_proxy="your host proxy"
cd /opt/workdir/code/dlrm/pytorch-cpu
export MODEL=/data/mlperf_data/raw_dlrm/model
export DATASET=/data/mlperf_data/raw_dlrm/terabyte_input
export DUMP_PATH=/data/mlperf_data/dlrm
bash dump_model_dataset.sh
Run the Benchmark
export MODEL_DIR=/data/mlperf_data/dlrm
export DATA_DIR=/data/mlperf_data/dlrm

bash runcppsut                     # offline performance
bash runcppsut accuracy               # offline accuracy
bash runcppsut performance server  # server performance
bash runcppsut accuracy server     # server accuracy
Get the Results
Check the appropriate offline or server performance log file, either
./output/PerformanceOnly/Offline/mlperf_log_summary.txt or
./output/PerformanceOnly/Server/mlperf_log_summary.txt:
- Verify you see
results is: valid. - For offline mode performance, check the field
Samples per second: - For server mode performance, check the field
Scheduled samples per second: - The performance result is controled by the value of "targetqps" in user
socket.conf file. The scripts will automatically select user socket.conf file according to the number of sockets on customer's platform. Customers can also manully change the value of "targetqps" in corresponding user socket.conf files.
Check the appropriate offline or server accuracy log file, either
./output/AccuracyOnly/Offline/accuracy.txt or
./output/AccuracyOnly/Server/accuracy.txt:
- Check the field
AUC
Save these output log files elsewhere when each test is completed as they will be overwritten by the next test.
Get Started with ResNet50
The docker container can be created either by building it using the Dockerfile or pulling the image from Dockerhub (if available). Please download the Imagenet dataset on the host system before starting the container.
Download Imagenet Dataset for Calibration
Download ImageNet (50000) dataset
bash download_imagenet.sh
Build & Run Docker container from Dockerfile
If you haven't already done so, build and run the Intel optimized Docker image for ResNet50 using:
cd inference_results_v3.0/closed/Intel/code/resnet50/pytorch-cpu/docker/

bash build_resnet50_contanier.sh

docker run -v </path/to/ILSVRC2012_img_val>:/opt/workdir/code/resnet50/pytorch-cpu/ILSVRC2012_img_val -it --privileged <resnet docker image ID> /bin/bash

cd code/resnet50/pytorch-cpu
Prepare Calibration Dataset & Download Model ( Inside Container )
If you need a proxy to access the internet, replace your host proxy with the proxy server for your environment. If no proxy is needed, you can skip this step:
export http_proxy="your host proxy"
export https_proxy="your host proxy"
Prepare calibration 500 images into folders
cd /opt/workdir/code/resnet50/pytorch-cpu
bash prepare_calibration_dataset.sh
Download the model
bash download_model.sh
The downloaded model will be saved as resnet50-fp32-model.pth
Quantize Torchscript Model and Check Accuracy
- Set the following paths:
export DATA_CAL_DIR=calibration_dataset
export CHECKPOINT=resnet50-fp32-model.pth
- Generate scales and models
bash generate_torch_model.sh
The start and end parts of the model are also saved (respectively named) in models
Run Benchmark (Common for Docker & Baremetal)
export DATA_DIR=${PWD}/ILSVRC2012_img_val
export RN50_START=models/resnet50-start-int8-model.pth
export RN50_END=models/resnet50-end-int8-model.pth
export RN50_FULL=models/resnet50-full.pth
Performance
- Offline
bash run_offline.sh <batch_size>
- Server
bash run_server.sh
Accuracy
- Offline
bash run_offline_accuracy.sh <batch_size>
- Server
bash run_server_accuracy.sh
Get the Results
Check the ./mlperf_log_summary.txt log file:
- Verify you see
results is: valid. - For offline mode performance, check the field
Samples per second: - For server mode performance, check the field
Scheduled samples per second: - The performance result is controled by the value of "targetqps" in ./src/user
socket.conf file. The scripts will automatically select user socket.conf file according to the number of sockets on customer's platform. Customers can also manully change the value of "targetqps" in corresponding user socket.conf files.
Check the ./offline_accuracy.txt or ./server_accuracy.txt log file:
- Check the field
accuracy
Save these output log files elsewhere when each test is completed as they will be overwritten by the next test.
Get Started with Retinanet
The docker container can be created either by building it using the Dockerfile or pulling the image from Dockerhub (if available). Please download the Imagenet dataset on the host system before starting the container.
Download the dataset
- Install dependencies (python3.9 or above)
pip3 install --upgrade pip --user
pip3 install opencv-python-headless==4.5.3.56 pycocotools==clear2.0.2 fiftyone==0.16.5
- Setup env vars
CUR_DIR=$(pwd)
export WORKLOAD_DATA=${CUR_DIR}/data
mkdir -p ${WORKLOAD_DATA}

export ENV_DEPS_DIR=${CUR_DIR}/retinanet-env
- Download OpenImages (264) dataset
bash openimages_mlperf.sh --dataset-path ${WORKLOAD_DATA}/openimages
Images are downloaded to ${WORKLOAD_DATA}/openimages
- Download Calibration images
bash openimages_calibration_mlperf.sh --dataset-path ${WORKLOAD_DATA}/openimages-calibration
Calibration dataset downloaded to ${WORKLOAD_DATA}/openimages-calibration
Note: If you meet any obstacles on downloading the dataset, please try again in the docker container to be launched after [Build & Run Docker container from Dockerfile](Build & Run Docker container from Dockerfile).
Download Model
wget --no-check-certificate 'https://zenodo.org/record/6617981/files/resnext50_32x4d_fpn.pth' -O 'retinanet-model.pth'
mv 'retinanet-model.pth' ${WORKLOAD_DATA}/
Build & Run Docker container from Dockerfile
If you haven't already done so, build and run the Intel optimized Docker image for Retinanet using:
cd inference_results_v3.0/closed/Intel/code/retinanet/pytorch-cpu/docker/

bash build_retinanet_contanier.sh

docker run --name intel_retinanet --privileged -itd --net=host --ipc=host -v ${WORKLOAD_DATA}:/opt/workdir/code/retinanet/pytorch-cpu/data <retinanet docker image ID>

docker exec -it intel_retinanet bash

cd code/retinanet/pytorch-cpu/
Calibrate and generate torchscript model
If you need a proxy to access the internet, replace your host proxy with the proxy server for your environment. If no proxy is needed, you can skip this step:
export http_proxy="your host proxy"
export https_proxy="your host proxy"
Run Calibration
CUR_DIR=$(pwd)
export WORKLOAD_DATA=${CUR_DIR}/data
export CALIBRATION_DATA_DIR=${WORKLOAD_DATA}/openimages-calibration/train/data
export MODEL_CHECKPOINT=${WORKLOAD_DATA}/retinanet-model.pth
export CALIBRATION_ANNOTATIONS=${WORKLOAD_DATA}/openimages-calibration/annotations/openimages-mlperf-calibration.json

cd /opt/workdir/code/retinanet/pytorch-cpu/retinanet-env/vision
git checkout 8e078971b8aebdeb1746fea58851e3754f103053
python setup.py install && python setup.py develop

cd /opt/workdir/code/retinanet/pytorch-cpu
bash run_calibration.sh
Set Up Environment
Export the environment settings
source setup_env.sh
Run the Benchmark
# Run one of these performance or accuracy scripts at a time
# since the log files will be overwritten on each run

# for offline performance
bash run_offline.sh

# for server performance
bash run_server.sh

# for offline accuracy
bash run_offline_accuracy.sh

# for server accuracy
bash run_server_accuracy.sh
Get the results
Check the ./mlperf_log_summary.txt log file:
- Verify you see
results is: valid. - For offline mode performance, check the field
Samples per second: - For server mode performance, check the field
Scheduled samples per second: - The performance result is controled by the value of "targetqps" in user
socket.conf file. The scripts will automatically select user socket.conf file according to the number of sockets on customer's platform. Customers can also manully change the value of "targetqps" in corresponding user socket.conf files.
Check the ./accuracy.txt log file:
- Check the field
mAP
Save these output log files elsewhere when each test is completed as they will be overwritten by the next test.
Get Started with RNNT
Build & Run Docker container from Dockerfile
If you haven't already done so, build the Intel optimized Docker image for RNNT using:
cd inference_results_v3.0/closed/Intel/code/rnnt/pytorch-cpu/docker/
bash build_rnnt-99_container.sh
Set Up Environment
Follow these steps to set up the docker instance.
Start a Container
Use docker run to start a container with the optimized Docker image we built earlier.
docker run --name intel_rnnt --privileged -itd -v /data/mlperf_data:/data/mlperf_data \
--net=host --ipc=host mlperf_inference_rnnt:3.0
Login to Docker Container
Get the Docker container ID and login into a bashrc shell in the Docker instance using docker exec.
docker ps -a #get container "id"
docker exec -it <id> bash
cd /opt/workdir/code/rnnt/pytorch-cpu
- Setup env vars
export LD_LIBRARY_PATH=/opt/workdir/code/rnnt/pytorch-cpu/third_party/lib:$LD_LIBRARY_PATH
If you need a proxy to access the internet, replace your host proxy with the proxy server for your environment. If no proxy is needed, you can skip this step:
export http_proxy="your host proxy"
export https_proxy="your host proxy"
Run the Benchmark
The provided run.sh script abstracts the end-to-end process for RNNT:
| STAGE | STEP |
|---|---|
| 0 | Download model |
| 1 | Download dataset |
| 2 | Pre-process dataset |
| 3 | Calibration |
| 4 | Build model |
| 5 | Run Offline/Server accuracy & benchmark |
Run run.sh with STAGE=0 to invoke all the steps requried to run the benchmark (i.e download the model & dataset, preprocess the data, calibrate and build the model):
SKIP_BUILD=1 STAGE=0 bash run.sh
or to skip to stage 5 without previous steps: Offline/Server accuracy and benchmark:
SKIP_BUILD=1 STAGE=5 bash run.sh
Get the Results
Check the appropriate offline or server performance log files, either
./logs/Server/performance/.../mlperf_log_summary.txt or
./logs/Offline/performance/.../mlperf_log_summary.txt:
- Verify you see
results is: valid. - For offline mode performance, check the field
Samples per second: - For server mode performance, check the field
Scheduled samples per second: - The performance result is controled by the value of "targetqps" in ./configs/user
socket.conf file. The scripts will automatically select user socket.conf file according to the number of sockets on customer's platform. Customers can also manully change the value of "targetqps" in corresponding user socket.conf files.
Check the appropriate offline or server accuracy log file, either
./logs/Server/accuracy/.../mlperf_log_summary.txt or
./logs/Offline/accuracy/.../mlperf_log_summary.txt:
Save these output log files elsewhere when each test is completed as they will be overwritten by the next test.
Disclaimer
To the extent that any data, datasets, or models are referenced by Intel or accessed using tools or code on this site such data, datasets and models are provided by the third party indicated as the source of such content. Intel does not create the data, datasets, or models, provide a license to any third-party data, datasets, or models referenced, and does not warrant their accuracy or quality. By accessing such data, dataset(s) or model(s) you agree to the terms associated with that content and that your use complies with the applicable license.
Intel expressly disclaims the accuracy, adequacy, or completeness of any data, datasets or models, and is not liable for any errors, omissions, or defects in such content, or for any reliance thereon. Intel also expressly disclaims any warranty of non-infringement with respect to such data, dataset(s), or model(s). Intel is not liable for any liability or damages relating to your use of such data, datasets, or models.