Want to unlock the potential of generative AI (GenAI) for your enterprise, enhance productivity, and sharpen your competitive edge? In this post, we’ll show you how to build your own chatbot in less than an hour using the components and frameworks that are part of the Open Platform for Enterprise AI (OPEA).
Why OPEA? GenAI applications leverage models trained on massive datasets with strong generalization capabilities. However, when addressing specific problems, your application may produce inaccurate responses due to the trained model lacking relevant knowledge. To obtain contextually accurate answers, you have to provide specific data to the system. For enterprises looking to customize GenAI applications, OPEA can provide valuable support.
In this blog, we’ll show you step-by-step how to build your first chatbot. And that is just the beginning. OPEA also provides samples for document summarization, data analysis to harvest new insights, and code generation solutions to accelerate software development.
What is OPEA?
OPEA is an open source project that allows you to create multi-provider, robust, and composable GenAI solutions, leveraging innovations across the ecosystem.
OPEA includes:
- Framework: A framework of composable state-of-the-art building blocks for GenAI systems including LLMs, data stores, guardrails, and prompt engines.
- Architectural blueprints: Retrieval-augmented GenAI component stack structure and end-to-end workflows.
- Evaluation: A four-step assessment, which is in development, for grading GenAI systems around performance, features, trustworthiness, and enterprise-grade readiness.
OPEA is designed with the following considerations:
Efficient Infrastructure Utilization: OPEA supports a wide range of hardware, including Intel® Xeon®, Intel® Gaudi® AI Accelerator, Intel® Arc™ GPU, Nvidia GPU, and AMD ROCm enabling you to harness your existing infrastructure, including AI accelerators or other hardware of your choosing.
Seamless Enterprise Integration: Seamlessly integrates with enterprise software, including authentication and authorization systems and firewalls, providing heterogeneous support and stability across systems and networks.
Open Innovation and Flexibility: Brings together best-of-breed innovations and is free from vendor lock-in, ensuring flexibility and adaptability.
Ubiquitous Versatile Deployment: Runs everywhere through a flexible architecture designed for cloud, data center, edge, and on-premises environments.
Scalable Ecosystem and Growth: Access to a vibrant ecosystem of partners to help build and scale your solution.
Build Your Chatbot with OPEA
OPEA GenAIExamples are designed to give developers an easy entry into GenAI, featuring microservice-based samples that simplify the processes of deploying, testing, and scaling GenAI applications. All examples are fully compatible with Docker and Kubernetes, supporting a wide range of hardware platforms, ensuring flexibility and efficiency for your GenAI adoption.
ChatQnA is a retrieval-augmented generation (RAG) chatbot, which integrates the power of retrieval systems to fetch relevant, domain-specific knowledge with GenAI to produce human-like responses. The ChatQnA dataflow is shown in Figure 1. At the left side it ingests a file into the vector database. From step A to D, it reads and splits data into chunks, which are then encoded into vectors through an embedder and stored along with meta data into the vector database.
On the right side, the retrieval subsystem converts the user query (also known as a prompt) into a vector using the same embedder, which is then used to retrieve similar items from the vector database. These are then sent together to the large language model (LLM). Even if the LLM has no prior knowledge pertaining to the user’s original query, it can comprehend the supplied related material to answer the question.
RAG chatbots can address various use cases by providing highly accurate and context-aware interactions, which can be used in customer support, internal knowledge management, finance and accounting, and technical support.
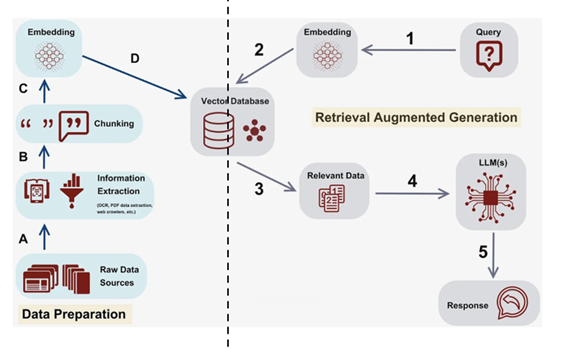
Figure 1. ChatQnA Dataflow
Deploying ChatQnA: A Step-by-Step Guide
In this section, we’ll walk you through the hardware and software requirements for running ChatQnA on AWS, followed by the environment variables you’ll need to set it up. Next, we’ll explain how to retrieve the necessary container images, followed by the commands to actually launch the ChatQnA application using either Docker or Kubernetes. Lastly, we show how to determine whether the application is running and how to use it.
Hardware Requirements
- CPU: 4th Gen (and newer) Intel® Xeon® Processors with Intel® Advanced Matrix Extensions (Intel® AMX)
- Memory: 64GB minimum
- Storage: 100GB disk space, minimum
The recommended configurations are Amazon EC2 C7i.8xlarge and C7i.16xlarge instance types. These instances are Intel® Xeon® with AMX, to leverage 4th Generation Intel® Xeon® Scalable processors that are optimized for demanding workloads.
Software Requirements
- OS: Ubuntu 22.04 LTS (you could use another OS)
Required Models
The default embedding, reranking, and LLM models are set in set_env.sh. You can choose models by changing the corresponding environment variable in set_env.sh mentioned in section 3.3.
Deploy Using Docker on an AWS EC2 Instance
In this section we show how to deploy ChatQnA on an AWS EC2 instance.
Step 1. Set Up your Environment
Download the code and setup environment variables here:
git clone https://github.com/opea-project/GenAIExamples.git
cd GenAIExamples/ChatQnA/docker_compose/intel/cpu/xeon
git checkout v1.2 (Note: this retrieves the 1.2 version of OPEA.)
export host_ip=”your_ipv4_address”
export HUGGINGFACEHUB_API_TOKEN="Your_Huggingface_API_Token"
source set_env.sh
Step 2. Start the Docker Container
Run this command to start the Docker container:
docker compose up –d
Note: docker compose up -d starts the multi-container application defined by the compose.yaml file, listed in Table 1. You can use other available YAML files or create your own to run different containers, for example using vLLM versus TGI for LLM inference.
This command automatically downloads the following Docker images from Docker Hub and starts the Docker containers.
Table 1. docker images defined in compose.yaml
| Image name | tag |
|---|---|
| opea/dataprep | 1.2 |
| opea/vllm | 1.2 |
| ghcr.io/huggingface/text-embeddings-inference | cpu-1.5 |
| opea/retriever | 1.2 |
| opea/chatqna | 1.2 |
| opea/chatqna-ui | 1.2 |
| opea/nginx | 1.2 |
| redis/redis-stack | 7.2.0-v9 |
Step 3. Check Docker Container Status
Run this command to check the Docker container status:
docker ps -a
Make sure all the Docker containers are in UP status as shown below:

Step 4. Check That the vLLM Service Is Ready
It takes a few minutes for the vLLM service to download LLM models and warm up before it’s ready for inference. Check the vLLM service log to ensure it is ready.
Run this command to check the log:
docker logs vllm-service 2>&1 | grep complete
The following log indicates the vLLM service is ready.
![]()
Step 5. Access the ChatQnA Service
Open the following URL in your browser:
http://{Public-IPv4-address}:80
Make sure to access the AWS EC2 instance through the Public-IPv4-address.
In the following video demo, we ask ChatQnA “what was Nike’s revenue in 2023?” It does not give the correct answer because the LLM model has no current up-to-date knowledge of Nike’s revenue. After we upload the Nike 2023 ANNUAL REPORT document, it gives the right answer using the RAG feature.
Access ChatQnA video demo.
Deploy Using Kubernetes on an AWS EC2 Instance
You will first need to set up a Kubernetes cluster on your AWS EC2 instance followed by installing Helm. Please refer to k8s_install_kubespray and Helm to set up Kubernetes and Helm respectively.
Step 1. Setup Environment
Please refer to Step 1 in Deploy Using Docker on AWS EC2 Instance to set up the environment.
Step 2. Start Kubernetes Services
To start your Kubernetes services type in this command:
helm install chatqna oci://ghcr.io/opea-project/charts/chatqna --set global.HUGGINGFACEHUB_API_TOKEN=${HF_TOKEN} -f cpu-values.yaml
Step 3. Check Kubernetes Status
First, check the services status to get the port number to access ChatQnA by entering this command:
kubectl get services
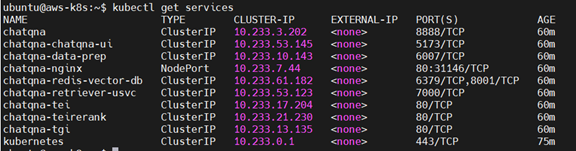
Figure 2. Kubernetes Service
Take note of the nginx node port, which is **31146**. We will access ChatQnA using this port in an upcoming step.
Next, check that the pods are in “Running” status using:
kubectl get pods
Make sure all pods are in the ready state. Please check the container logs to troubleshoot any issues if any one of the pods isn’t in the running state. If you’re still stuck, file an issue providing details in the GenAIExamples repository.
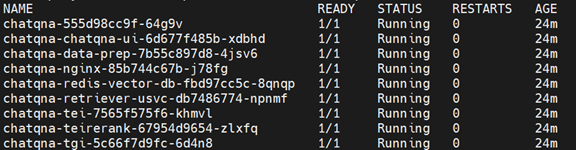
Figure 3. Kubernetes Pod Status
Step 4. Access the ChatQnA Service
Open the following URL in your browser:
http://{Public-IPv4-address}:31146
Note that the port number 31146, is the Kubernetes chatqna-nginx service port shown in Figure 2.
For ChatQnA example interaction, please refer to the Access ChatQnA Service video demo show above in Step 5.
Next Steps
We demonstrated the detailed steps to deploy ChatQnA on AWS cloud. You can deploy other OPEA GenAIExamples such as VisualQnA, VideoQnA, Document Summarization, Documents Index and Retrieval, Code Generation, Translation, Text2Image, and Instruction-Tuning using similar steps. The computing instance size and/or cluster resources you need depends on the model size and other elements in your pipeline.
Please refer to the following links for more OPEA details.
Resources
- opea.dev: Open Platform for Enterprise AI main site
- OPEA Projects and Source Code
- OPEA Documentation
- Resources for getting started with GenAI development
About the Authors
Wang, Xigui, Software AI Frameworks Engineer.
Bhandaru, Malini, Dr. Malini Bhandaru, OPEA Technical Steering Committee Chair, Cloud Architect and Intel Senior Principal Engineer
Sin, Alex AI Software Solutions Engineer
Du, dolpher, Cloud Orchestration Software Engineer
Yao, Yi, AI Frameworks Engineer
Hu, Ying, Software AI Frameworks Engineer