Download [3KB]
When a Fortran coarray application is started under the Visual Studio* debugger on Windows, the current debug window does not have control over the images running the application. This article presents a method for getting debug control over a selected instance of the program ("image" in the language's terminology).
Each image is running in a separate process, but there is no external indication of which process corresponds to which image. The Visual Studio debugger has the ability to attach control to another process, but you need a way to know which process is which image and to have all the images wait until you have set the desired breakpoints and resume execution.
The attached source is a module called Coarray_Debugging, containing a subroutine called Enable_Coarray_Debugging. Save this source to your local disk and add it to your project as a source file.
At the beginning of your main program's source file, add the line:
This goes after the PROGRAM statement (if any) and before any IMPLICIT statements or other specification statements. If you have other USE statements, it can go in with them in any order.
Next, before the first executable line in your program add the line:
This subroutine makes all images wait until you indicate that they should proceed. Build your application. Before starting the program, open Coarray_Debugging_Mod.f90 and set a breakpoint on the line with the call to SLEEPQQ.
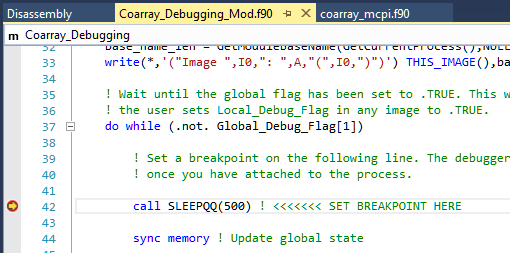
When you set the breakpoint by clicking in the gray bar to the left of the line, a red circle will appear. When the breakpoint is hit later, the circle will also contain a yellow arrow as it does in this image.
Start the program under the debugger (Debug > Start Debugging or press F5).
The program will call Enable_Coarray_Debugging which will display in the Output pane a line for each image. Each line contains the image number, process name and process ID. For example:
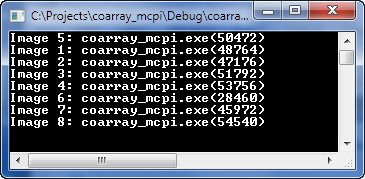
In this example, the process name is "coarray_mcpi.exe" (the name of the executable). Image 1 is process ID 48764, image 2 is 47176, etc. We are going to debug image 2 which is process ID 47176.
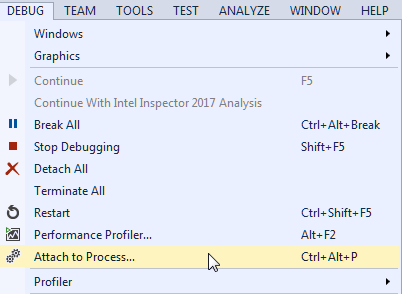
In Visual Studio, select Debug > Attach to Process...
The Attach dialog will appear, listing all of the processes on your system. Scroll until you find the process ID that matches the one you want. In this case we want 47176.
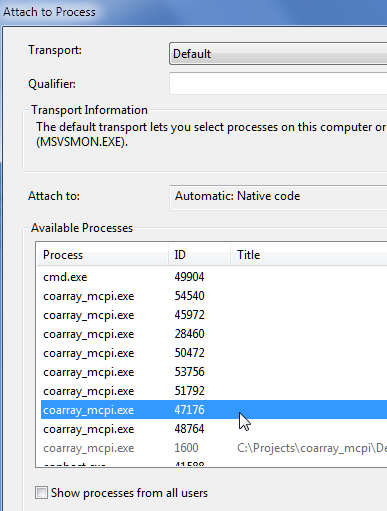
Once the correct process has been selected, click the Attach button. You should now see the debugger stop at the breakpoint you set earlier.
At this point you can set breakpoints in other parts of the program as normal. Note that if a process is not currently attached to the debugger, it will not stop at breakpoints, but all the processes are waiting in the routine.
The Enable_Coarray_Debugging subroutine declares a scalar logical coarray variable Global_Debug_Flag that is initialized to .FALSE. in image 1. All images then enter a wait loop checking to see if image 1's Global_Debug_Flag is .TRUE.. In order to preserve system responsiveness, the loop contains a call to SLEEPQQ that waits 500 milliseconds before checking again.
A local variable Local_Debug_Flag is checked inside the loop. This variable is also initialized to .FALSE. Once you have set all the breakpoints, use the debugger's Locals window to change the value of Local_Debug_Flag to .TRUE..

Double-click on the .FALSE. value and change it to .TRUE. Then continue execution in the debugger (click Continue or press F5).
All images will now resume execution. The image you attached to will stop at any breakpoints you have set, and you can examine local variables. Note that coarray variables may not display properly in the debugger and changing their value in the Locals window typically has no effect.
You can go back to the Attach to Process... dialog and attach to other image processes. If breakpoints have been set they will now stop in that process. If you have attached to multiple processes you can switch among them using the Process control towards the upper left:
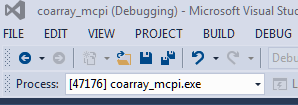
We find, however, that switching among processes in a coarray application may cause unexpected errors and recommend against it.
If you have questions specifically about this article you can ask below. For all other questions, or for faster response, please ask in our user forum.