My Profile Self Help
Browse through the navigation tabs for the information you are interested in.
FAQs
Frequently Asked Questions
- My Profile is an application which enables you to easily view and update your Profile settings.
- A Profile allows you to control which transactions you receive e-mail notifications of, which are visible to you, and which you can act on.
- All users who have access to Web Suite applications are required to maintain their Profile to view and act on transactions.
- New approved Web Suite users will have their Profile setting auto map to all Intel Locations. To set any preference, users would need to modify My Profile settings by deselecting the Intel locations.
Note: If there is any change for your company name or address, kindly contact Intel buyer to make necessary change in Supplier’s database as well

| Step | Action |
| 1 | Go to supplier.intel.com. |
| 2 | Supplier update his/her personal and company details. |
| 3 | Selected/filtered PO will be visible to supplier. |

| Subject | Remarks |
| View Profile tab | To view your as-is Profile settings. |
| Edit Profile tab | To perform search then update your Profile settings, through
|
| Company Information tab | To update your company information. |
FAQs
Frequently Asked Questions
| Step | Action |
| 1 | Go to supplier.intel.com. |
| 2 | Click on Supplier Sign-In link. |
| Result: The Intel Login page is displayed. | |
| 3 | Enter your User ID and Password. |
| 4 | Click Sign In. |
| Result: The Supplier Information page will be displayed. | |
| 5 | Click Intel Web PO/Web Invoice/Payment Tracker > My Profile link. |
Result: The View Profile tab will be displayed.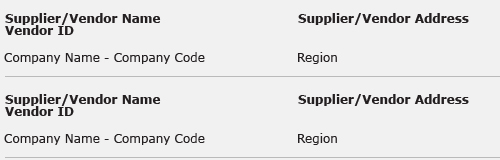 |
|
| Note : Click Edit Profile button to make changes to your current settings. |

Incomplete Company Information error could be a result of incomplete TAX information, company address, or city.
| Step | Action |
| 1 | Go to My Profile > Company Information tab. |
| 2 | Update Local Company Address. |
| 3 | Update Corporate Address. |
Notes:
|
|
| 4 | Update TAX/VAT/Company Reg. Number. |
| 5 | Click Save Profile button. |
Results:
|

Incorrect profile setting could be a result of mismatched Vendor ID-Company Code combination. Click hereto contact customer support.

| Step | Action |
| 1 | Go to My Profile. |
| 2 | Click Edit Profile tab. |
| Result: The Edit Profile page will be displayed. | |
| Note: You can display the list of vendor and company code base on a specific PO, vendor name, or company code. | |
| 3 | Select option from dropdown. |
| Notes:Step-by-step instructions will be displayed on screen | |
| 4 | Select supplier location-to-Intel location combination. |
| 5 | Click Submit Change button. |
Results:
|
FAQs
Frequently Asked Questions
| Step | Action |
| 1 | Go to My Profile. |
| 2 | Click Edit Profile tab. |
| Result: The Edit Profile page will be displayed. | |
| Note: You can display the list of vendor and company code base on a specific PO, vendor name, or company code. | |
| 3 | Select option from dropdown. |
| 4 | Update the required information. |
| Note: Select supplier location-to-Intel location combination. | |
| 5 | Click Submit Change button. |
Results:
|
| Subject | Remark |
| Supplier Locations |
|
| Intel Locations |
|
Your Profile allows you to filter out transactions you do not wish to see. This means you don’t have to look through lists of transactions to find the ones that you’re responsible for. This also enables you to share the transaction workload with other users from your company.
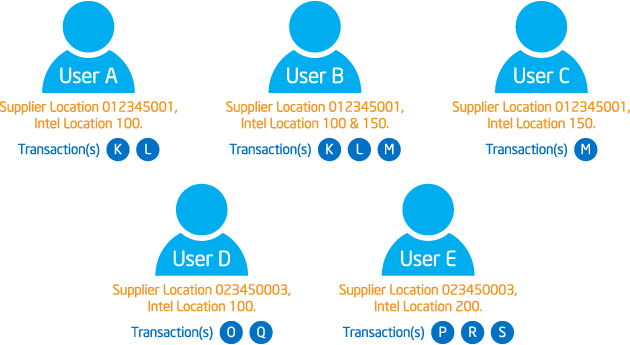
Note: It is most efficient if all users at a company can jointly agree on Profile settings to ensure proper ‘ownership’ of all transactions. Failure to manage Profiles across all users can leave some transactions un-owned and can impact the supply line.
| Step | Action |
| 1 | Go to My Profile. |
| 2 | Click Edit Profile tab. |
| Result: The Edit Profile page will be displayed. | |
| Note: You can display the list of vendor and company code base on a specific PO, vendor name, or company code. | |
| 3 | SelectPO option. |
| 4 | Enter PO number. For example, PO number 4300123456 generated from Intel location 150 to supplier location 0123450001. |
Notes:
|
|
| 5 | Click show vendors button. |
| 6 | Select supplier location to Intel location combination.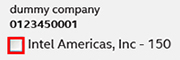 |
| Note: This indicates you would like to view PO’s placed from Intel location 150 to supplier location 0123450001. | |
| 7 | Click Submit Change button. |
Results:
|
| Step | Action |
| 1 | Go to My Profile |
| 2 | Click Edit Profile tab. |
| Result: The Edit Profile page will be displayed. | |
| Note: You can display the list of vendor and company code base on a specific PO, vendor name, or company code. | |
| 3 | Select Vendor option. |
| 4 | Click combo box. |
| Result : The list of supplier locations available on your account will be displayed accordingly. | |
| 5 | Select supplier location. For example, 0123450001. |
| Note: This indicates you would like to view PO’s placed to this supplier location. | |
| 6 | Click show vendors button. |
| 7 | Select supplier location to Intel location combination. For example, Intel Americas, Inc. – 150. 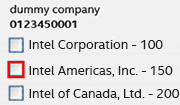 |
| Note : This indicates you would like to view PO’s placed from Intel location 150 to supplier location 0123450001. | |
| 8 | Click Submit button. |
Results:
|
| Step | Action |
| 1 | Go to My Profile |
| 2 | Click Edit Profile tab. |
| Result: The Edit Profile page will be displayed. | |
| Note: You can display the list of vendor and company code base on a specific PO, vendor name, or company code. | |
| 3 | Select Company Code option. |
| 4 | Click combo box. |
| Result : The list of Intel locations available on your account will be displayed accordingly. | |
| 5 | Select Intel location. For example, 150 – Intel Americas, Inc. |
| Note: This indicates you would like to view PO’s placed to your company from this Intel location. | |
| 6 | Click show vendors button. |
| 7 | Select supplier location to Intel location combination. For example, supplier location 0123450001.  |
| Note : This indicates you would like to view PO’s placed from Intel location 150 to supplier location 0123450001. | |
| 8 | Click Submit button. |
Results:
|
| Step | Action |
| 1 | Go to Intel Web PO. |
| 2 | Enter related keywords to specify and narrow down the search criteria. |
| 3 | click search  button. button. |
| Result: The search result with matching criteria will be generated. | |
| Note: You need to modify your profile setting in order to view more search results. | |
| 4 | Click Add PO to Profile  button. button. OR, Click  link to view and select PO from a pop up window. link to view and select PO from a pop up window. |
Results:
|
|
Notes:
 |


| Step | Action |
| 1 | Go to supplier.intel.com. |
| 2 | Click on Supplier Sign-In link. |
| Result: The Intel Login page will be displayed. | |
| 3 | Enter your User ID and Password. |
| 4 | Click Manage My Account link. |
| 5 | Click Sign In. |
| Result: The Manage My Account page will be displayed. | |
| 6 | Click Account Information link. |
| Result: The Account Information page will be displayed. | |
| 7 | Update your personal information. |
| 8 | Click Submit button. |
| Result: Your personal information has been updated successfully. |
FAQs
Frequently Asked Questions
- Corporate Address is address Intel has on file for your company.
- It is necessary to use the address Intel has for you in order to properly process your application.
- Contact your Intel buyer for further confirmation.