Hot Topics
Browse through some of the hot topics people are asking questions about.
FAQs
Frequently Asked Questions
- Go to supplier.intel.com.
- Click Sign In button.

- Enter your User ID and Password.
- Click Sign In button.
Result: The Supplier Information page will be displayed.
- Click Manage My Account > Application Access link.
Result: The Application Access page will be displayed.
- Select checkbox to request for additional permissions.
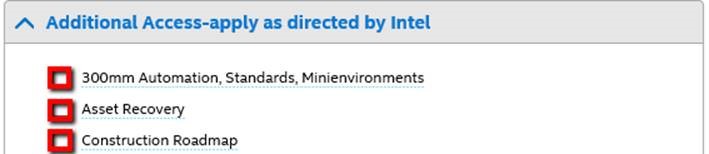
- Click Next.

Note: You might be prompted to provide Country of Residence if you have not fill up the column before.
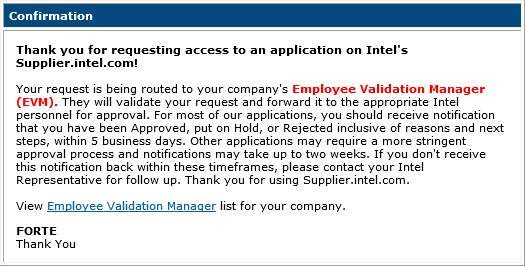
Result: The confirmation message will be displayed. Your application is now subject to your EVM’s approval.
Scenario 1: Upgrade from Manage My Account page.
- Go to supplier.intel.com
- Click Sign In button.
Result: The Intel Login page will be displayed.
- Enter your User ID and Password.
- Click Sign In button.
Result: The Supplier Information page will be displayed.
- Click Manage My Account > Upgrade to Standard (Full) Registration link.
Result: The Upgrade to Standard (Full) Registration page will be displayed.

- Click Begin button.
- Select the checkbox for Intel® WebSuite (Invoice/PO/Payment Tracker/ASN/Forecast) - Suppliers Only.

- Click Next button.
Result: The access request form will be displayed.
- Update all the mandatory fields.
- Click Next button.
Result: The upgrade request will be routed to your company’s EVM for approval.
Note: If your company does not have EVM, kindly refer to Supplier Registration > How do I become an EVM?
Scenario 2: Upgrade from Web PO page.
- Go to Intel Web PO.
- Click EVM conversion link.
Result: The Upgrade to Standard (Full) Registration page will be displayed.
- Click Begin button.
- Select the checkbox for Intel® WebSuite (Invoice/PO/Payment Tracker/ASN/Forecast) -
Suppliers Only.
. - Click Next button.
Result: The access request form will be displayed.
- Update all the mandatory fields.
Note: Mouse over the “?” icon for explanation of what to fill.
- Click Next button.
Result: The upgrade request will be routed to your company’s EVM for approval.
Note: If your company does not have EVM, kindly refer to Supplier Registration > How do I become an EVM?
- Go to supplier.intel.com.
- Click Sign In.
Result: The Intel Login page will be displayed
- Enter your Login ID and Password.
- Click Sign In button.
Result: The Supplier Information page will be displayed.
- Click Manage My Account > Check Request Status link.
Result: The Check Request Status page will be displayed. The date and status of your request will be displayed.
Status- Pending EVM Approval
- Awaiting validation from your company’s EVM.
- It is advisable to mail reminder, just in case.
- Awaiting validation from your company’s EVM.
- Pending Intel Approval
- Awaiting validation from Intel.
- Confirmation e-mail will be sent between 3-5 business days from the date of EVM approval.
- Rejected
- The reason will be stated in the Comment column.
- Pending Request
- Only applies for request to become an EVM.
- Intel contact will need to approve the request.
- Pending EVM Approval
- Go to supplier.intel.com.
- Click Sign in.
Result: The Intel Login page will be displayed.
- Enter your User ID and Password.
- Click Sign In button.

Result: The Supplier Information page will be displayed.
- Click Manage My Account > Account Information link.
Result: The Account Information page will be displayed.
- Update e-mail address and other personal data and click Save.

Result: The information has updated successfully.
- Go to Intel Web PO.
- Click Advance Search button.

Result: The Advance Search form will be displayed.
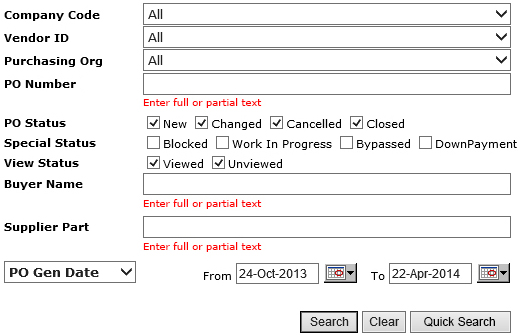
- Enter related keywords to specify and narrow down the search criteria.
Note: Select the checkbox next to the necessary PO status type(s), if necessary.

- Click Search button
.
Result: The matching POs will be generated.

Note: Most statuses of a specific PO will be displayed under the Status column, EXCEPT for Bypassed PO and Down Payment PO.
- Go to Intel Web PO.
- Enter related keywords to specify and narrow down the search criteria.
- Click Search button.
Result: The search result with matching criteria will be generated.
Note: You need to modify your profile setting in order to view more search results.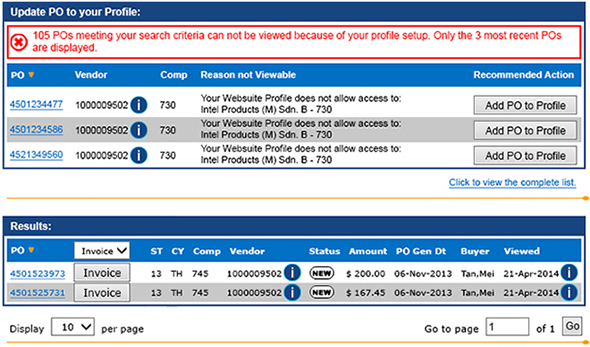
- Click Add PO to Profile button.
Results:
- If successful, the acknowledgement message will be displayed.

- OR,
Error message will be displayed.
- It takes 1 to 2 minutes to update your profile to the system.
- Error message will be generated in case the same Supplier Number/Vendor ID has already clicked on the same PO and still pending for approval.

- If successful, the acknowledgement message will be displayed.
- Click Search button again to view the newly added PO result.
- Go to Intel Web Invoice.
- Click Create New Invoice link.
Result: The Create New Invoice screen will be displayed.
- Enter PO number.
For example, 4200103597.
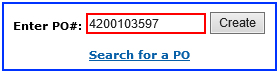
Note: You must enter the entire PO number in the PO field for Intel Web Invoice to retrieve the requested information and in order to continue.
- Click Create button.
Result: The invoice for PO number entered will be created.
Notes:- The invoice generated requires supplier to fill in additional mandatory fields.
- The supplier assumes responsibility to submit complete and accurate invoices.
- Update the mandatory fields:
- Invoice number
- Supplier invoice date
- Ship/Service Date
- Add (PO Line)
- Click Review Invoice button.
Result: The Review Invoice screen will be displayed.
Note: The errors and missing fields will be notified in red.
- Click Submit Invoice button.

OR,
Click Edit Invoice button for amendment.
Result: The TAX Invoice Confirmation screen will be displayed.
Notes- Once suppliers click on the Submit Invoice button, the invoice is immediately interfaced into the Intel back-end system and cannot be changed through Web Invoice tool.
- Supplier may print a copy of the generated invoice confirmation.
- Go to Intel Payment Tracker.
- Enter search criteria.
For example, invoice number 6172123456.
- Click Generate Report button.

Result: The matching record will be displayed.
- Click Cancel link.

Result: The Invoice Cancellation Request page will be displayed as pop-up.
- Update reason for cancellation.
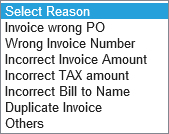
Note: State the reason in Remark column, if Others is chosen.
- Click Submit button.

Result: The confirmation message will be displayed.
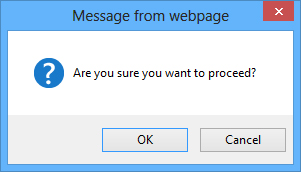
- Click OK button.
Results- The cancellation request has been submitted.
- The Cancel link will be grayed-out for SEVENTY-TWO (72) hours.

Notes- Invoice cancellation is subject to Intel review.
- Please resubmit cancellation in the event cancellation request is not processed within the SEVENTY-TWO(72) hours turnaround time.
- The Pay Status will be updated to MAN upon cancellation approval.
- Go to Intel Payment Tracker.
- Enter search criteria.
For example, PO number 4200103597.
- Click Generate Reports button.
Result: The matching record will be displayed.
- Go to Intel Web Invoice.
- Click Create Credit Memo link.
Result: The Create New Credit Memo screen will be displayed.
- Enter PO number.
For example, 4200103597.
Note: You must enter the entire PO number in the PO field for Intel Web Invoice to retrieve the requested information and in order to continue.
- Click Create button.
Result: The credit memo for PO number entered will be created.
Notes- The credit memo generated requires supplier to fill in additional mandatory fields.
- The supplier assumes responsibility to submit complete and accurate invoices.
- Update the mandatory fields:
- Credit Type
- Supplier Original Invoice Number
- Credit Number
- Ship Service Date
- PO Line
- Credit Description
- Click Review Credit Memo button.
Result: The Review Credit Memo screen will be displayed.
Note: The errors and missing fields will be notified in red.
- Click Submit Credit Memo button.

OR,
Click Edit Credit Memo button for amendment.
Result: The Credit Note screen will be displayed.
Note: Supplier may print a copy of the generated invoice confirmation.