Visible to Intel only — GUID: dfp1619809179212
Ixiasoft
3.5.2.5.1. Build and Install Netdev Driver
3.5.2.5.2. Enable VFs if SRIOV is Supported
3.5.2.5.3. Configure the Number of Channels Supported on the Device
3.5.2.5.4. Configure the MTU Value
3.5.2.5.5. Configure the Device Communication
3.5.2.5.6. Configure Transmit Queue Selection Mechanism
3.5.2.5.7. Test Procedure by Using Name Space Environment
3.5.2.5.8. PIO Test
Visible to Intel only — GUID: dfp1619809179212
Ixiasoft
3.5.2.3.3. Run the Reference Example Application
- Build the reference application.
$ cd software/user/cli/perfq_app/
$ make clean && make all
$ ./perfq_app -h
- This command displays the available options in the application, as shown in the image below:
Refer to the README file located in the software/user/cli/perfq_app directory for more information.
- Perform a PIO test to check if the setup is correct. If successful, the application displays a Pass status as shown in the image below:

Here the -b option should be provided with the correct BDF in the system.
- Perform IP reset.
This step will perform an IP Reset. You can perform this step before every run.
Build devmem utility:$ cd software/user/cli/devmem $ make clean all $ ./devmem 0000:01:00.0 0 0x00200120 0x1
-
For Channel ID VF PF verification: Channel ID , VF and PF information is inserted in AVST data pattern. To test dma in proper channel and VF, it can be tested as described below:
For AVST LB : In the file software/user/common/mk/common.mk, enable CID _PAT.
For Example: __cflags += -DCID_PAT
Data validation mode supported. Performance mode is disabled.
__cflags += -DPERFQ_LOAD_DATA \
__cflags += -UPERFQ_PERF
Supported direction: Applicable Bi-directional (-i) only.
For AVST PKT GEN: The following configuration should be made in software/user/common/mk/common.mk
Enable both CID_PAT and IFC_PROG_DATA_EN
__cflags += -DCID_PAT
__cflags += -DIFC_PROG_DATA_EN
DIFC_PROG_DATA_EN
In validation mode, enable DPERFQ_LOAD_DATA flag and disable PERFQ_PERF flag.
__cflags += -DPERFQ_LOAD_DATA
__cflags += -UPERFQ_PERF
Supported direction: Bi-directional (-Z), Tx (-t) and Rx (-r) as well.
- Example of testing a loopback design with the following configuration:
Command:
$ ./perfq_app -b 0000:01:00.0 -p 32768 -l 5 -i -c 2 -d 2 -a 4
Configuration:
- bdf (-b 0000:01:00.0)
- 2 channels (-c 2)
- Loopback (-i)
- Payload length of 32,768 bytes in each descriptor (-p 32768)
- Time Limit (-l 5)
- Debug log enabled (-d 2)
- One thread per queue (-a 4)
Note: This hardware test was run with the Intel® Stratix® 10 GX H-tile PCIe Gen3 x16 configuration.Note: This hardware test was run with the Intel Agilex® 7 P-Tile PCIe Gen4x16 configuration.Figure 31. Custom AVST DMA Gen4 x16 : P-Tile Hardware Test Result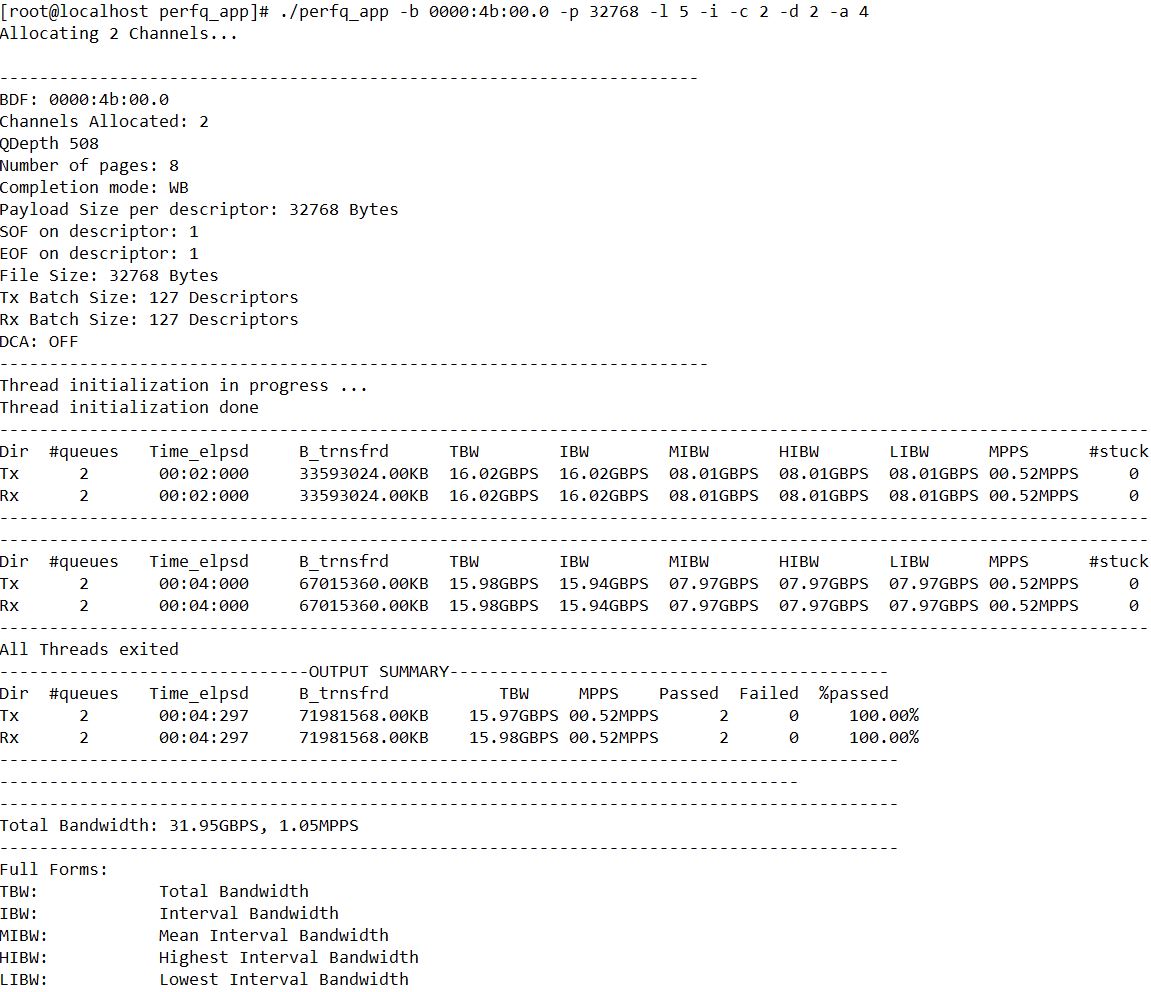 Note: For Rx/Tx test:
- AVMM should use -u instead of -i
- -i should be used for AVST Loopback case
- -z should be used in AVST PKT case
- Example of verifying on AVMM DMA:
Modify the below micro in the file: user/common/include/ifc_libmqdma.h
#define PCIe_SLOT 0 /* 0 - x16, 1 - x8 */
Command:$ ./perfq_app -b 0000:01:00.0 -p 32768 -l 5 -u -c 2 -d 2 -a 4
Configuration:
- bdf (-b 0000:01:00.0)
- 2 channels (-c 2)
- bi-directional DMA transfer (-u)
- Payload length of 32768 bytes in each descriptor (-p 32768)
- Time Limit set to 5 (-l 5)
- Debug log enabled (-d 2)
- One thread per queue (-a 4)
Note: To test the data validity, you need to perform H2D then D2H operations.Figure 32. Custom AVMM DMA Gen4 x16 : P-Tile Hardware Test Result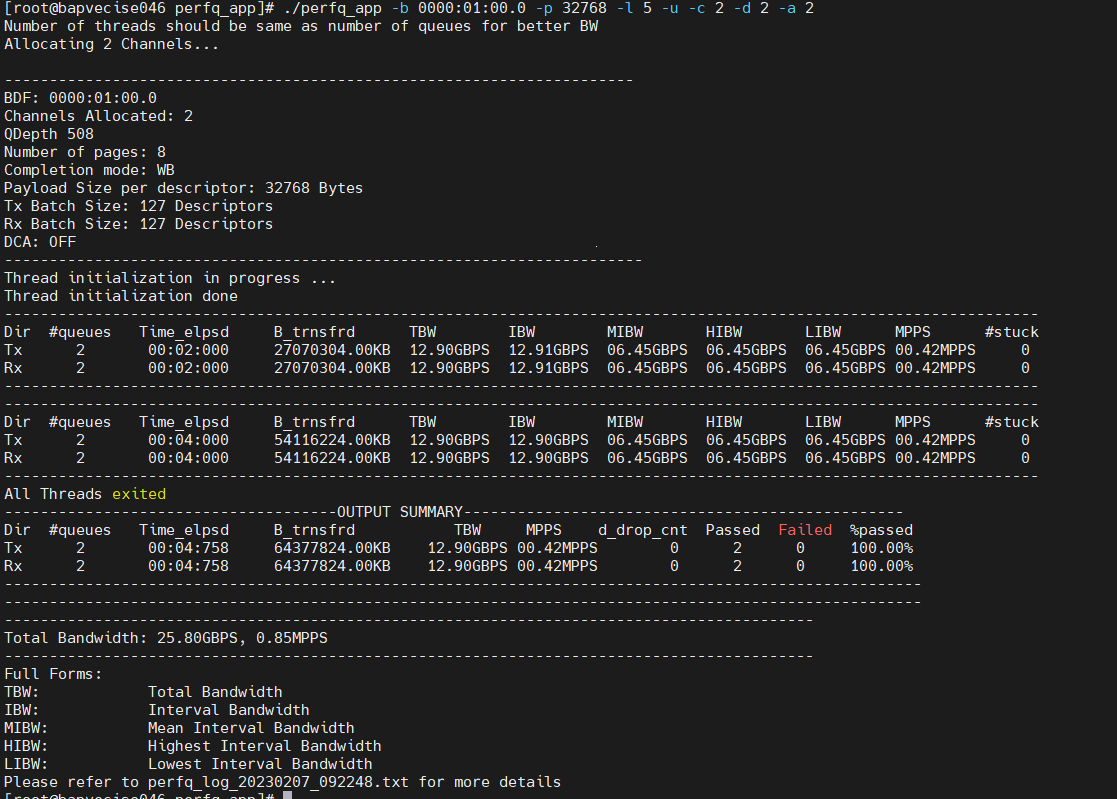
Note: Execute the following command for MSIX:
$ulimit -n 8192
To enable data validation using -v option, set the software flags in user/common/mk/common.mk as follows:
cflags += -UPERFQ_PERF
cflags += -DPERFQ_LOAD_DATA