Analyzing CPU and FPGA (Intel® Arria® 10 GX) Interaction
This recipe instructs you how to configure your platform to analyze an interaction of your CPU and FPGA, using Intel® Arria 10 GX FPGA as an example.
Content experts: JONG IL P.
Ingredients
This section lists the hardware and software tools used for the performance analysis scenario.
- Application: Matrix Multiplication OpenCL™ application. The Matrix Multiplication sample application is available for download from the Intel® FPGA SDK for OpenCL™ website
Tools: Intel® FPGA SDK for OpenCL™, Intel® VTune™ Amplifier 2019 or higher
NOTE:Starting with the 2020 release, Intel® VTune™ Amplifier has been renamed to Intel® VTune™ Profiler.
Most recipes in the Intel® VTune™ Profiler Performance Analysis Cookbook are flexible. You can apply them to different versions of Intel® VTune™ Profiler. In some cases, minor adjustments may be required.
Get the latest version of Intel® VTune™ Profiler:
From the Intel® VTune™ Profiler product page.
Download the latest standalone package from the Intel® oneAPI standalone components page.
- Operating System: CentOS* 7, Red Hat* Enterprise Linux 7 or higher
- CPU: Intel® server platform code named Skylake
- FPGA: Intel® Arria® 10 GX
Configure the Intel® Arria® 10 GX FPGA and Intel® FPGA SDK for OpenCL™
On your Intel Arria 10 GX FPGA, set up the DIP switches and connect the power and USB cables. See detailed instructions.
Download Intel® FPGA SDK for OpenCL™ (includes CodeBuilder, Quartus Prime software and devices) from http://fpgasoftware.intel.com/opencl/.
Run the setup_pro.sh file to install the SDK.
Run source init_opencl.sh to set the appropriate environment variables.
Run aocl version to verify the installation. The output should look similar to the following:
aocl 17.1.0.240 (Intel(R) FPGA SDK for OpenCL(TM), Version 17.1.0 Build 240, Copyright (C) 2017 Intel Corporation)Run aocl install to install the FPGA board.
Run aocl diagnose to verify the hardware installation. The output should look similar to the following:
Device Name:
acl0

Package Pat:
/home/tce/intelFPGA_pro/17.1/hld/board/a10_ref

Vendor: Intel(R) Corporation

Phys Dev Name  Status   Information

acla10_ref0   Passed   Arria 10 Reference Platform (acla10_ref0)
                   	PCIe dev_id = 2494, bus:slot.func = 44:00.00, Gen3 x4
                   	FPGA temperature = 44.3555 degrees C.

DIAGNOSTIC_PASSED
Build the Sample Application and Flash to the FPGA
Run make with the default makefile to build the host executable. The executable output filename is host.
Build the binary for the FPGA using the following command:
aoc -v -board=a10gx device/matrix_mult.cl -o bin/ matrix_mult.aocxSet up the USB driver to flash.
Run the following command:
sudo vim /etc/udev/rules.d/51-usbblaster.rulesAdd the following lines:
# usb blaster
SUBSYSTEM=="usb", ENV{DEVTYPE}=="usb_device", ATTRS{idVendor}=="09fb", ATTRS{idProduct}=="6001", MODE="0666", NAME="bus/usb/$env{BUSNUM}/$env{DEVNUM}", RUN+="/bin/chmod 0666 %c"
SUBSYSTEM=="usb", ENV{DEVTYPE}=="usb_device", ATTRS{idVendor}=="09fb", ATTRS{idProduct}=="6002", MODE="0666", NAME="bus/usb/$env{BUSNUM}/$env{DEVNUM}", RUN+="/bin/chmod 0666 %c"
SUBSYSTEM=="usb", ENV{DEVTYPE}=="usb_device", ATTRS{idVendor}=="09fb", ATTRS{idProduct}=="6003", MODE="0666", NAME="bus/usb/$env{BUSNUM}/$env{DEVNUM}", RUN+="/bin/chmod 0666 %c"
SUBSYSTEM=="usb", ENV{DEVTYPE}=="usb_device", ATTRS{idVendor}=="09fb", ATTRS{idProduct}=="6010", MODE="0666", NAME="bus/usb/$env{BUSNUM}/$env{DEVNUM}", RUN+="/bin/chmod 0666 %c"
SUBSYSTEM=="usb", ENV{DEVTYPE}=="usb_device", ATTRS{idVendor}=="09fb", ATTRS{idProduct}=="6810", MODE="0666", NAME="bus/usb/$env{BUSNUM}/$env{DEVNUM}", RUN+="/bin/chmod 0666 %c"
Lower the JTAG clock speed to 6 MHz using the following command:
jtagconfig --setparam 1 JtagClock 6MFlash the binary to the FPGA using the following command:
aocl flash acl0 ./bin/matrix_mult.aocxReboot the host system with the FPGA.
Run CPU/FPGA Interaction Analysis
Launch the VTune Amplifier. For example:
/opt/intel/vtune_amplifier_2019/bin64/amplxe-guiCreate a project for your analysis, for example: hello_world_opencl.
Click Configure Analysis to start a new analysis.
Set up the CPU/FPGA Interaction analysis.
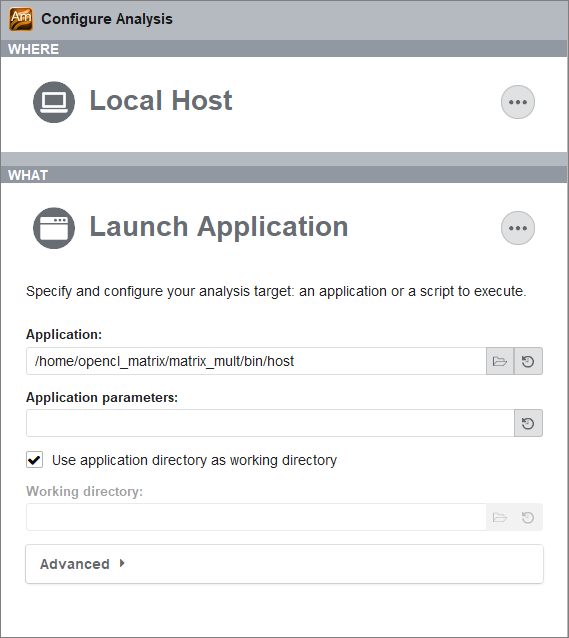
In the WHERE pane, select Local Host.
In the WHAT pane, select Launch Application and browse to the hello world application. Typically the application can be found under <sample app>/bin/host.
In the HOW pane, select CPU/FPGA Interaction from the available analysis types.
Click Start to begin the analysis.
Interpret Results
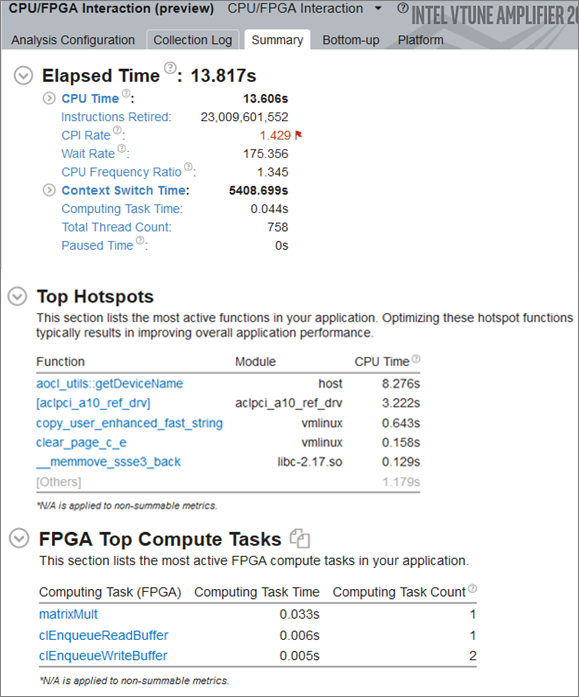
After data collection completes, the results are finalized and shown in the CPU/FPGA Interaction viewpoint. Start with the Summary tab to view the FPGA top compute tasks and well as the top tasks and hotspots for the CPU.
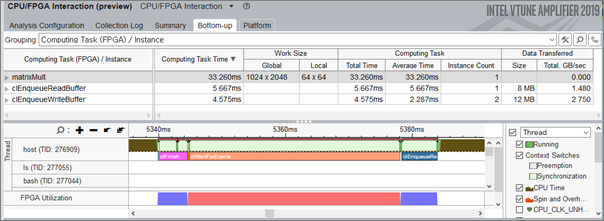
Switch to the Bottom-up tab to review the work size of a compute task and data transfer throughput. Use the timeline pane to review the FPGA utilization for compute and transfer.
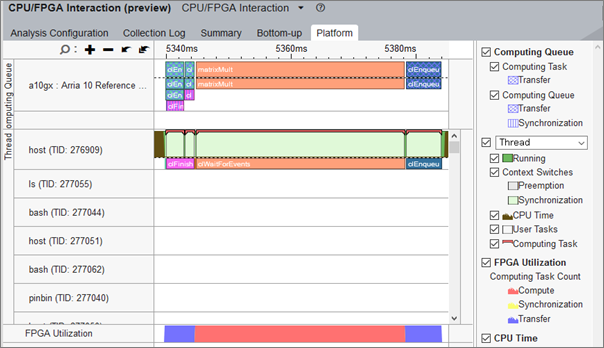
Use the Platform tab to check the computing queue for the FPGA and host application. You can also find the start time and duration of each transfer and synchronization.
Parent topic: Configuration Recipes