Download [PDF 838 KB]
Content
Cloth Simulations
Realistic cloth movement can bring a great amount of visual immersion into a game. Using PhysX* Clothing* is one way to do this without the need of hand animating. Incorporating these simulations into Unreal Engine* 4 is easy, but as it is a taxing process on the CPU, it’s good to understand their performance characteristics and how to optimize them.
Disabling Cloth Simulation
Cloth simulations in Unreal are in the level they will be simulated, whether they can be seen or not. Optimization can prevent this risk. Do not rely on the Disable Cloth setting for optimizing simulated cloth, as this only works in the construction, and has no effect while the game is in play.
Unreal Physics Stats
To get a better understanding of cloth simulation and its effect on a game and system, we can use a console command Stat PHYSICS in Unreal.
After entering Stat PHYSICS at the command line, the physics table overlay appears (Figure 1). To remove it, just enter the same command into the console.

Figure 1. Physics overlay table.
While there is a lot of information available, we need only worry about the first two (Cloth Total and Cloth Sim) for the purposes of this paper.
Cloth Total represents the total number of cloth draws within the scene, and Cloth Sim (simulation) represents the number of active cloth meshes currently simulated. Keeping these two numbers within a reasonable level to your target platform helps prevent a loss of frame rate due to the CPU being loaded down with processing cloth. By adding an increasing number of cloth meshes to the level, the number of simulations the CPU can handle at once becomes apparent.
Level of Detail
When creating a skeletal mesh and attaching an apex cloth file to it, that cloth simulation will always be tied to the zero value of the Level of Detail (LOD) of that mesh. If the mesh is ever switched off of LOD 0, the cloth simulation will no longer take place. Using this to our advantage, we can create a LOD 1 that is the same in every way as our LOD 0 (minus the cloth apex file), and use it as a switch for whether we want to use the cloth simulation (Figure 2).
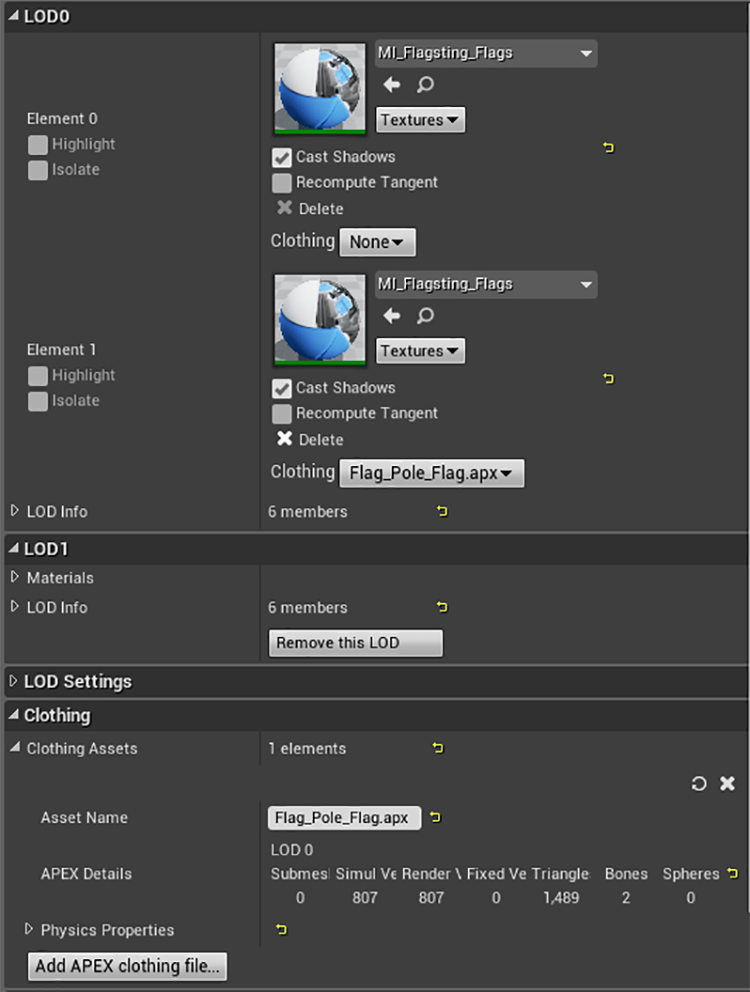
Figure 2. Level of Detail information.
Boolean Switch
Now that we have a switch, we can setup a simple blueprint to control it. By creating an event (or function), we can branch using a Boolean switch between simulating the cloth (LOD 0) and not simulating the cloth (LOD 1). This event could be called on a trigger entered to begin simulating the cloth meshes in the next area, and again when the player leaves that area to stop those simulations, or any number of methods, depending on the game level.
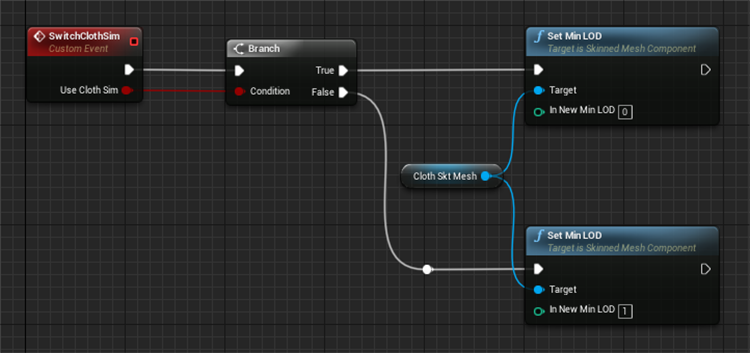
Figure 3. Switch blueprint.
Occlusion Culling Switch
If a more automated approach is desired, Occlusion Culling can be used as the switching variable. To do this, call the “Was Recently Rendered” function, and attach its return to the switch branch (Figure 4). This will stop the cloth simulation when the actor is no longer rendered.
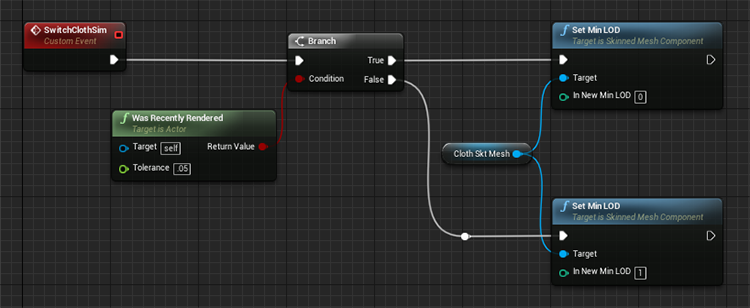
Figure 4. The ”Was Recently Rendered” function in the switch blueprint.
The problem with this method comes from the simulation reset that occurs when the simulation is switched back on. If the cloth mesh is drastically different when it is simulated, the player will always see this transition. To mitigate the chance of this happening, the bounds of the mesh can be increased with import settings. However, this also means intentionally rendering objects that cannot be seen by the player, so make sure it is worthwhile in terms of the game’s rendering demands.
A level design approach to solving this issue would include making sure all dynamically capable cloth meshes (such as flags) are placed in the same direction as the wind.
It may be possible to program a method in C++ that will save the position data of every vertex of the cloth simulation and translate the mesh back into that position when the simulation in turned back on. That could be a very taxing method, depending on the data structure used and the amount of cloth simulations in the level.
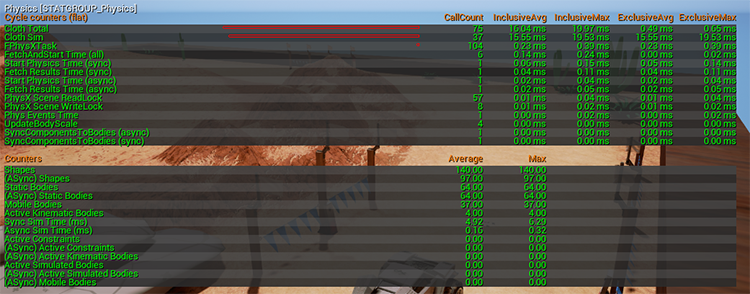
Figure 5. Cloth Simulations without Occlusion Culling switch.
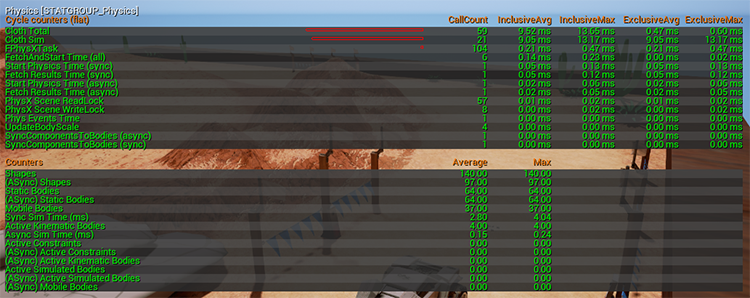
Figure 6. Cloth Simulations with Occlusion Culling switch.
Combination/Set Piece Switch
If the level happens to have a very dynamic set piece that is important enough to always look its best, an additional branch that uses a Boolean switch can be attached to the actor; in figure 6 we call it “Optimize Cloth?”.
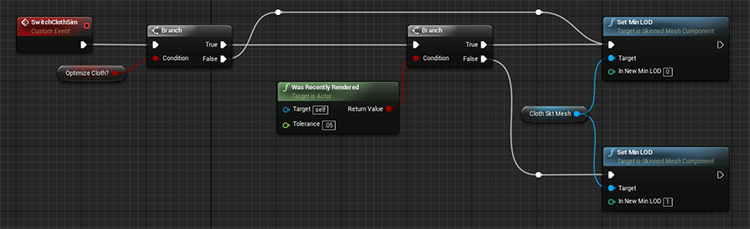
Figure 7. Set Piece switch.
With this new switch, importance can be given to certain cloth meshes that should always be simulated by switching their “Optimize Cloth?” value to false.
Using a Set Piece Switch
In figure 8 below, three cloth meshes are flags that turn away and point backwards, relative to their starting position. It takes a few seconds for this to look natural, but because they really sell the fact that they are not hand animated, I set them to be Set Pieces (Optimize Cloth? false), so they are always being simulated.
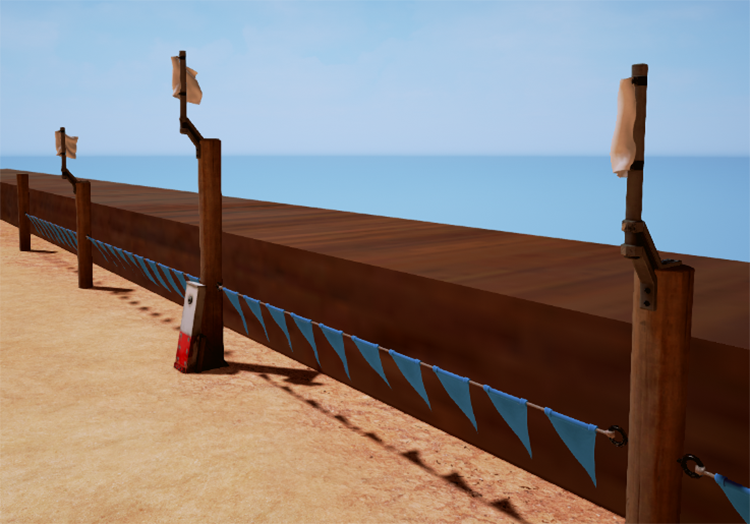
Figure 8. Complex flags used with set piece switches.