Download PDF [ 245 MB]

Introduction
The purpose of this cookbook is to guide users through the steps required to build a Data Plane Development Kit (DPDK) based traffic generator.
We built a DPDK-in-a-Box using the MinnowBoard Turbot, which is a low cost, portable platform based on the Intel® Atom™ processor E3826. For the OS, we installed Ubuntu* 16.04 client with DPDK. The instructions in this document are tested on our DPDK-in-a-Box, as well as on an Intel® Core i7-5960X Haswell-E desktop. You can use any Intel® Architecture (IA) platform to build your own device.
For the traffic generator, we will use the TRex* realistic traffic generator. The TRex package is self-contained and can be easily installed.
About the Author

M Jay has worked with the Intel DPDK team since 2009. He joined Intel in 1991 and has worked in various divisions and roles within Intel as a 64-bit CPU front side bus architect and 64-bit HAL developer before joining the Intel DPDK team. M Jay holds 21 US patents, both individually and jointly, all issued while working at Intel. M Jay was awarded the Intel Achievement Award in 2016, Intel's highest honor based on innovation and results.
Please send your feedback to M Jay Muthurajan.Jayakumar@intel.com

Any Intel processor-based platform will work—desktop, server, laptop or embedded system.
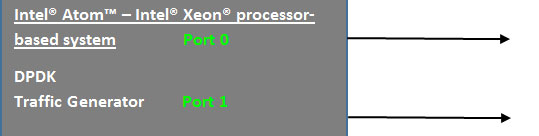
The DPDK Traffic Generator
Block Diagram
Software
- Ubuntu 16.04 Client OS with DPDK installed
- TRex* realistic traffic generator
Hardware
Our DPDK-in-a-Box uses a MinnowBoard Turbot single board computer:
- Out of the three Ethernet ports, the two at the bottom are for the traffic generator (dual gigabit Intel® Ethernet Controller I350). Connect a loopback cable between them.
- Connect the third Ethernet port to the Internet (to download the TRex package).
- Connect the keyboard and mouse to the USB ports.
- Connect a display to the HDMI Interface.
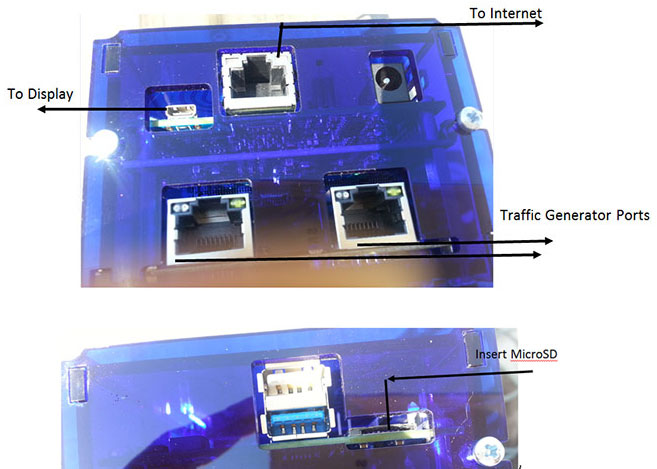
The MinnowBoard Turbot
The MinnowBoard includes a microSD card and an SD adapter.
- Insert the microSD card into the microSD Slot. The SD adapter should be ignored and not used.
- Power on the DPDK-in-a-Box system. Ubuntu will be up and running right away.
Choose the username test and assign the password tester (or use the username and password specified by the Quick Start Guide that comes with the platform).
- Log on as root by inputting the command, and verify that you are in the /home/test directory with the following two commands:
# sudo su
# ls

Note NIC Information
The configuration file for the traffic generator needs the PCI bus-related information and the MAC address. Note this information first using Linux commands, because once the DPDK or packet generator is run, these ports are unavailable to Linux.
-
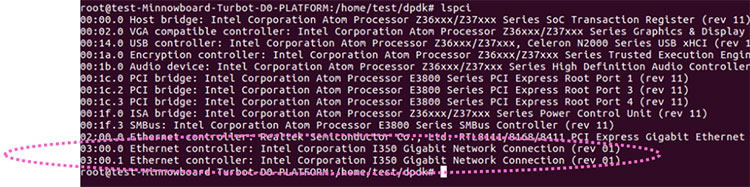
For PCI bus-related NIC information, type the following command:
# lspciYou will see the following output. Note down that for port 0 the information is 03:00.0 and for port 1 the information is 03:00.1.
-
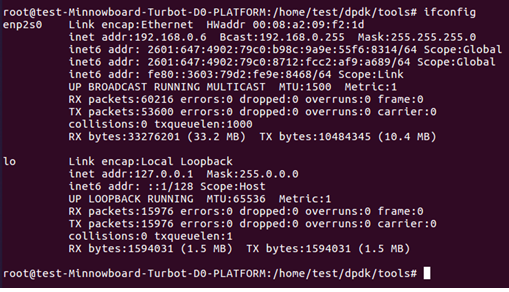
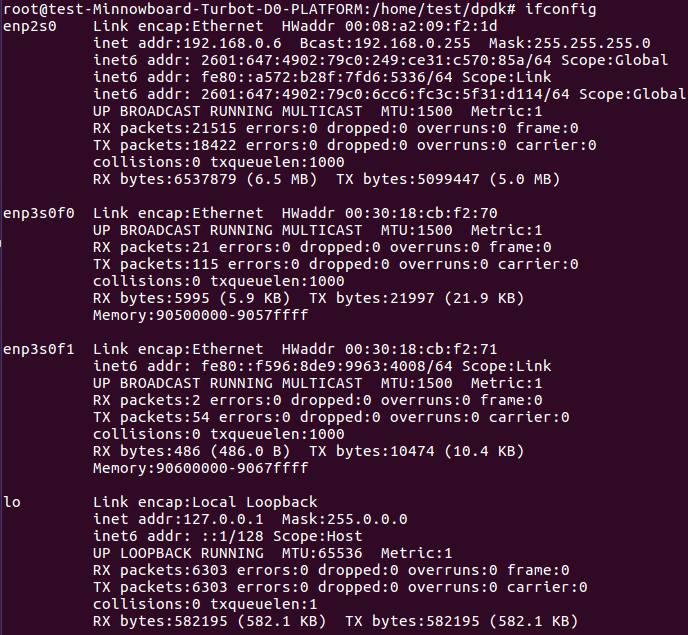
Find the MAC address with this command:
# ifconfigYou will see the following output. Note down that for port 0 the MAC address is 00:30:18:CB:F2:70 and for port 2 the MAC address is 00:30:18:CB:F2:71.
Note that the first port in the screenshot below, enp2s0, is the port connected to the Internet. No need to make a note of this.

| Item | Port 0 | Port 1 |
| PCI Bus-related NIC info (from lspci) | 03:00.0 | 03:00.1 |
| MAC address | 00:30:18:CB:F2:70 | 00:30:18:CB:F2:71 |
Fill the following table with the information you gathered from your specific platform:
| Item | Port 0 | Port 1 |
| PCI Bus-related NIC info (from lspci) | ||
| MAC address |
What if you don’t see both of the ports in response to the ifconfig command?
One possible reason is that you might have run the DPDK based application previously, in which case the application might have claimed those ports, making them unavailable to the kernel. In that case, refer to the appendix on how to unbind the ports from DPDK so that the kernel can claim them and you can find the MAC address with the ifconfig command.
In the following discussion, we will assume that you successfully found the ports and have noted down the MAC addresses.
Install the TRex* Traffic Generator
Input the following commands:
# pwd
# mkdir trex
# cd trex
# wget –no-cache https://trex-tgn.cisco.com/trex/release/latest
You should see that the install is complete, and saved in /home/test/trex/latest:

The next step is to untar the package:
# tar –xzvf latest
Below you see that version 2.08 is the latest version at the time of this screen capture:

# ls –al
You will see the directory with the version installed. In this exercise, the directory is v2.08, as shown below in response to the ls –al command. Change directory to the version installed on your system; for example, cd <dir name with version installed>:
# cd v2.08

# ls –al
You will see the file t-rex-64, which is the traffic generator executable:

Configure the Traffic Generator
The good news is that the TRex package comes with a sample config file cfg/simple_cfg.yaml. Copy that to /etc/trex_cfg.yaml and edit the file by issuing the following commands, making sure that you’re in your /home/test/trex/<your version> directory:
# pwd
# cp cfg/simple_cfg.yaml /etc/trex_cfg.yaml
# gedit /etc/trex_cfg.yaml

Edit the file as shown below with the applicable NIC information you gathered in previous steps:
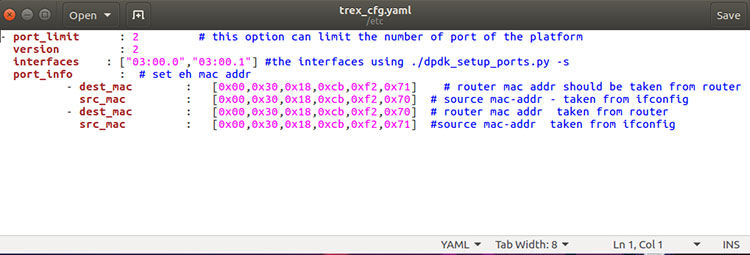

Below is the line-by-line description of the configuration information:
Port_limitshould be 2 (since DPDK-in-a-Box has two ports)- Version should be 2
- Interfaces should be the PCI bus ports you gathered using
lspci. In this exercise they are [“03:00.0”, “03:00.1”] Port_informationcontains adest_mac,src_macpair, which will be in the packet header of the traffic generated. The first pair is for port0. Since port0 is connected to port1, the firstdest_macis the MAC address of port 1. The second pair is for port1. Since port1 is connected to port0, the seconddest_macis the MAC address of port 0.
Please note that when you connect an appliance to which traffic must be injected, the dest_mac addresses will be that of the appliance.
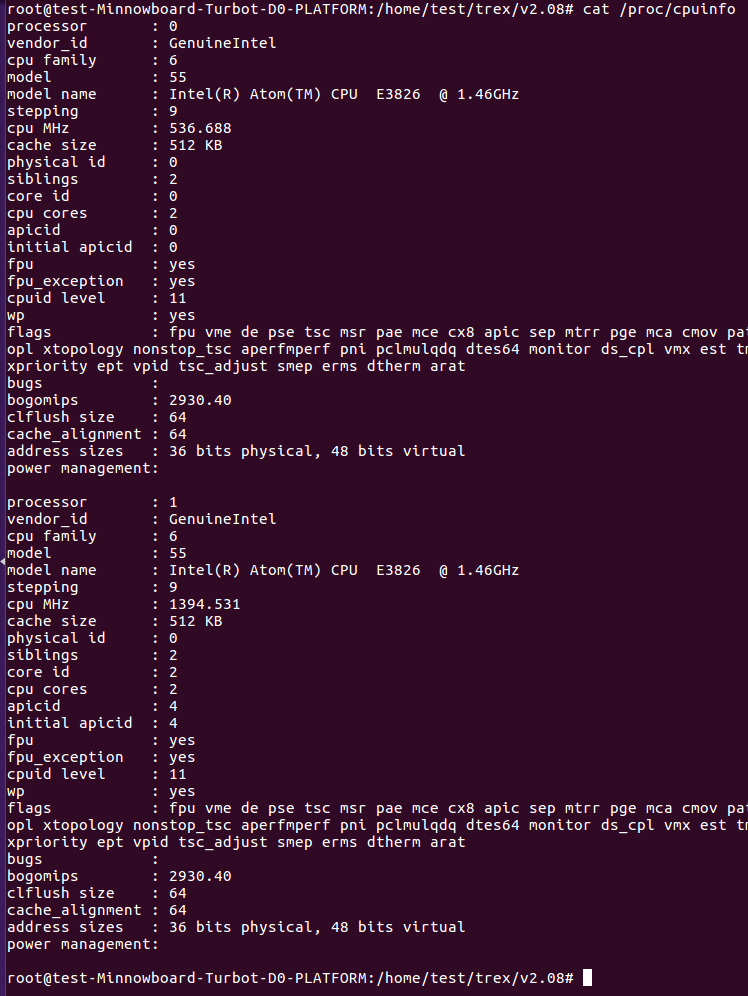
Note Platform lcore Count
This section is for informational purposes only.
# cat /proc/cpuinfo will give you the lcore information as shown in the Exercises section.
Why is this information useful?
The command line below that runs the traffic generator uses the –c option to specify the number of lcores to be used for the traffic generator. You want to know how many lcores exist in the platform. Hence, issuing cat /proc/cpuinfo and eyeballing the number of lcores that are available in the system will be helpful.
Run the Traffic Generator
# sudo ./t-rex-64 –f cap2/dns.yaml –c 1 –d 100
What are the parameters –f, -c, and –d?
-f for YAML traffic configuration file
-c or number of cores. Monitor the CPU% of TRex – it should be ~50%. Use cores accordingly
-d for duration of the test (sec). Default: 0

Summary
Below are three output screens: 1) During the traffic run, 2) Linux top command output, and 3) Final output after the completion of the run.
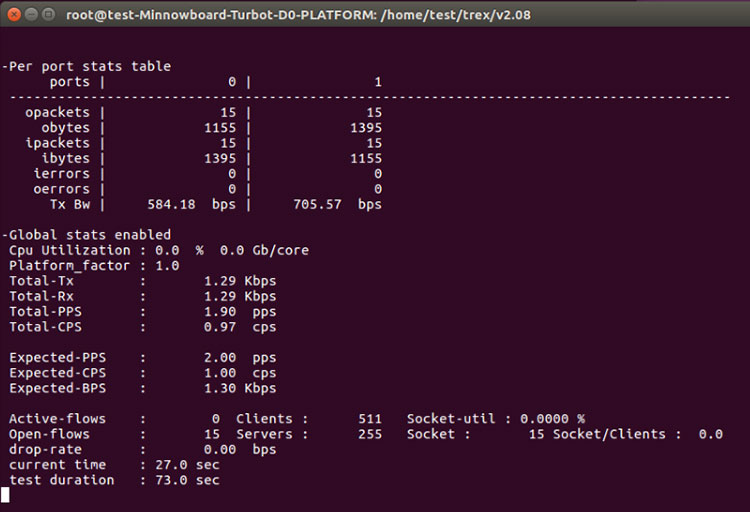
Screen output showing traffic during run (15 packets so far Tx & Rx)
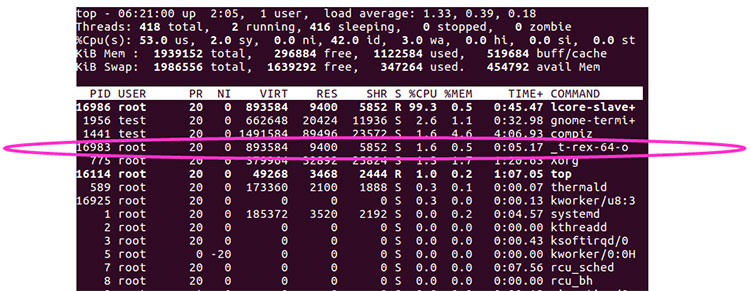
Output of top –H command during the run
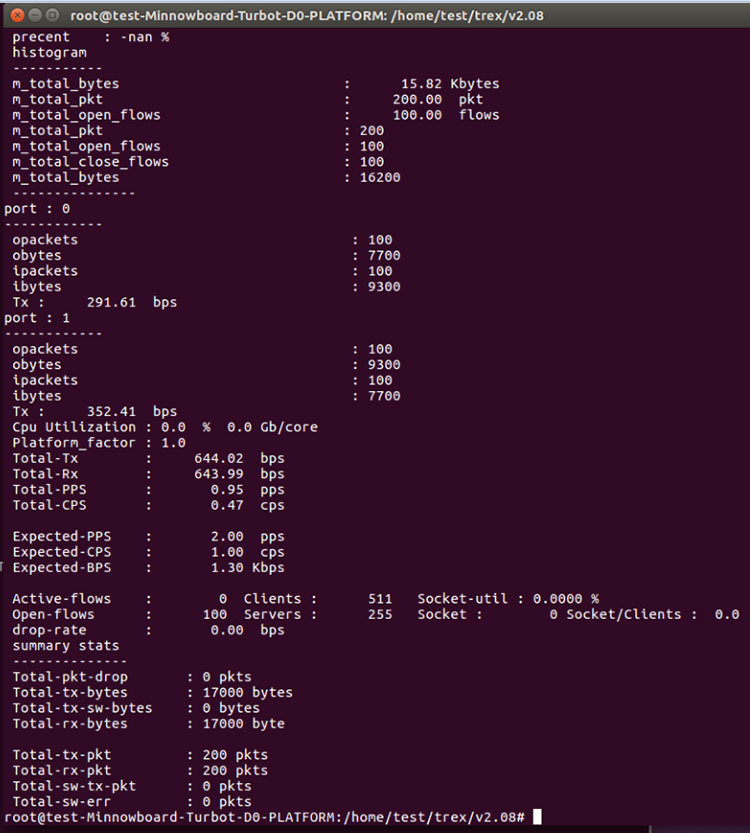
Screen output after completing the run (100 packets Tx & Rx)
Next Steps
Congratulations! With the above hands-on exercise, you have successfully built your own Intel DPDK based traffic generator.
As a next step, you can connect back-to-back two DPDK-in-a-Box platforms, and use one as a traffic generator and the other as a DPDK application development and test vehicle.
Please send your feedback to M Jay Muthurajan.Jayakumar@intel.com.
Exercises
- How would you configure the traffic generator for different packet lengths?
- To run the traffic generator forever, what should be the value of –d?
- How would you measure latency (assuming you have more cores)?
- Reason out the root cause and find the solution by looking up the error, “Note that the uio or vfio kernel modules to be used should be loaded into the kernel before running the dodk-devbind.py script” in Chapter 3 of the DPDK.org document Getting Started Guide for Linux.
- In the following screenshot, determine the hyperthreading state—enabled vs. disabled? (Hint: this is the Intel Atom processor platform.)
Appendix: Unbinding from DPDK & Binding to Kernel
This section is not needed if ifconfig is able to find the ports you want to use for traffic generation. In that case, you can skip this section.
What is the reason ifconfig cannot find the two ports? If you are only interested in the solution, skip this troubleshooting section and go to the Solution section.
Root Cause
ifconfig is not showing the two ports below. Why?
The reason that ifconfig is unable to find the two ports is possibly because the DPDK application was previously run and was aborted without releasing the ports, or it might be that a DPDK script runs automatically after boot and claims the ports. Regardless of the reason, the solution below will enable ifconfig to show both ports.
Solution
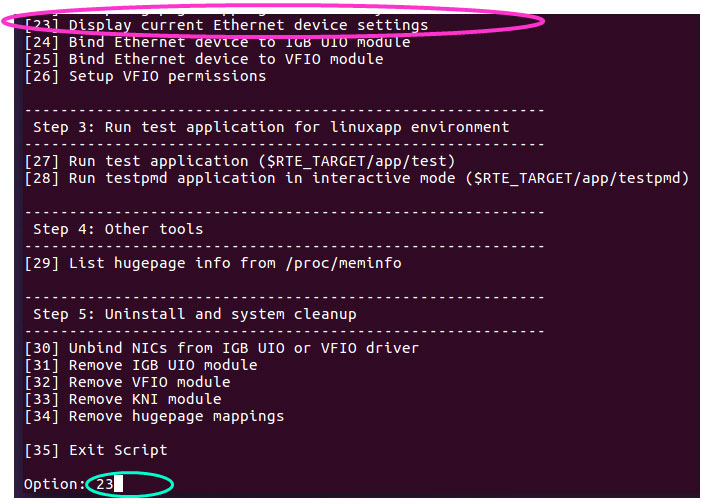
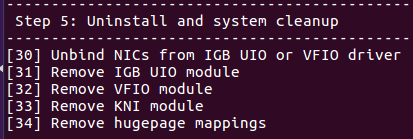
- Run ./setup.sh in the directory /home/test/dpdk/tools
- Display current Ethernet device settings
- Unbind the first port from IGB UIO (assuming it is bound to IGB UIO)
- Bind the port to IGB (the kernel driver)
- Repeat steps 3-5 to unbind the second port from IGB UIO and bind to IGB.

Select “Display current Ethernet device settings” (option 23 in this case).
Status showing two ports claimed by the DPDK driver.
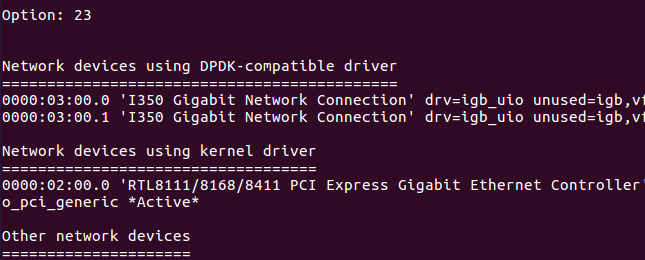
Unbind the first NIC from DPDK (specifically IGB UIO).
-
Select option 30 and then enter the PCI address of device to unbind:
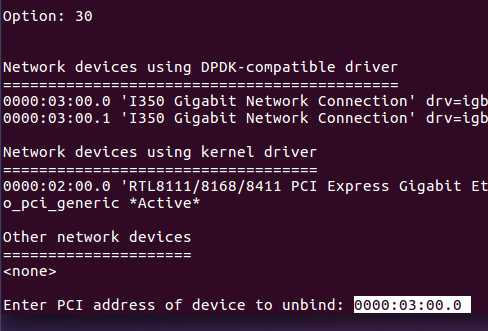
-
Bind the kernel driver igb to the device:

If the inputs entered are correct, script acknowledges OK.

- Verify by displaying current Ethernet device settings.
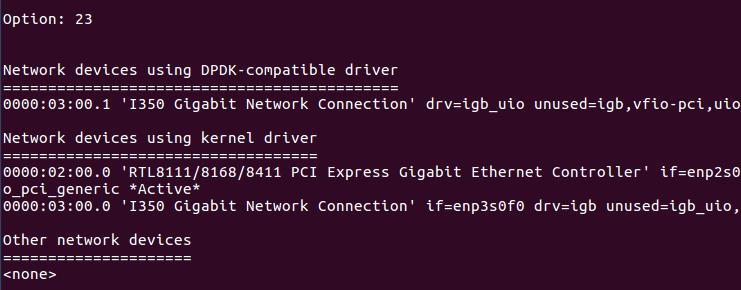
Success!
Above you will see the first port 0000:30:00.0 bound to the kernel.
Now on to the second port 0000:30:00.1
Success!
Below you will see both ports bound back to kernel.
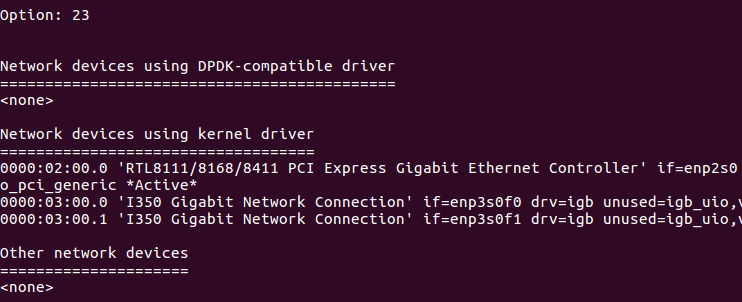
Now that both ports are bound back to kernel, ifconfig will give the needed info for those ports.
References
- MinnowBoard Wiki Home – learn more about the MinnowBoard Turbot single board computer.
- Profiling DPDK Code with Intel® VTune™ Amplifier - Use Intel® VTune™ Amplifier to profile DPDK micro benchmarks with your application. This comprehensive reference provides guidelines and instructions.
- Intel® VTune™ and Performance Optimizations - This session recording from the July 11, 2016DPDK/NFV DevLab covers performance optimization best practices, including analysis of NUMA affinity, microarchitecture optimizations with VTune, and tips to help you identify hotspots in your own application.
- DPDK Performance Optimization Guidelines White Paper - Learn best-known methods to optimize your DPDK application's performance. Includes profiling methodology to help identify bottlenecks, then shows how to optimize BIOS settings, partition NUMA resources, optimize your Linux* configuration for DPDK, and more.