Legal Disclaimers & Copyrights
All information provided here is subject to change without notice. Contact your Intel representative to obtain the latest Intel product specifications and roadmaps.
Intel technologies’ features and benefits depend on system configuration and may require enabled hardware, software or service activation. Performance varies depending on system configuration. No computer system can be absolutely secure. Check with your system manufacturer or retailer or learn more at intel.com.
You may not use or facilitate the use of this document in connection with any infringement or other legal analysis concerning Intel products described herein. You agree to grant Intel a non-exclusive, royalty-free license to any patent claim thereafter drafted which includes subject matter disclosed herein.
No license (express or implied, by estoppel or otherwise) to any intellectual property rights is granted by this document.
The products described may contain design defects or errors known as errata which may cause the product to deviate from published specifications. Current characterized errata are available on request.
Intel disclaims all express and implied warranties, including without limitation, the implied warranties of merchantability, fitness for a particular purpose, and non-infringement, as well as any warranty arising from course of performance, course of dealing, or usage in trade.
Intel does not control or audit third-party benchmark data or the web sites referenced in this document. You should visit the referenced web site and confirm whether referenced data are accurate.
Intel, the Intel logo, Intel Unite, Intel Core and Intel vPro are trademarks of Intel Corporation or its subsidiaries in the U.S and/or other countries.
*Other names and brands may be claimed as the property of others
© 2017 Intel Corporation. All rights reserved
.
Revision History
|
Revision |
Date |
Notes |
|
0.1 |
Nov 24, 2014 |
Outline |
|
1.0 |
Apr 24, 2015 |
Review and Edit |
|
1.1 |
May 7, 2015 |
Added Admin Web Portal |
|
1.2 |
May, 12 2015 |
Product updates, name change |
|
1.3 |
May 22, 2015 |
General updates to this guide |
|
1.4 |
May 27, 2015 |
Update images |
|
1.5 |
May 27, 2015 |
Update Profile Provisioning and Added Quiet Installers |
|
1.6 |
Jun 5, 2015 |
Updates for new software released |
|
1.7 |
Jun 8, 2015 |
Added more released features |
|
1.8 |
Jun 9, 2015 |
Added Appendix, Architecture, additional overview details |
|
1.9 |
Jun 16, 2015 |
Changed document flow and updates in deployment information |
|
2.0 |
Jun 17, 2015 |
Added screenshots and IIS details |
|
2.1 |
Jun 23, 2015 |
Added installation details and screenshots for Hub and Client |
|
2.2 |
Jun 30, 2015 |
Added details on the installation process and on the uninstall instructions |
|
2.3 |
Jul 7, 2015 |
Text fixes, added hyperlinks for easier navigation |
|
2.4 |
Jul 21, 2015 |
Replaced image in section 2.1 |
|
2.5 |
Sep 7, 2015 |
Update Legal Disclaimers, removed NDA terms, removed Intel Confidential, added HKCU, additional formatting |
|
2.6 |
Sep 10, 2015 |
Added new installers and new Quiet Installers |
|
2.7 |
Oct 20, 2015 |
Added Appendix for Apple OSX |
|
2.8 |
Dec 6, 2015 |
Added details on Enterprise Server installation for MS SQL installation and update images for version 2.0 app. Included Mac Client installation section under Client Installation and troubleshooting section. |
|
2.9 |
Dec 16, 2015 |
Update images for consistency and re-arranged sections of installation instructions |
|
3.0 |
Moved Mac out of the appendix, fixed TM&B and text. Moved Troubleshooting to the end, removed Appendix C |
|
|
3.1 |
Jan 11, 2016 |
Update Admin portal section, changed footer, minor text changes |
|
3.2 |
Jan 21, 2016 |
Trademark, text changes and layout fixes |
|
3.3 |
Feb 25, 2016 |
Changed SQL min requirement from 2008 to 2008 R2 |
|
3.4 |
May 11, 2016 |
Update troubleshooting content for software version 3.0 |
|
3.5 |
May 25, 2016 |
Modified Enabling IIS section to include SHA-2 support, update Solution Requirements |
|
3.6 |
May 31, 2016 |
Added registry keys and profile key-value pairs for 3.0 |
|
3.7 |
June 7, 2016 |
Added registry key to disable SHA-2 certificate, check for Windows under Enabling IIS section. Added additional clause on the Legal page, iPad Client install. |
|
3.8 |
June 10, 2016 |
Added registry key, added a command for self-signed SHA 2 certificate for win server 2012, and registry keys for Guest Access |
|
3.9 |
June 20, 2016 |
Re-arranged and fixed default values for the Profile keys table. Added Plugin Installation Notes and Certificate Hash Value section. |
|
3.10 |
June 20, 2016 |
Update screenshots for v3.0 |
|
3.11 |
July 13, 2016 |
Added the *.dmg file for OS X install, fixed 5 default data types in Profile Configuration, added the “Supported SKU” in min requirements, plugin details and default colors in Profile Settings, added SKIP_EXTENDED_DISPLAY key |
|
3.12 |
July 27, 2016 |
Added 12.8, text changes on section 5.6.1 and 5.6.2 |
|
3.13 |
Aug 21, 2016 |
Updates to section 5.6.1 and 5.6.2 |
|
3.14 |
Nov 16, 2016 |
Added Load Balancer, updated min req. for Win7. Added new Telemetry plugin and Reg Key ShowAvToggle. Changed order for plugin section. Added Microsoft web links. Changed default Profile window for the Admin Portal and A/V value to false. |
|
3.1.1 |
Feb 17, 2017 |
Added New Features table, modified Server Req., added pics for Connect for Non-Window devices, substantial changes on the Admin Portal section 8, Intel Unite branding changes showed on pics, added 5 keys to Profile Configuration; moved logfile Reg Key from HKCU to HKLM. Added details on section 2.1, 4.2 and 8.7.3 for the SMTP email server. Changed Standalone to StandAlone. Removed ‘repair’ option from uninstall server. |
|
3.1.2 |
Mar 5, 2017 |
Added new screenshots |
|
3.1.3 |
Mar 17, 2017 |
Minor text changes, changed default login info for Admin Portal |
|
3.1.4 |
Mar 31, 2017 |
Added deployment challenges for mobile devices on section 2.4 and 6.1, delete “tablet” from section 6.5 |
|
3.1.5 |
Apr 3, 2017 |
Added section 12.12 to Troubleshooting section (Admin Web Portal issue) |
|
3.1.6 |
Apr 13, 2017 |
Update screenshots on section 6.5, 8.2, 8.4.2, 12.4.1. Modified default values for “Allow File Transfer, Audio Video Streaming Support” on table 8.7.1 |
|
3.1.7 |
May 3, 2017 |
Changed min requirements for the Server from 2012 to MS 2008 and Server SQL 2008 R2 (as documented on earlier guide versions) |
|
3.2.1 |
Oct 18, 2017 |
Added a new Server installer image with the Host FQDN setting on section 4.3, a new column on the table in section 1.3, Whiteboard & Telemetry plugin details on section 5.6. Changed min iOS requirement on section 2.3. Fixed “Full Screen Room Mode” & “Full Screen Room Mode Show Pin” to True on section 8.7.1. |
|
3.2.2 |
Oct 27, 2017 |
Added section 8.7.5 Setup for Moderators and a note for setup moderators on section 8.5.4 paragraph C. |
|
4.0.1 |
Feb 26, 2018 |
Contents
1.2 Intel Unite Solution Terminology and Definitions 8
2 Intel Unite Solution Requirements 9
2.1 Enterprise Server Requirements 9
2.4 IT Considerations and Network Requirements 10
2.4.1 Mobile Client Devices 10
4 Enterprise Server Installation 12
4.1 Enterprise Server Overview 12
4.2 Enterprise Server Pre-Installation 12
4.3 Enterprise Server Installation 13
4.4 Uninstalling the Intel Unite Application [TBD - need update] 16
5.4 Recommended Hub Practices 22
5.6.1 Plugin Installation Notes 23
5.6.2 Plugin Certificate Hash Value 23
5.6.3 Adding the Certificate Hash to a Plugin on the Admin Web Portal 24
6.1 Client Pre-Installation 27
6.2 Windows Client Installation 27
6.3 macOS Client Installation 31
6.4 iOS Client Installation 33
6.5 Android Client Installation 34
6.6 Chrome OS Client Installation 36
8.1 Admin Web Portal Welcome Page 41
8.1.2 Log In with an existing account 42
8.2 The Admin Portal Home Page 42
8.2.2 Icon/ links nomenclature 44
8.4.1 Groups > Device Group 46
8.5.1 Management > Server Properties 49
8.5.4 Management > Moderators 52
8.5.5 Management > Reserved PIN 56
8.5.6 Management > Telemetry 57
8.7 Other Configuration Options for the Admin Portal 58
8.7.1 Profile Configuration 58
8.7.3 Email Server Settings 62
8.7.4 Alerting and Monitoring 63
9 OS and PC Security Controls 65
9.1 Minimum Security Standards (MSS) 65
9.2 Machine Hardening [TBD - update hyperlink] 65
9.3 Other security controls [TBD - update hyperlink] 65
11 Intel Unite Solution for macOS 67
11.2 General Connection Workflow 67
11.4 Common Distribution Methodologies 68
12.2 Can’t access the Admin Portal 70
12.3 Error when launching Hub application 71
12.3.1 Platform check fails with error ID333333 [TBD - update link] 72
12.3.2 Platform check fails with error ID666666 72
12.4 Hub does not get a PIN from the PIN Server- Scrolling dashes displayed 72
12.4.1 Server unable to process request; Login failed for user “UniteServiceUser” 72
12.4.2 No Servers listed. Trying DNS service record: _uniteservice._tcp 73
12.5 Client application crashes on launch/connect 74
12.7 Caution Area: Slowness on the PIN Server 75
12.8 Mac Client troubleshooting 75
12.8.2 Enterprise Server Connection Error -1001: The request timed out [TBD - update link] 76
12.10 Error 2147217900: failed to execute SQL string. 76
12.11 Error message: “Database error” 77
12.12 The Admin Web Portal is not displaying properly (missing components) 77
Appendix A. Enterprise Server Preparation 79
Appendix B. Example of ServerConfig.xml 91
- Introduction
Intel Unite® software powers secure, connected meeting spaces that simplify collaboration. It was designed to connect everyone in a meeting, quickly and easily. The Intel Unite solution is a simple and instant collaboration solution available today and a foundation for added capabilities and innovation in the future.
This document can be used to install the Intel Unite software in enterprise mode, learn more about features and assist with troubleshooting.
- Audience
This guide focuses on enabling users to launch and get familiar with the Intel Unite application and its featuresThis document is designed for use by IT professionals within a corporate environment and for other audiences that will be deploying the Intel Unite solution in an enterprise environment..
- Intel Unite Solution Terminology and Definitions
Enterprise Server (Server) – This term refers to the web server and the PIN service running on the server that will assign and resolve PINs. It provides a download page for the Clients and the admin portal for configuration.
Client – This term refers to a device (Windows*, macOS*, iOS*, Android* or Chromebook*) that will be used to connect to the Hub.
Hub – This term refers to a mini form factor PC with Intel® vPro™ technology that is connected to a display in a conference room running the Intel Unite application.
FQDN – This acronym stands for Fully Qualified Domain Name.
Plugin – This term refers to a software component that is installed on the Hub which extends the functionality of the Intel Unite solution.
IIS – This acronym stands for Internet Information Services, which is a web server provided by Microsoft*..
- What’s new in the Intel Unite Solution [TBD - needs updating, what's new or treat it like a complete different solution and remove this section]
To help you identify what has been added to the Intel Unite software, from the deployment perspective, the following table summarizes the features added to this deployment guide.
New functionality for the Client devices is documented on the Intel Unite Solution User Guide.
- Audience
- Intel Unite Solution Requirements
- Enterprise Server Requirements
- Microsoft Windows* Server 2012 or greater
- Recommended latest patch level
- Microsoft .NET* 4.5 or greater
- Microsoft .NET Framework 4.5.2 runtime
- Microsoft Internet Information Services (IIS) 7 or greater Requirements
- SSL enabled
- This will require a SHA2 based web server certificate with an internal or public root of trust
- Required IIS Features:
- Miscrosoft .NET Framework 3.5 Features
- ASP .NET 4.5
- WCF Services
- HTTP Activation enabled for both .NET 3.5 and 4.5
- Required IIS Roles:
- Common HTTP Features
- Deafult Document
- IIS Extensions:
- URL Rewrite 2.1
- SSL enabled
- Microsoft SQL Server 2012 R2 or greater
- Database server running with mixed mode authentication (The Active Directory only security model is not supported)
- SMTP email server configured under Microsoft Internet Information Services
- 4 GB RAM
- 32 GB available storage
NOTE: The IIS web server and Microsoft SQL database server can be installed on separate machines
- Microsoft Windows* Server 2012 or greater
- Hub Requirements
- Microsoft Windows 7 SP1, 8.1 or 10 (32 bit and 64 bit)
- Recommended latest patch level
- Microsoft .NET 4.5 or greater
- Supported SKU , 4th generation or newer Intel® Core™ vPro™ processor-based mini PC
- Wired or wireless network connection
- 4 GB RAM
- 32 GB available storage
- Microsoft Windows 7 SP1, 8.1 or 10 (32 bit and 64 bit)
- Client Requirements
- Microsoft Windows 7 SP1, 8.1 or 10 (32 bit and 64 bit)
- Recommended latest patch level
- Microsoft .NET 4.5 or greater
- OS X* 10.10.5 and greater
- iOS 10.1 or higher
- Chrom OS [TBD - version needed]
- Wired or wireless network connection
- Microsoft Windows 7 SP1, 8.1 or 10 (32 bit and 64 bit)
- IT Considerations and Network Requirements
Hub and Client installation should be managed using your IT department’s established process for software distribution.
To ensure reliability, it is strongly recommended that the Hub uses a wired network connection. This will prevent wireless bandwidth saturation, especially in congested areas.
Another consideration is that you will need to allow the Intel Unite software to accept incoming connections. This may require you to add an exception to the firewall installed on the Hub. Please contact your firewall vendor for specific details on how to create application exceptions.
In a production environment, it is strongly recommended that you use a Fully Qualified Domain Name (FQDN) and to setup a DNS service record, which points to the Enterprise Server. This provides the easiest method for Hubs and Clients to locate the Enterprise Server.
As a security upgrade, the application accepts only SHA-2 or greater certificates. This may require you to upgrade the certificates on your web server. Work with your IT Security team to get SHA-2 certificates during setup.
- Mobile Client Devices
If your organization will be deploying mobile client devices as part of the Intel Unite client OSs, please be aware of the following:
To be able to connect to the Intel Unite solution, all client devices need to be connected to the corporate network or use an appropriately configured VPN, including iOS and Android devices. When using tablets and phones – normally used for personal use- which are not connected to the corporate network but their own carrier provider, these may not be able to connect to an Intel Unite app session as you may have a corporate firewall that will not allow these connections.
For IT Administrators:
- If Intel Unite app users are using their own mobile devices, ensure they are on the company network to connect to Intel Unite or create a way to allow these connections.
- Ensure you have the necessary tools to properly manage these devices and keep the network safe.
- Have a proper strategy in place to manage these devices which may add additional security risk.
- Have a Mobile Device Management policy in place regarding personal devices, or mobile devices for work purposes.
- Security should be tailored to provide the correct amount of security in accordance with the sensitivity of the data to be protected, how much tailoring depends on what data your company considers critical and how far you want to drill down to apply protections.
- Mobile Client Devices
- Enterprise Server Requirements
- Deployment Overview*
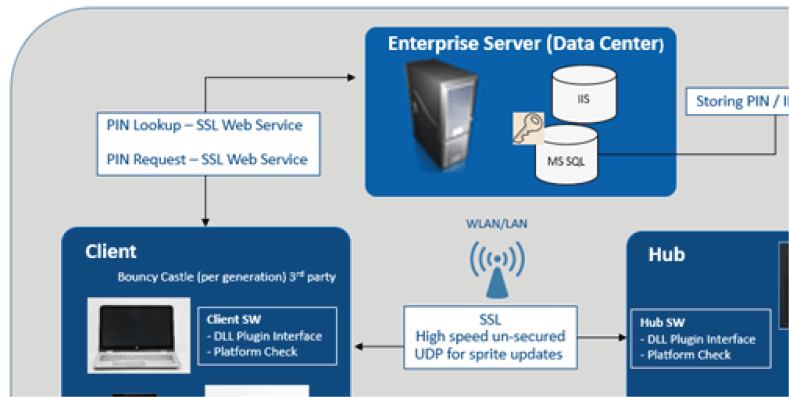
The Intel Unite solution consists of three components – an Enterprise Server, a Hub and a Client.
The Enterprise Server is the first component you will need to set up. When the Hub and Client applications are launched, they will use the Enterprise Server to exchange connection information and receive PIN assignments.
The Hub is the Intel Core vPro processor-based mini PC that is typically connected to a display or projector in a conference room.
Clients follow the instructions displayed on the Hub to download the Client software and connect to the Hub by entering the displayed PIN. Once connected, a Client can present content, view and annotate, and share files with other participants connected to the same Hub and interact with plugins installed on the Hub.
This diagram provides an overview of the installed components.
- Deployment Resources
In order to complete the installation, you will need the following:
- Administrative rights on the database
- Administrative rights on the Enterprise Server
- Administrative rights on the Hub
You may also need:
- IT security administrator to issue the SHA-2 certificate
- IT security administrator for firewall policies
- IT administrator to create a DNS service record which is used by Hub and Clients to locate the Enterprise Server (strongly recommended)
- Deployment Resources
- Enterprise Server Installation
- Enterprise Server Overview
The Enterprise Server Installer includes the Database, PIN server, Admin web portal, and Client download page.
The Enterprise Server contains 4 components:
- Microsoft SQL database: maintains all status information for the Intel Unite solution infrastructure.
- Web Service: a standardized messaging service that communicates with the database and the Hubs and Clients.
- Administration Portal Website: manages Hubs and Clients, generates statistics, and provides monitoring and alerting.
- Client download landing webpage: contains the Intel Unite software for the Client.
In addition, it is important to know that the Hubs and Clients locate your Enterprise Server on your network infrastructure through one of the following two methods: ServerConfig.xml file or DNS Service Record.
It is recommended that you use the DNS service record as this enables zero-touch configuration for the Client and Hub. See section on Creating a DNS Service Record. [TBD - update link] However, if you are not able to acquire a DNS service record, the Enterprise Server can be configured in the ServerConfig.xml file. See Appendix B for Example of a ServerConfig.xml file. [TBD- update link]
- Enterprise Server Pre-Installation
- Verify that the Server meets the minimum software and hardware requirements specified.
- Verify that IIS version 8.0 or greater is installed on your Server. The Server installer requires IIS to be enabled, otherwise installation will fail. For help enabling and setting up IIS, see section on Enabling IIS. [TBD - how to underline?]
- Setup the SMTP email server under IIS Manager, see section Email Server Settings. [TBD - how to underline]
- Make sure you have installed and enabled ASP.NET 4.5.
- Ensure SSL is enabled in IIS (https sites should work). NOTE: This may require you to work with your IT department to install a SHA-2 certificate with a valid root of trust.
- Make sure you have administrative access to MS SQL via Windows authentication or SQL authentication, see section on Microsoft SQL Server Install. [TBD - update link]
- Add a DNS Service record to enable automatic lookup of the Enterprise Server. See section on Creating a DNS Service Record. [ TBD - update link]
- Obtain Microsoft .NET Framework 4.5.2 from: https://www.microsoft.com/en-us/download/details.aspx?id=42642
- Install Microsoft .NET Framework 4.5.2.
- Obtain the Microsoft Web Platform Installer from: https://www.microsoft.com/web/downloads/platform.aspx
- Install and run the Web Platform Installer on your Server:
- Go to the Products tab
- Search for URL Rewrite
- Select URL ReWrite 2.1 from the list and click the Add button for the entry
- Click the Install button at the bottom of the screen
- Review the license and accept it to begin the instalation of the extension
- Enterprise Server Installation
Once you have verified all the steps in the previous section (Enterprise Server Pre-Installation), continue with the Intel Unite software installers (this process needs to be run on the server that hosts the IIS environment).
- Locate the Intel Unite Server.mui.msi file (either copied to local storage or on network storage)
- The installation wizard provides the option to install these components: a Database, Web Service, Client Download page, and Administration Portal[TBD - what is the server component name?]. [TBD - verify this is still true]
- After launching Intel Unite Server.mui.msi, accept the license agreement, by checking I accept the terms of the License Agreement box.
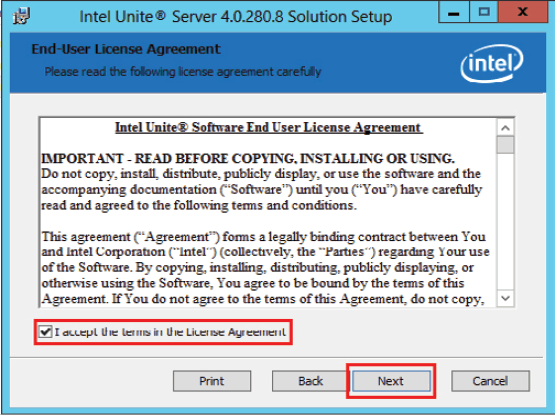
- Click Next to continue.
- Choose the type of data base, select Choose SQL if using Microsoft SQL Server, otherwise select Choose MySQL if using MySQL.
- Click Next to continue.
- In the SqlTitle [TBD - update] window, set the SQL database options. Available options are:
- In the DB Server section:
- The SQL Hostname default value is (local) for the SQL server. You can change it by editing your Hostname or leave the default value (if SQL is installed on the same server, leave the SQL Hostname as (local)).
- The default value for database server authentication is Windows Authentication. If SQL authentication is perferred select SQL Authentication and fill in the Login ID and Password of a SQL account that has access to the databaase. Test the database connection by clicking Test Connection button and confirm Database connection passed message box appears, click the OK button to close the message box.
- In the DB Server Connection Details section:
- Create a password and enter the password into the DB Account Password text box. This password is for the UniteServiceUser [TBD-confirm this] which is used to access the new database named unite_server. Retype the password into the Confirm Password text box.
- The password must contain at least 8 characters, at least one uppercase character, one lowercase character, one digit and one symbol.
- In the DB Server section:
- Click Next to configure the installation path.
- The default path for the installation is C:\Program Files (x86)\Intel\Intel Unite\. If a differnt location is perferred, either enter the new location into the text box or click the Change... button to use the Change destination folder dialogue box to select the install location. If using the Change destination folder dialogue box, browse to the install location and click the OK button.
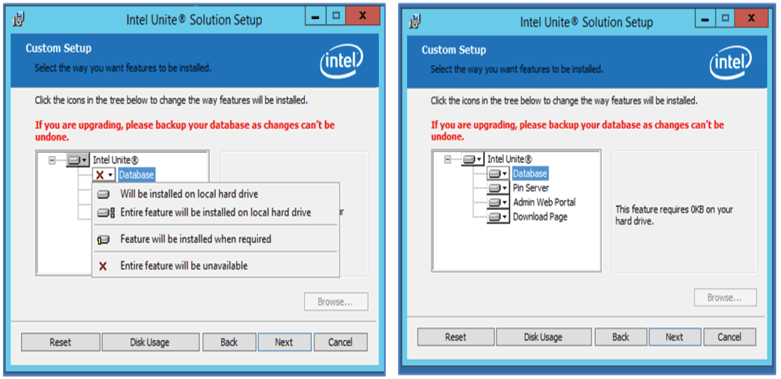
- Click Next to customize the setup.
- In the Custom Setup window, click Next to accept default settings. [TBD - need to understand what each of the drop down menu means - what is installed and what is not installed with each option] [TBD - why is there a browse button?]
- Enter an organization name in the Organization Name: text box and enter a description in the Organization Description: text box.
- Click Next to continue.
- Click Install to start the installation.
- You have now installed the Enterprise Server. Continue to the next section to install the Hub.
Optional:
- If you want to verify that the UniteServer database has been created by using SQL Management Studio Open SQL Management Studio on your server and connect to the SQL server. Expand Databases on the left side pane and make sure UniteServer Database has been created.

- Verify the installation was successful by accessing the Admin Portal (if it is installed on the server along with the database and PIN Server), following the link:
https://<yourservername>/admin
Note: Recommend using Chrome or Firefox for the web browser.
[TBD - is this correct?] You can login into your account if you have one. If this is a new software installation you can use the default admin account, the system will ask you to change the password before you can continue.
Default User: admin@server.com
Default Password: Admin@1

Note: If you receive an error when accessing the Admin Portal, please refer to the Troubleshooting section.
- Locate the Intel Unite Server.mui.msi file (either copied to local storage or on network storage)
- Uninstalling the Intel Unite Application [TBD - need update]
If you need to uninstall the application, you also need to delete the UniteServer database and the UniteServiceUser login created previously to avoid conflict within the application. Before you do this, ensure you have created a backup of your database.
- Launch the installer Intel Unite Server.mui.
- Click on Remove, and on Next to continue.

- Go to Microsoft SQL Server Management Studio, and manually delete the UniteServer SQL Database and the UniteServiceUser account. See the highlighted areas in the image below.

- Enterprise Server Overview
- Hub Installation
- Hub Pre-Installation
The Intel Unite application needs an exemption in the Hub firewall to check in and communicate with the Enterprise Server, since the Hub needs to be able to locate and check in with the Enterprise Server.
When you run the Hub installer, it will prompt you for server connection details and give you the option of bypassing the manual lookup (named Specify Server in the install process) in favor of retrieving information from the DNS Service Record. When the Hub installer is run, it will edit the ServerConfig.xml.
Depending on the method chosen for PIN look up, you need to know if you will use the Automatically Find Server or Specify Server selection when executing the installation.
If you know that the DNS Service record exists, then you can select Automatically Find Server, if unsure, use the Specify Server option (manual lookup), where you would need to know the hostname for the Enterprise Server.
If you have edited the ServerConfig.xml with the public key (see next section Public Key), you are not required to input the key again for the Client and Hub installers.
Note: If a server is defined in the ServerConfig.xml, it will take precedence over the DNS Service Record.
- Public Key
The public key is optional; what it does is specify how the Hub or Client will talk to the Enterprise Server. If left blank or unspecified, the Hub and the Client will validate the root of trust. If the application does not accept the certificate it will prompt for the user.
The public key would be used when you execute the installation of the Hub and the Client. You will need this key when running the installers for the Hub and the Client. To obtain the public key, go to: https://yourservername/unite/ccservice.asmx
In the URL bar, click the lock and view the certificate information. Go to details, click show all, scroll down the field to “Public Key”, then click public key to view. Optionally, you may copy the value out there and paste it into the ServerConfig.xml file.
Make sure you remove the spaces from the string after you paste in the ServerConfig file. If you have edited the ServerConfig.xml with the public key, you are not required to input the key again for the Client and Hub installers. See Appendix B for an Example of ServerConfig.xml.
- Public Key
- Hub Installation
- Locate the installer folder and run the installer for the Hub: Intel Unite Hub.mui.msi
- Click Next to continue.

- Click Next after you check the box I accept the terms in the License Agreement.

- Choose Enterprise and click Next.

- In this window you must specify the PIN server connection settings; your choices are:
- Automatically Find Server: This is the recommended choice (default).
- Specify Server: In this step you need to know the hostname for Enterprise Server
- Enter the hostname of the PIN Server.
- Enter the certificate public key if you have checked I know the certificate public key.
Select your choice and click on Next.

- Automatically Find Server: This is the recommended choice (default).
- The Destination Folder window will open up with the default folder where the Hub will be installed. You can change the destination folder if you wish, otherwise keep the default location. In this step you can also create a desktop icon. Click Next to continue.

- In this step you can go back to review your settings or click on Install to continue.

- Once the installation has ended, you will see the Completed the Intel Unite® Software Setup Wizard window. Click on Finish to end the installation process.

- When you launch the application for the first time, you will see the Intel Unite® application Privacy Statement.

- The Intel Unite® application Privacy Statement function is used to collect anonymous usage data. Intel is always looking to improve its products and would like to collect data to continue to improve the product. Please select YES or NO and check the box if you do not want to show the dialog box again.
- You will now see a PIN displayed on your screen or monitor. This is the PIN you will need for the Clients to connect to the Hub. (Please refer to the Troubleshooting section if the PIN is not displayed.)

- Hub Configuration
The configuration options for Hubs running Intel Unite software can be modified via the Admin Portal. The Admin Portal contains a default profile with default configuration settings that are applied to all Hubs that are checking in with the Enterprise Server. The configuration options are pushed to the Hubs after a connection from the Hub to the Enterprise Server is established. The settings are updated each time the Hub checks in, most of the settings for the Hub can be customized according to your organization needs, for example, each Hub can display different color, image, PIN size, contain different plugin, etc.
Refer to the Admin Portal Guide section to learn more about the Hub configuration.
- Recommended Hub Practices
In order to ensure the best possible end user experience, the Hub should be configured so that it is always ready to be used and system alerts or popups that display on the screen are suppressed. Recommended practices include the following:
- Windows should automatically log in the domain or user that Intel Unite application will execute.
- Screen savers should be disabled.
- The system should be set to never go to standby.
- The system should be set to never log out.
- Display should be set to never turn off.
- System alerts should be suppressed.
- Hub Security
The Hub administrator should ensure that recommended security practices are followed for each Hub. If the local user is logged on automatically, ensure that the user does not run with administrative privileges.
- Plugins
The Intel Unite application supports the use of plugins. Plugins are software elements that extend the features and capabilities of the application, implementing user experience modalities. Plugins may be unique to each Hub, if you want to install or find out more about each plugin please refer to the specific plugin guide. The following plugins are currently available for the Intel Unite application:
Plugin for Protected Guest Access: this plugin allows a computer to connect to a Hub without the need to be on the same enterprise network and without the enterprise server PIN validation. The Hub creates an ad-hoc/hosted network (access point) that an Intel Unite Client can connect to.
Plugin for Skype for Business: This plugin is a solution for including people from an online Skype meeting into an Intel Unite app session. The plugin runs on the Hub of the Intel Unite software and manages a mail account specific to each instance.
Plugin for Telemetry (software version 3.x): This plugin adds the ability for the Enterprise Server to accept and display Hub data. Minimum requirement is Enterprise Server v3.0 (Build # 3.0.38.44). Please note that on software version 4.0, this functionality has been incorporated in the solution thus no need for the plugin.
Plugin for Whiteboard: When using a touch base monitor, this plugin allows the monitor where the Intel Unite app is running to become a whiteboard for the in-room users, whom can draw on the screen and email the final content to other participants in the session.
In addition, there is an SDK used to write plugins:
Software Development Kit (SDK): Application Interface Guide to assist software developers or anyone looking to develop additional functionality for the Intel Unite application.
- Plugin Installation Notes
Each plugin is installed by default in the plugin directory within the installation directory [Program Files(x86) \Intel\Intel Unite\Hub\Plugins\PluginName (Plugin.dll)]. Plugins are enumerated at the start of the application. If a new plugin is added, the application will need to be restarted.
Before you install the plugin, verify compatibility with your target version of your Intel Unite solution [please refer to the specific plugin guide, as requirements vary among plugins].
You must also ensure you obtain and add the Plugin Certificate Hash value on the Admin Web Portal for each plugin used.
NOTE: For a test environment, you could use the default key value, but this is not recommended for a production environment.
- Plugin Certificate Hash Value
Follow these steps to find the Certificate Hash key value for your Plugin:
- Locate the plugin in the Plugins folder, right click on the *Plugin.dll and choose Properties (E.g. GuestAccessClientPlugin.dll)
- When the plugin Properties window opens, locate the Digital Signatures tab, click to open.
- Select Intel Unite Plugin and click on Details.
- In the Digital Signature Details window, click on View Certificate.
- In the Certificate window, select the Details tab and scroll down until you see Thumbprint.
- Select Thumbprint, once the value is displayed, paste it into a notepad or a text file, remove the spaces and save it.
- This key value will be used when you create the Profile for your plugin. The key value can be created and entered after the profile has been created, continue to next section to know more about it.

- Adding the Certificate Hash to a Plugin on the Admin Web Portal
Go to the Admin Web Portal, under Groups, select the profile where you want to enable the plugin.
On the Profile window, click on Add Profile Property and enter the following:

- Key: PluginCertificateHash_XXX
- XXX is the name of the plugin for which the hash is being added e.g. GuestAccessPlugin, for identification purposes, is recommended to use the name of the plugin that corresponds to the hash.
- Data Type: String
- Unit: Text
- Value: Use the thumbprint value saved in the notepad or text file mentioned in section Plugin Certificate Hash Value. The key value can also be entered after creating the key.
Click on Save, you can update the values later on by selecting the Edit link.
The new key will be displayed on the Profile window.

You also need to enable the Verify Plugin Certificate Hash key by setting it to True, the default value is False.

You can select if you want to enable or disable the plugin by switching from true to false or vice versa. Keep in mind that key values ensure the validity of the plugin.

Click on the Edit link to change the value to True and Save it.

The plugin settings have now been enabled.
- Key: PluginCertificateHash_XXX
- Plugin Installation Notes
- Hub Pre-Installation
- Client Installation
- Client Pre-Installation
A Client needs to be able to locate and check in with the Enterprise Server. The Intel Unite application needs an exemption in the client firewall to check in and communicate with the Enterprise Server.
When you run the client installer, it will prompt you for server connection details and give you the option of bypassing the manual lookup (named Specify Server in the install process) in favor of retrieving information from the DNS Service Record. When running the installer, it will edit the ServerConfig.xml.
Depending on the method chosen for PIN lock up, you need to know if you will use the Automatically Find Server or the Specify Server selection when executing the installation.
If you know that the DNS Service record exists, then you can select Automatically Find Server, it is preferable to use the automatic lookup to avoid mistyping errors. If unsure, use the Specify Server option (manual lookup), where you would need to know the hostname for the Enterprise Server.
Note: If a server is defined in the ServerConfig.xml, it will take precedence over the DNS Service Record.
Mobile Client Devices: all client devices need to be connected to the corporate network or use an appropriately configured VPN, including iOS and Android devices. When using tablets and phones – normally used for personal use- which are not connected to the corporate network but their own carrier provider, these may not be able to connect to an Intel Unite app session as you may have a corporate firewall that will not allow these connections, see section Mobile Client Devices for more information.
- Windows Client Installation
- Locate the installer folder and run the Client installer: Intel Unite Client.mui.msi. Click Next to continue.

- Check the box I accept the terms in the License Agreement and then click Next.

- Select Enterprise and click Next

- In this window you must specify the PIN server connection settings. Your choices are:
- Automatically Find Server: This is the most convenient choice (default).
- Specify Server: In this step you need to know the hostname for the Enterprise Server.
- Enter the certificate public key: this option will be enabled when you select Specify Server.
- Enter the certificate public key if you have it and have selected this method.
- Select your choice and click on Next to continue.

- The Destination Folder window will open up with the default folder where Intel Unite application is installed on Client, you can change the destination folder if you wish, otherwise keep the default location.

- You can go back to review your settings or click on Install to continue.

- the installation has ended, you will see the Completed the Intel Unite® Software Setup Wizard window, click on Finish.

- The following Connect to a screen window appears:

- To connect to the Hub, enter the PIN number shown on the monitor or screen, by default the PIN changes every five minutes.
- Please refer to the Intel Unite® Solution User Guide to learn about features and user information.
- macOS Client Installation
- Locate the file Intel Unite macOS X,X.dmg and download the software on your Mac Client. Double click the file to extract the application.
- You will be prompted to accept an End User License Agreement. Click Agree to continue.

- When extracted, drag and drop it to the Applications folder.

- Go to the Applications folder and locate the application, click on it to launch it.
- The screen Enter PIN & Connect to a Screen will be opened, you may connect to the Hub by entering the PIN displayed on the monitor or screen and start sharing.

- Please refer to the Intel Unite® Solution User Guide to learn about features and user information.
Note: The application will use DNS Auto Discovery (DNS service record) to locate the Enterprise Server. A default Enterprise Server can be specified by changing the settings to the com.intel.Intel-Unite.plist located in the user’s ~/Library/Preferences folder:
defaults write com.intel.Intel-Unite EnterpriseServer myServer.mydomain.myTLD . For more information refer to Intel Unite Solution for macOS section of this guide.
You can also change to which Enterprise Server the application will connect to. Click on the gear icon at the right lower corner of the Connect Screen to access Settings.
Two tabs will be available:

General: You can enter the Name, Email and Avatar of the user. You can also select if this client machine will connect to the Enterprise Server automatically (default) or by entering a defined path to the Server.
Advanced: Through this tab you can Enable Debugging or select if you will allow only Trusted Certificates.
- iOS Client Installation
The app is compatible with all iPads except the original 2010 iPad.
- On your iOS Client (i.e. your iPad device) go to the Apple app store and download the Intel Unite software for your Client.
- Once the app has been downloaded, open the app.
- Click on the gear icon at the right upper corner to access Settings and enter the information requested.

- On Settings enter your Screen Name and Server information.
- You can select Automatic to find the server, or if you want to connect to a specific server, click on Manual and enter the server you want to connect to.
- Click on Save.
- You may connect to the Hub by entering the PIN displayed on the monitor or screen and start sharing.
- Please refer to the Intel Unite® Solution User Guide to learn about features and user information.
- Android Client Installation
- On your Android device, go to the Google app store and download the Intel Unite software for your Client.
- Once the app has been downloaded, open the app.
- Click on the gear icon at the right upper corner to access Settings and enter the information requested.

- On Settings enter your Screen Name and Server information.
- You can select Automatic to find the server, or if you want to connect to a specific server, click on Manual and enter the server you want to connect to.
- Click on Save Settings.

- You may connect to the Hub by entering the PIN displayed on the monitor or screen and start sharing.
- Please refer to the Intel Unite® Solution User Guide to learn about features and user information.
- Chrome OS Client Installation
On your Chromebook device, go to the Google app store and download the Intel Unite software for your Client.
Once the app has been downloaded, open the app.
Click on the gear icon at the right upper corner to access Settings and enter the information requested.

- On Settings enter your Screen Name, Email, Server information. You can select Automatic to find the server, or if you want to connect to a specific server, click on Manual and enter the server you want to connect to.
- Click on Save Settings.
You may connect to the Hub by entering the PIN displayed on the monitor or screen and start sharing.
Please refer to the Intel Unite® Solution User Guide to learn about features and user information.
- Client Configuration
Client configuration settings can be changed via the Admin Portal. The Admin Portal contains a default profile with default configuration settings that are applied to all Clients that are checking in with the server. The configuration options are pushed to the Client after a connection from the Client to the Enterprise Server is established. The settings are updated each time the Client checks in.
Please refer to Profile Configuration to understand your configuration options.
- Client Pre-Installation
- 7 Advanced Installation
- Scripted Installers
This section provides information to run the installers silently, without any menus or windows appearing. In this way, property parameters will be passed to the installer via command line.
To run the silent installers, open the command prompt and use the following command line:
msiexec /i "PATH_TO_CLIENT_MSI" PARAMETER=VALUE PARAMETER=VALUE … /qn /l* “PATH_TO_LOG”
- The /i flags the specified MSI for installation. “PATH_TO_CLIENT_MSI” is the file name to the installer you are calling.
- “PARAMETER=VALUE PARAMETER=VALUE …” is a list of the parameters specified in the table below.
- The /qn flag will run the installer in quiet mode.
- The /l* flag will log output to the logfile you specify.
NOTE: You can see all options for msiexec by running the command: msiexec /?
Below is the full list of property parameters that can be passed into each installer:
Server Installation Parameters
Description
DBHOSTNAME = “local” or “{IP}” or “{server},{port}”
(defaults to local)
Host name of the Microsoft SQL Server. This will be where the installer creates the UniteServer database and adds the database service account. If installing the database to the current machine, you do not need to include this parameter, as it defaults to local.
DBLOGONTYPE = “WinAccount” or “SqlAccount” defaults to WinAccount
Specifies the logon type to access the Microsoft SQL Server. Options are Windows authentication or SQL authentication.
DBUSER = “{SQL username}”
DBPASSWORD = “{SQL password}”
If logon type is SqlAccount, provide the username and password.
NOTE: This account must have permissions to add the Database, and create the database service account.
DBLOGONPASSWORD = “{service account password}”
The password to be used by the service account to connect to the UniteServer database.
DBLOGONPASSWORDCONF = “{service account password}”
This variable must have the same value as specified in DBLOGONPASSWORD
ADDLOCAL = “ALL”
There are only two options: ALL = Install the database AND PIN server, admin portal, and download page.
(do not specify this variable) = Install Pin Server, admin portal, and download page.
Client and Hub Installation Parameters
Description
PINSERVERLOOKUPTYPE = “Lookup” or “Manual”
defaults to Lookup
Specifies how the application will find the PIN server. Lookup will utilize the DNS service record, while Manual requires the input of the parameters PINSERVER.
PINSERVER = “{hostname}”
The host name of the server to connect to.
CERTKEYCHECKED = “1” or “0”
Defaults to 0
This parameter is optional.
0 = Don’t check certificate key hash
1= Check certificate key hash, CERTKEY must also be specified.
CERTKEY = “{certificate key}”
This parameter is optional.
Enter the certificate public key of the PIN Server.
SHORTCUTS
Optional. Set to "1" to place desktop shortcut icons.
INSTALLTYPE = two possible values "Enterprise" and "StandAlone".
If INSTALLTYPE is "Enterprise", then the Client/Hub will install as enterprise. If INSTALLTYPE is "StandAlone", then the Client/Hub will install as standalone.
SKIP_EXTENDED_DISPLAY= “1” or “0”
Defaults to 0
0 = False
1= True
- Registry Keys
The registry keys are written to the registry when you run the installers and application. Values in some of these keys can be adjusted in accordance to the desired outcome. See the list below to understand the keys that are written by the Intel Unite application:
Registry Keys: (current user)
Value
Device
HKEY_CURRENT_USER\software\Intel\Unite\ActiveConnection (DWORD)
[0 = no users connected 1= users connected]
Hub
HKEY_CURRENT_USER\software\Intel\Unite\ PublicKey (String)
[public key of connection certificate]
Both
HKEY_CURRENT_USER\software\Intel\Unite\ CurrentPin (string)
[current PIN of this system]
Hub
HKEY_CURRENT_USER\software\Intel\Unite\DoNotShowPrivacyStatement (DWORD)
[0 = privacy statement on launch 1 = do not show privacy statement]
Both
HKEY_CURRENT_USER\software\Intel\Unite\HWThumbprint (String)
[hash of HW]
Both
HKEY_CURRENT_USER\software\Intel\Unite\ ServicePort (DWORD)
[port that service is listening on]
Hub
HKEY_CURRENT_USER\software\Intel\Unite\ ActivePresenter
[1 = client is presenting 0 = no client is presenting]
Hub
HKEY_CURRENT_USER\software\Intel\Unite\PinPadWindows (DWORD)
[1 = the application is ready to enter a PIN 0 = otherwise]
Client
HKEY_CURRENT_USER\software\Intel\Unite\GuestAccess\SSID
Reference: GUEST ACCESS Plugin Guide
Setting a default value will decrease security in Guest Access
Hub
HKEY_CURRENT_USER\software\Intel\Unite\GuestAccess\PSK
Reference: GUEST ACCESS Plugin Guide
Setting a default value will decrease security in Guest Access
Hub
HKEY_CURRENT_USER\software\Intel\Unite\GuestAccess\Download
Reference: GUEST ACCESS Plugin Guide
The default download link is http://2.168.173.1/download
Hub
HKEY_CURRENT_USER\software\Intel\Unite\ShowAvToggle (DWORD) = 1
(A/V Mode Enable/Disable toggle)
Win7 aero-mode. Allows the user to toggle between RTF & WebRTC.
Client
Registry Keys: (machine)
Value
Device
HKEY_LOCAL_MACHINE\software\Intel\Unite\ HubUnlockPassword (String)
[password to exit Hub application]
Hub
HKEY_LOCAL_MACHINE\software\Intel\Unite\ DisableCheckCertificateChain (DWORD)
[Set for Self-Signed Certificates, where 1 = do not check certificate chain of Enterprise (Server Certificate)]
Both
HKEY_LOCAL_MACHINE\software\Intel\Unite\ DisableUsageCollection (DWORD)
[1 = Disable telemetry data collection]
Both
HKEY_LOCAL_MACHINE\software\Intel\Unite\WindowedMode (DWORD)
(only works in Small Business mode, not Enterprise mode)
[1 =the user wants the hub to launch in windowed mode (with minimize, maximize and exit buttons)
0 = otherwise]
Hub
HKEY_LOCAL_MACHINE\software\Intel\Unite\AllowInsecureCertificates (DWORD)
[1 = certificate algorithm check should be skipped
0 = the enterprise certificate is forced to use a SHA2 certificate]
Both
HKEY_LOCAL_MACHINE\software\Intel\Unite\ShowOnlyInOneMonitor (DWORD)
[This key only works if windowed mode is set to 1.
1= it will only show one PIN window even though it has more monitors plugged]
Hub
HKEY_LOCAL_MACHINE\SOFTWARE\Intel\Unite\S4BPlugin
Keywords (String) = comma,separated,list,of,keywords
Key used for the Plugin for Skype for Business
Hub
HKEY_LOCAL_MACHINE\software\Intel\Unite\ LogFile (String)
[path to filename with write access to log runtime debug messages]
Both
- Scripted Installers
- Admin Portal Guide
The Admin Portal is the administrator web portal for the Intel Unite application which will let you view and manage the devices on which the Intel Unite application is installed. It is one of the components installed on the Enterprise Server during the installation, along with the PIN service and Web Server. (See section on Enterprise Server Installation). The Admin Portal need not be on the same server as the database, as long as it has access to the database.
In addition to the new features, there is a new look at the Admin Portal; help menus and feature information have been added to facilitate the configuration of your Hubs and Client devices.
- To access the Admin Portal go to your browser and follow the link assigned to the portal, the link is https://<yourservername>/admin, where <yourservername> is the name assigned to the Intel Unite Server (Default name = UniteServer, i.e. https://uniteserver/admin)
[TBD - is this true?]When the IT administrator ran the software installers, a default administrator account was created with the following username and password:
- User: admin@server.com
- Password: Admin@1
This account has complete access to the Admin Portal and it will let you login, however, you will be prompted to change it by the system. If you have already registered an account, enter your login information to access the Admin Portal.
- Admin Web Portal Welcome Page
The welcome page will be displayed as soon as you connect to the Admin Portal, to access the home page you must log in with the default account created during installation or with your account information.

- Register an Account
To register an account, make sure you are logged out of the Admin Portal.
- Click on the Register link at the top right of the navigation bar.
- Fill in the form with the desired email address and password and click Register.

- Alternatively, you can add/register users through the Management tab once you have logged into the Admin Portal.
- Log In with an existing account
You can log in with a registered account or use the default account created during the installation, as a reminder, this account has complete access to the Admin Portal but you will be prompted to change the password to ensure there is restricted access to the Portal.

- Register an Account
- The Admin Portal Home Page
The home page contains a welcome message and provides a quick overview of all active Systems - Clients and Hubs - that have checked in with the server. The table displays the name of each System, the Profile assigned to each system, the ON or OFF Status, and the last check-in date and time.

The entries of the table can be filtered using the search box with multiple keywords and each keyword will search through all the columns. You can select how many entries you want to display on this window by clicking on the Show <number of> entries. You can view 10, 25, 50 or up to 100 entries.
- Navigation bar
The navigation bar will direct you to the different areas of the web portal and also shows the currently logged in user or will show Register if no user is logged in.

The web portal pages and subpages are:
- Devices
- Groups
- Device Group
- Profiles
- Management
- Server Properties
- Users
- Roles
- Moderators
- Reserved PIN
- Telemetry
- Schedule Meeting
To learn more about them, go to the section assigned to each topic in this chapter of the Admin Portal.
- Icon/ links nomenclature
Through the Admin Portal, you will consistently see the following icons or links:

Edit

View Details

View Devices

Delete

Dialog box containing information about a specific value
By placing the cursor over the icon you will be able to see the information pertaining to the respective item.
- Navigation bar
- Devices page
The Devices page contains all devices currently in the database. You can select a specific device and View, Edit, Update or Remove accordingly.

On the Devices page you will find:
- System FQDN is the fully qualified domain name of the Client/Hub
- Profile has configuration settings that are applied to the device
- Group is the name of the group that a device has been assigned to
- Status shows if the device is active - ON (green) - or inactive - OFF ( gray) -
- Last Check-in is the last time the device checked in with the server
- Details: by clicking on the View Details link, the window Client Properties will be displayed showing the system properties and its metadata. Some of the keys under Client Properties are:
- CertificateHash
- ClientHostName
- IPAddress
- IsRoomMode
- SevicePort
To know more about valid values for each key go to section Profile Configuration for detailed information about keys and corresponding values.

Edit link- Clicking on the Edit link will allow you to edit the device profile and assign the device to a specific group

Delete link- Clicking on the Delete link will remove the device from the admin Portal, you will get a confirmation message before the device is removed. Alternatively, you can select on the left column, one or multiple devices and click on the button Remove selected devices.
- Groups page
The Groups page gives you two options in the menu: Device Group and Profiles.

- Groups > Device Group
Device Group provides a way for you to group devices together for monitoring, functionality, or convenience. You can have devices with the same or different profile assigned to a group. This page lets you create, view, edit and delete the groups and entries for each group. You can create a new group by clicking on Create Group and providing the name of the group.

Once the Group has been created, you can:
- Click on the View Devices link to add or remove devices to the group selected or you can click on the Details link, on the right column, to view the Properties and the Metadata of each system belonging to this group.

- Click on the Edit link to update or change the Group Name.
- If you made changes, click on Save to keep your changes.
- Groups > Profiles
This page allows you to create, view, delete and edit the profiles. It is similar in layout and function to Device Group but contains profiles. The difference between Profiles and Groups is that Profiles contain the configuration options for devices. Devices may only belong to one profile, while they can belong to many device groups.

The Profiles page displays the Profile Name and Description of each profile available in the Server. Profiles are applied to all devices checking in with the Enterprise Server, you will notice that the default profile cannot be deleted in the Admin Portal.
By clicking on the View Devices link, you will see the systems that have been assigned to the profile selected.
By clicking on the Edit link, you can update the name of the profile and its description.
By clicking on the View Details link of a particular profile, you can access and edit key and value settings of the default or newly created profile. A list will be displayed showing each key, its value and the Edit link to update or customize accordingly. See section Profile Configuration for detail information about keys and corresponding values.
- Default Profile
The default profile cannot be deleted in the Admin Portal, you can create other profiles knowing that the default one will not be deleted.

Default Keys and Values:


Please note that each key has a dialog box next to the key, by placing the cursor on the dialog box, you should be able to see the values and/or information about each key, providing the information you need before you edit the key, see the two examples below:


You can also refer to the table provided on Profile Configuration for detailed keys and corresponding values.
- Groups > Device Group
- Management page
The Management page drops down into several sub-pages:

Server Properties: the interface for viewing and modifying server keys and values.
- Users: you may add, remove or manually edit any account on this page.
- Roles: will allow you to create new roles, update existing ones, assign users to roles, and edit permissions for user management.
- Moderators: this feature allows users to take control of a meeting by grouping functionality into roles, in this section you can easily add or remove Moderators.
- Reserved PIN: This feature allows IT administrators to assign PINs to certain rooms. PINs can be auto-generated or manually set by IT according to the needs of the session to take place or the room location.
- Telemetry: in order to view Telemetry data, the Telemetry plugin for the Intel Unite® Solution needs to be installed. The Telemetry plugin allows IT Administrators to collect usage information about the Intel Unite application and the client devices connected to each Hub.
For more information on these sub-pages, see sections below.
- Management > Server Properties
On this page you can view, create, edit and delete key-value pairs for the server.

The keys that the Admin Portal uses are:
- EmailServer: This is the email where the server will send notifications.
- InactiveCount: used by the Intel Unite application’s health monitoring tool that emails users that are assigned the Notifications role.
- WarningThreshold: used to determine the threshold of when a device is considered to be inactive, in minutes, with a default value of 60 minutes.
By clicking on the Edit link, you can update the keys accordingly.
- Management > Users
The Users page will display a list of all users registered on the Admin Portal, if their account has been locked out, and their roles. You can also update this information by clicking on the Edit link.

You can add a new user by clicking on Create User and providing an email, phone number, and password. While creating the user, you can also assign a specific role or leave the default value. To assign access rights to the new user, you can define roles and assign the user to a role.

On this same page, by clicking on the role itself (Default or Admin), the Roles page will open up, please continue to the next section to get more information about Roles.
NOTE about the Default account: Adding a new user account by logging in with the default admin@server.com account will not automatically send an email verification. To manually verify the email address, log in to the new account, click the “Hello <your user name>!” in the top right of the navigation bar, and hit the “Send Email Verification” button at the bottom of the page. Before you do this, you will need to edit your server’s mail settings in the web.config xml file. See section on Email Server Settings.
- Management > Roles
This page shows the roles that are currently defined, which are Admin and Default. You can add new roles and edit current ones. Roles alone do not regulate access to the portal, instead, the actions on the portal are restricted to roles (e.g. creating a user), which are associated with a set of users.

To view the activities and permissions assigned to each role, click on the gear icon on the right column, the Permissions window will be displayed. Assigned activities can be customized to allow a set of roles to perform the action.

To add a new role, click on the Create Role button and edit the name of the role, then, on the Roles page, click on the gear icon and select the activities you want this role to perform. This will let you add or remove permissions.
Keep in mind that Users may be assigned to multiple Roles.
- Management > Moderators
This page shows the users that have been assigned the Moderator role. To assign a user as a Moderator, there are a few steps you need to follow.
There are two ways you can add Moderators: you can click on Add Moderator and fill out their data requested, or you can import a CSV File with the names and corresponding emails you want to add to the list by clicking on Import Moderators from CSV. If you choose to import a CSV file with the names of the Moderators, ensure it follows the format: Name,Email,Action or click on the Sample File to view the valid format.
Example: John Smith,jsmith@aaa.com,Add
Sandra Leon,sleon@bbb.com,Delete

Click on Add Moderator to manually enter the Name and Email of the Moderator, click on Save when finished.

The mode for the Moderator functionality needs to be set on the profile of the Hub, so you can have a mixed environment on your systems, continue following the next steps:
- Go to the Groups page and select Profiles, click on Create Profile, when the window opens, enter the name and the description of the Profile you want.


- Once the profile is created, locate it on the list and in the right column next to the profile, click on View Details.

- On the Key column, locate the Moderator Mode key and enter the desired Value for the mode you want to apply to this profile, see below for valid values:

Moderator Description and Values:
0- Unmanaged: Default mode, no Moderators in meetings/sessions, all participants have equal rights to view and present, previous Intel Unite software versions (to v3.1) used this mode.
1- Self Promote: The meeting/session is unmanaged until someone promotes themselves to be the Moderator. In this case, only the Moderator can assign another participant to be the Moderator. The Moderator can also assign who presents during the session.
2- Strict: The meeting/session is managed only by the assigned Moderator. When a Moderator joins the session, they are automatically promoted to this role.
Notes:
a. The list of the Moderators is managed by the IT administrator through the Admin Portal, Moderators are authenticated using a key associated with their email address, when a user is promoted to Moderator, the Admin Portal will send them an email that will contain a URI which, when clicked will install the Moderator token on their Client. Users only have to go through this process one time for each system.
b. The IT administrator can revoke Moderator rights by removing the user’s token from the Admin Portal.
c. In order to send registration emails to Moderators, IT needs to configure an SMTP relay for this feature to work, go to section Setup for Moderators for more details.
d. If you don’t have an SMTP relay and need to manually generate the URI sent in the email, do the following:
Go to the Management tab and select Server Properties, click on the Edit link, next to EmailServer and input the SMTP relay, example: smtp.example.com:22
You can only configure an SMTP Relay that doesn’t require authentication. It is also possible to obtain and manually install the moderator token for a user, go to section Strict Mode Manual Token Install for more details.
- To enable the Moderator Profile on a selected Hub, go to the Devices page, select from the list the Hub you want to configure, and click on the Edit link located on the right column.

- When the window opens, select the Profile created for the Moderator in the Profile section, and the Group where this belongs - if any - and Save it.

Once you have filled out the list of the Moderators, any of these can be deleted by selecting them (blue box) and by clicking on Delete. To send the Moderator a URL to join the meeting/session as Moderators, select their name and click on Send Token.

- Strict Mode Manual Token Install
If you do not have an SMTP relay, it is possible to obtain and manually install the moderator token for a user that has been added as a Moderator. To do this, you will need the Microsoft SQL Server Management Studio installed.
To get the token:
- Add a Moderator
- Open the Microsoft SQL Server Management Studio and connect to the database Server using the admin credentials used during the installation of the Enterprise Server
- Expand “Databases”, then “UniteServer”, then “Tables”
- Right click on “dbo.Moderators” and click on “Select Top 1000”
- In the results, locate the “UserName” that matches what you added in the previous step
- Right click and copy the token to the clipboard
- Open notepad and create the URI: intelunite://localhost/SetModerationToken?Token=<paste the token form the previous step>
- Open Intel Unite
- On Windows devices: Open Explorer, copy/paste the full URI and hit Enter
- On Mac devices: Open Safari, copy/paste the full URI and hit Enter
- Management > Reserved PIN
This page shows you two sections, the Reserved and the Not Reserved list of the systems were the PIN displayed during the meeting/sessions is static or not. The IT administrator can assign systems in selected rooms where users will enter the same PIN during the meeting or session vs. having a rotational PIN, which is the default value.
- Reserved List - This is the list of reservations IT has already configured, you can un-assign them by clicking on Unreserved.

- Not Reserved list - This is the list of the systems which do not have Static PIN reservations. PINs can be manually entered, they can be auto-generated or they can be imported from a CSV file.

When assigning PINs, click on Save to keep the values.
- Management > Telemetry
This page shows telemetry data collected by the Admin Portal, in order to view these data, the Telemetry plugin for the Intel Unite® Solution has to be installed. The Telemetry plugin allows IT Administrators to collect usage information about the Intel Unite application and the client devices connected to each Hub. The IT Administrator will be able to view information such as the number of connections in each room, connections by day, average time used per connection, etc. Please refer to the Intel Unite® Plugin for Telemetry Guide for detailed information and to deploy the plugin in your system.


- Schedule Meeting page
The Schedule Meeting page, is a feature that will create a meeting URL for meeting/session participants who are not able to install or use the existing Intel Unite plugin for Microsoft Office. Any participant will be able to view this page.
Just click on the Generate New Meeting button to create the URL and send it to the users that will participate in the meeting or session.

- Other Configuration Options for the Admin Portal
- Profile Configuration
Profiles can be configured by accessing Groups > Profiles and clicking on Details of the profile in the Admin Portal. This displays the configuration settings in the form of a “Key-value” pair. You can change the values to customize the application and the experience of the meeting/session space. For example, background image for Hub display, PIN size, font color and content are some of the settings that can be customized.
After customizing the values in a profile, assign devices to the profile to apply the profile configuration settings. To apply the profile to devices, click on the View Devices link and then Update Device List. You will see the list of devices, click on the check box next to the device to apply the configuration settings.
The table below shows the available Keys, their description, data type and default values of the keys.
Key [TBD - fix table]
Description
Data Type
Default Value
Allow File Transfer
Flag to enable/disable the ability for a Hub or Client to transfer a file
Boolean
False
Audio Video Streaming Support
Flag to enable Windows users the ability to present their desktop with the full A/V experience (1080p at 20-30fps)
Boolean
True
Change PIN During Meeting
Lock the PIN for a meeting/session, the PIN will remain unchanged until all users disconnect
True = Allow the PIN to change during session
False = Lock the PIN during session
Boolean
True
Disable Remote View
Disable the remote view capability from certain rooms, when set, if a user attempts to view content using remote view, they will see an image indicating that this functionality is not available
True = Disables remote view
False = Allows remote view
Boolean
False
Display PIN Size
Size in Pixels. The value is the height in pixels for the onscreen PIN (larger values make the PIN easier to read from across the room)
Integer
48
Display PIN Transparency
Controls the alpha-transparency of the PIN displayed on the monitor
100 = 100% visible
1-99 = The PIN is visible with the box around it, the opacity changes depending on the value used
0 = The PIN is transparent
Integer
100
File Blocked Extensions, displayed as Blocked File Extensions
Comma separated list of blocked file extensions (e.g. exe, bin, msi )
String
Blank
File Max Size displayed as Max File Size
Max file size for file transfers
Integer
2147483647 Bytes (valid range: 0-2147483647)
Full Screen Room Mode
Enable/disable Hub full screen
False: PIN in upper right only
True: PIN in upper right and a full screen background
Boolean
True
Full Screen Room Mode Background Color
Background color used on the Hub. HTML colors (Hexadecimal colors)
Examples of valid values (RGB values, format #000000 ) are:
Red: #FF0000
Yellow: #FFFF00
Green: #00FF00
Light Blue: #00FFFF
Dark Blue: #0000FF
Black: #000000
White: #FFFFFF
Grey: #808080
String
Blank
(appears in black)
Full Screen Room Mode Background Image Stretch
Flag to set the background image to stretch across the entire screen
Boolean
False
Full Screen Room Mode Background URL
Sets the Hub background to the URL or image (jpg/png) specified. Set value to True if you want this feature
Example: http://myserver.com/background.jpg
String
Blank
Full Screen Room Mode Instructions
Text instructions to be displayed on Hub. Can use {pin} and {host} as replacements
URL for download of the Client. This item is displayed on the full screen room mode screen
String
{pin}
Full Screen Room Mode Pin Color
Color of the PIN displayed
String
Blank
(appears in white)
Full Screen Room Mode Show Pin
Show instructions. Set value to True if you want this feature
Boolean
True
Full Screen Room Mode Text Color
Color of the text displayed on Hub
String
Blank
(appears in white)
Full Screen Room Mode Text Font
Name of font for instructions
String
Blank
Hub Lock Keyboard
Lock out the following: Ctrl-Esc, Alt-Tab, Charms bar, Windows keys and Alt-F4 in Hub
If set to True Hub lock out is enabled. Can override with password set in Reg Key Machine (REG KEY Value)
Boolean
False
Hub Show Clock
Show clock in bottom right corner
Boolean
True
Moderator Mode
Assign Moderator mode on meetings/ session, use the following values:
0 = No Moderation
1 = Self Promote
2 = Strict
Integer
0
Send Error Email Address
Assign an email address where the hub will send error messages
String
Blank
(appears in white)
Service Listen Port
A port for the Hub to listen for incoming connections
Integer
0
(0 = auto- assigned port)
Tile Compression
Allows you to adjust the compression ratio for non-AV content sharing. % of compression to apply to a changed portion of the display (tile) being transmitted over the network
(Higher value uses more bandwidth)
Integer
85
(valid range: 5-100)
Tile Size
Allows you to adjust the tile size for non-AV content sharing. Tile size for breaking screen into chunks. The size, in pixels, for each tile.
Integer
128
(valid range: 32-512)
Verify Plugin Certificate Hash
Plugins need verification
True = Verify certificate hash
False = Do not verify certificate hash
Boolean
True
- PIN Refresh Interval
The default PIN refresh interval is 5 minutes, i.e. the PIN displayed on the hub changes every 5 minutes. This can be changed in 1 minute increments from 2 to 60 minutes by modifying the web.config file in the root of the web service site virtual directory. This can be accessed via the IIS manager. The file can also be accessed by navigating to the Intel Unite\PinServer directory. By default, this is installed under C:\Program Files (x86)\Intel\Intel Unite\PinServer.
Modify the value under <add key=”PinExpireTimeInMinutes” value=”5”></add> tag to the desired refresh interval.
- Email Server Settings
The Admin Portal defines the SMTP server in web.config xml file that is created when the Intel Unite application is installed on the server. Depending on where your SMTP server is configured, mailSettings have to be modified in the web.config xml file so that “host” points to your SMTP server. (By default, the Web.config xml file is located in C:\Program Files (x86)\Intel\Intel Unite\PinServer.).
Ensure the SMTP email Server is configured under IIS, and that the setting is correct to work with the application during the Enterprise Server pre-installation.
The settings in the file are as follows:
<mailSettings>
<smtp from="noreply@uniteserver.com" deliveryMethod="Network">
<network enableSsl="false" host="smtp.myco.com" port="25" userName="noreply@uniteserver.com" password="pass" />
</smtp>
</mailSettings>

- Alerting and Monitoring
The Enterprise Server offers Alerting and Monitoring services. This is an opt-in service and is configured in the Admin Portal.
Any device that is configured for alerts will be monitored and if it has not checked in within the warning threshold an email will be sent to specified users.
To opt in to receive emails about inactive devices, make sure that the Notifications role has been assigned to the user in Admin Portal. To opt a device into being monitored, add the key EnableReporting to its metadata and set the value to True.
The warning threshold is configured in Management > Server Properties and defaults to 60 minutes.
InactiveCount: If user wants to get an immediate email in the next check it should be set to a low number.
The email address (smtp from) and email server (host) must be specified in the clocktower.exe.config file, which is located in: /productfiles/release/clocktower.exe.config. (By default the location of the clocktower.exe xml config file is C:\Program Files (x86)\Intel\Intel Unite\ClockTower)
The settings in the file are as follows:
<mailSettings>
<smtp from="noreply@uniteserver.com" deliveryMethod="Network">
<network enableSsl="false" host="smtp.myco.com" port="25" userName="noreply@uniteserver.com" password="pass" />
</smtp>
</mailSettings>
- Setup for Moderators
To setup Moderators, you need to configure an SMTP relay for this feature to work, without this, the moderators will not able to receive their tokens and an error will be displayed when it tries to send tokens.
Find the web.conf file located in the C:\Program Files (x86)\Intel\Intel Unite\WebApi folder and add the following:
<mailSettings>
<smtp from="noreply@uniteserver.com" deliveryMethod="Network">
<network enableSsl="false" host="smtp.example.com" port="25" userName="noreply@uniteserver.com" password="pass"/>
</smtp>
</mailSettings>
This goes in between the <system.net></system.net> of that file.
Note that “smtp.example.com” needs to be changed to your email server (example replaced with your server name).
- Profile Configuration
- OS and PC Security Controls
- Minimum Security Standards (MSS)
It is recommended that all devices running the Intel Unite application are met with your default organization MSS standards, have an agent installed for patching, and an antivirus / IPS / IDS and other necessary control as per the MSS specification (McAfee suite for Anti Malware, IPS, IDS was tested for compatibility).
- Machine Hardening [TBD - update hyperlink]
Machine Unified Extensible Firmware Interface (UEFI) could be locked to boot the Windows boot loader only (so that boot from a USB disk / DVD will not work), Execute disable bit could be enabled, Intel® Trusted Execution Technology could be enabled, and settings can be locked with a password.
Windows OS Hardening: As a baseline, the system is running with non-elevated user rights. It is also recommended to remove unused software from the OS including unnecessary pre-installed software and Windows components (PowerShell, Print and Document services, Windows location provider, XPS services).
GUI subsystem lock: Since the systems uses a non-touch screen only without keyboard or mouse, it makes it harder to break out of the GUI subsystem. To prevent an attacker from attaching a HID device (USB keyboard/mouse) it is recommended to programmatically block Alt+Tab, Ctrl+Shift+Esc, and the Charms bar.
- Other security controls [TBD - update hyperlink]
It is recommended to lock the machine user account per specific machine account in Active Directory. If the deployment includes a high number of units, user accounts can be locked per a designated floor of a specific building.
Machine ownership: Each machine is recommended to have an identified owner. In case the machine goes offline for an extended period the identified owner will get notified.
Beyond the security mechanisms provided by the Intel vPro platform and the Intel Unite software itself, it is recommended to harden the Microsoft* Windows* OS per Microsoft's guidelines for machine hardening, for reference, please consult the Microsoft Security Compliance Manager* (SCM) in the following link: https://technet.microsoft.com/en-us/solutionaccelerators/cc835245.aspx
Note: information in the link contains a wizard based hardening tool, including hardening best known methods and relevant documentation.
- Minimum Security Standards (MSS)
- Maintenance
Your organization and IT administrator will decide a regular maintenance program. The following maintenance tasks are recommended:
- Nightly reboot
It is recommended to reboot the Hubs on a daily base (preferably at night time) and prior to this reboot, run maintenance tasks such as: wiping cached temp files and initiating the standard patching procedure.
- Patching strategy
If available, run your standard patching mechanism in an unattended mode (no GUI prompts) preferably before the above mentioned nightly reboot.
- Reporting
Collect the machine uptime indicators and create a tailored report per your organization’s needs.
- Monitoring
Use a health tracking system based on machines heartbeat and do backend uptime analysis according to need.
- Backend monitoring:
Use standard virtual server monitoring tools to generate and send alerts to second level support.
- Nightly reboot
- Intel Unite Solution for macOS
- Background
The Intel Unite software for macOS is packaged as a primary app package and can leverage IT specific preferences values. In this manner, the app supports a multitude of common deployments from general Mac management software and techniques, to manual installation and setting of preferences.
- General Connection Workflow
By default, the app will use DNS Auto Discovery (e.g. DNS SRV records) to determine the proper Enterprise Server to connect to. The overall workflow is as follows:
- (Optional) Enterprise Server as defined in preferences
- Auto Discovery to the following domains:
- _uniteservice._tcp
- _uniteservice._tcp.yourSubDomain.yourDomain.yourTLD
- Example: _uniteservice._tcp.corp.acme.com
- _uniteservice._tcp.yourDomain.yourTLD
- Example: _uniteservice._tcp.acme.com
- Example: _uniteservice._tcp.corp.acme.com
- Attempt connection to HTTPS followed by HTTP if failure
- uniteservice.yourDomain.yourTLD
- Preferences Values
IT can modify and customize the Intel Unite app to meet their own infrastructure or security needs by setting the following settings to the com.intel.Intel-Unite.plist located in each user’s ~/Library/Preferences folder:
- Define a Default Enterprise Server
defaults write com.intel.Intel-Unite EnterpriseServer myServer.mydomain.myTLD
- Define an Enterprise Server Public Key for Certificate Pinning
defaults write com.intel.Intel-Unite EnterpriseServerPublicKey "Public Key String"
- Force a Client to Only Allow Trusted Server Certificates
defaults write com.intel.Intel-Unite ClientOnlyAllowsTrustedCertificates -bool true
- Force a Client to Connect in Standalone Mode
defaults write com.intel.Intel-Unite Standalone -bool true
Each of these settings can be set or modified manually by opening the macOS Terminal (/Applications/Utilities) and entering the command followed by a return. Discussion and details of each command are as follows:
- Define a Default Enterprise Server
Setting a Default Enterprise Server will stop the Auto Discovery process from taking place. If your Mac Clients live solely on your own network, this can be a useful setting to "pin" the Intel Unite app to your particular Enterprise Server for security reasons or troubleshooting.
- Define an Enterprise Server Public Key for Certificate Pinning
If you wish to "pin" the Client application to your Enterprise Server, regardless of whether auto discovery is being used, you can do so by setting the “Public Key String” on each Client. To obtain this value:
- Open Safari on any Mac on your corporate network
- Go to the HTTPS address of your Enterprise Server
- Click the lock icon in the Address Bar
- Click the Show Certificate button in the certificate sheet
- Click the Details disclosure triangle to expand it
- Scroll down the certificate data until you find the Public Key Info > Public Key field
- Click on the data field, which starts with "256 bytes:"
- The data field will expand
- Select all the data in this field via a mouse selection or CMD+A
- Copy the data to your clipboard by selecting Copy from the context menu or CMD+C
- In the defaults command, replace Public Key String with the data from your clipboard. Note: You will need to wrap the data in double quotes.
Just as with defining a default Enterprise Server, setting this option will make it difficult for your user base to connect to other Intel Unite solution installations at other partners/locations.
- Force a Client to Only Allow Trusted Server Certificates
Beyond defining a specific Enterprise Server or pinning the certificate Public Key, you can also tell the Intel Unite app to only allow connections to servers/certificates that are fully allowed by your certificate trust chain. In doing so, you must ensure that your Enterprise Server certificate follows back to a public root server as defined by Apple in the keychain, or that you've installed your own root server certificate and any intermediate certificates necessary on each Client.
- Force a Client to Connect in Standalone Mode
Setting this mode will change the connection workflow to perform a UDP Auto Discovery of a Hub that has generated a PIN in an environment without an Enterprise Server. In this scenario the Intel Core vPro processor-based system will act as the primary host and is useful in a small and medium business environment where there may not be an IT department to install the Enterprise Server infrastructure. This mode will only work across systems on the same subnet where UDP packets are not blocked.
- Define a Default Enterprise Server
- Common Distribution Methodologies
If you are using Auto Discovery, distribution can be as easy as dragging the Intel Unite application to the Applications folder. In more complex environments, or those that require additional security settings, you may want to set specific preferences in conjunction with the app package distribution. There are numerous ways of doing this and here are some of the more common ones:
- Bash Script
- You can define your preference settings in a Bash script that can be distributed to your users in conjunction with the app package.
- Custom Installation Package via PackageMaker
- You can define your preference settings via a pre- or postflight script.
- Custom Installation via Apple Remote Desktop
- Using Apple Remote Desktop, you can install the Intel Unite app package and define any preference settings via the Send UNIX Command… menu.
- Custom Installation via Enterprise Mac Management software
- You can create a custom push or pull installation via most common Enterprise Mac Management solutions including:
- Casper / Bushel
- Puppet
- Munki
- Chef
- Etc.
- You can create a custom push or pull installation via most common Enterprise Mac Management solutions including:
- Bash Script
- Background
- Troubleshooting
- The Admin Portal page cannot be reached after installing the Intel Unite application on the server
Workaround/Solution: Make sure the necessary roles and features for Web Server have been added to the server.
- Add Roles and Features to the server using Server manager
- Server Roles: Web Server
- Include Management Tools
- Add .NET Framework 3.5 features
- Add .NET Framework 4 features
- ASP .NET
- WCF Services
- HTTP Activation
- Web Server Roles:
- Web Server, Common HTTP features and Default Document.
- ASP .NET
- Server Roles: Web Server
- Add Roles and Features to the server using Server manager
- Can’t access the Admin Portal
If you receive an error page when accessing the Admin Portal about a specific xml tag in the Web.config, remove the tag from the Web.config in the top level of the portal’s virtual directory (accessible from IIS management console).
- Verify that the Web Service installation was successful by following the link:
https://<yourservername>/unite/ccservice.asmx
- Select GetProfile.
- Enter test in the Value field and press invoke.

- Verify that you can view a default profile in the xml file as shown below. This indicates that the PIN service can access the database and successfully retrieve data.

- Verify that the Web Service installation was successful by following the link:
- Error when launching Hub application
A pop up window indicates the error ID. Based on the ID, the nature of the error can be determined.
- Platform check fails with error ID333333 [TBD - update link]
This error indicates that the Hub passed a platform check, but the code-signing certificate couldn’t be validated. This is usually due to an OS that doesn’t have an updated root certificate, so the public Intel Unite code signing certificate can’t be validated.
Ensure the system is connected to the Internet, open a browser and navigate to https://www.microsoft.com (this forces the system to update root certificates).
- Platform check fails with error ID666666
This error indicates that the platform is not compatible with the Intel Unite application. Check with the OEM vendor to make sure you have a supported platform to run the application.
- Platform check fails with error ID333333 [TBD - update link]
- Hub does not get a PIN from the PIN Server- Scrolling dashes displayed
Launch Intel Unite application on the Hub with a debug switch, i.e. from the command prompt navigate to the folder where the application is saved and run: IntelUnite.exe /debug
This will open a debug window and display the connection information. Some of the common errors and workarounds are listed below. If the debug information indicates any of these errors, follow the solution/workaround to resolve and get a PIN on the Hub.
- Server unable to process request; Login failed for user “UniteServiceUser”
This could happen if there is a SQL login mismatch or if the database password gets corrupted because a user tries to install the Enterprise Server multiple times.
Workaround/Solution:
Verify the authentication modes used during MS SQL installation. To change login/authentication type go to Microsoft SQL Management Studio and connect to the SQL server, right click on the SQL server and select Properties. Select Security page and make sure SQL Server and Windows authentication mode is selected if SQL authentication is selected when installing Intel Unite application on the server.

If you still see the error, reset the password for the UniteServiceUser. Use Microsoft SQL Management Studio and connect to your SQL server, go to Security > Logins and right click on UniteServiceUser to open a window for Login Properties. Enter a new password and click OK to save changes.

- No Servers listed. Trying DNS service record: _uniteservice._tcp
Workaround/Solution:
This could happen if the Hub cannot find the DNS record. As a debug step, open the command line window and run the nslookup command. Make sure that the Hub can ping the server on which DNS service is running and a DNS service record has been created for the Intel Unite solution. The service record must have the following values: Service: _uniteservice, Protocol: _tcp, Port number: 443 and Host offering this service: FQDN of the Enterprise Server.

- Could not establish trust relationship for SSL/TLS secure channel with authority ‘uniteserverfqdn’
The latest version of Intel Unite solution only accepts SHA-2 certificates or greater. You should work with your IT department to ensure the trusted web server certificate issued is a SHA-2 certificate and the certification path is valid.
For a test environment, obtain a SHA-2 certificate or disable encryption in your environment.
- To use Unite without encryption, skip the next steps that provide details on Site Bindings for secure port 443 and proceed to install MS SQL Server and prepare the DNS service record. You also need to make sure that the service is found on port 80 when a DNS service record is created.
- Another way to skip the certificate check is to add the registry in the machine account of the hub and client. HKEY_LOCAL_MACHINE\software\Intel\Unite\AllowInsecureCertificates (DWORD) [1 if certificate algorithm check should be skipped, 0 otherwise. (if value is 0, we force the enterprise certificate to use a SHA2 certificate)]
- Server unable to process request; Login failed for user “UniteServiceUser”
- Client application crashes on launch/connect
Run the client application with a debug switch and save the information to a log file.
(Run Intel Unite.exe /debug >logfile.txt)
If the log file has the message “EXCEPTION: - Key not valid for use in specified state.”, close the application and delete the file C:\Users\eaviles\AppData\Roaming\Microsoft\Crypto\RSA\[sid]\d046df
- Caution Area: The user may see longer-than-usual connect times, or periodic slow screen updates. [TBD - update link]
Root Cause:
This is a bug with some wireless access points when U-APSD (Unscheduled Automatic Power Save Delivery) is enabled. Refer to http://www.intel.com/support/wireless/wlan/sb/CS-034875.htm.
Workaround: This can potentially be solved with an update to the firmware of the wireless access point. In most enterprises, this is not easy to do; as a last resort you can disable U-APSD on the Client in the advanced properties of the wireless driver.

- Caution Area: Slowness on the PIN Server
Workaround/Solution: The Enterprise Server manages allocation of pins and looking up pins to connect to rooms. As a security feature the rate at which a user can request pins and query pins from the database is limited with an exponential back off algorithm. This back-off mechanism tracks attempts based on the user’s IP address and the number of attempts.
Production servers may utilize load balancers to help manage load and maintain redundancy in the environment. The load balancers redirect traffic to the appropriate web servers. So the web server may appear to be receiving all requests from the same IP address thus triggering the back off algorithms.
The database contains a stored procedure (spGetPinBackoffTime) that returns the calculated delay in seconds back to the web server. This functionality can been disabled, so the stored procedure always returns 0. This disables the security back off algorithm.
- Mac Client troubleshooting
Launch the Intel Unite application (/Applications/Utilities) from the Terminal to see the debug messages.
/pathToUnite/Intel\ Unite.app/Contents/MacOS/Intel\ Unite
The application will start and you'll see all the debug information in the Terminal.
- Enterprise Server Connection Error -1003: A server with the specified hostname could not be found.
Workaround/Solution: Make sure that the DNS Search Domain is defined correctly.
If a user defines a DNS server but does not specify any Search Domains, when the MAC tries to perform an Auto Discovery there is no DNS domain suffix to search through. If there's no DNS Search Domains defined, the Intel Unite application can't add them to either Auto Discovery or even the "static" entry of uniteservice. So unless Auto Discovery works on _uniteservice._tcp, the Client won’t be able to find the Enterprise Server.
The easiest solution is simply to add a DNS Search Domain (which should match the DNS SRV record), but one could also define the Enterprise Server in the plist settings instead.
Use the Terminal command:
defaults write com.intel.Intel-Unite EnterpriseServer myServer.mydomain.myTLD
- Enterprise Server Connection Error -1001: The request timed out [TBD - update link]
Workaround/Solution: This error could be because of the following two reasons.
1. There is potentially a problem with the Web Service on the Enterprise Server.
2. The Mac has a network issue connecting to the server.
The first step in addressing this would be to find the Web Service in the debug log. Look for https://yourserver/Unite/CCService.asmx.
Copy and paste this URL into Safari and confirm that the Mac can get to the Web Service. This will verify if there is a network issue connecting to the server and if the web service on Enterprise server is running.
- Enterprise Server Connection Error -1200: An SSL error has occurred and a secure connection to the server cannot be made.
Work with your IT department to get valid SHA-2 certificates that are needed for the Intel Unite Solution.
- Enterprise Server Connection Error -1003: A server with the specified hostname could not be found.
- The Mac OS Intel Unite app is removed/uninstalled from the Client device and an alternate or newer version of the Intel Unite application is installed, however the old install properties are present.
The Intel Unite application for Mac Client devices follow general OS X conventions, hence users settings are not removed when the app is deleted.
Workaround/Solution:
Uninstall the Intel Unite application from the Client device. There are two ways of removing these settings and getting back to a clean state.
- Within the Terminal (/Applications/Utilities), enter the following command:
defaults delete com.intel.Intel-Unite
- From the Finder, delete the ~/Library/Preferences/com.intel.Intel-Unite.plist file then...
Reboot the system. Plist files are heavily cached by the OS these days so you generally can't delete them and have the OS pick up the change.
- Within the Terminal (/Applications/Utilities), enter the following command:
- Error 2147217900: failed to execute SQL string.
This error is generated when the Intel Unite server installer is run and the Unite database already exists but the server name is blank.

Workaround/Solution:
The installer throws an error if the Database already exists in the cluster. To resolve this error, delete the database, make sure you have DBAdmin rights and re-run the installer.
- Error message: “Database error”
If an IT administrator chooses the “Send Token” option from the admin console and gets the error message “Database error” – it is likely that the SMTP server settings are wrong. You will need to verify the SMTP email Server settings.
- The Admin Web Portal is not displaying properly (missing components)
The Admin Web Portal is not displaying completely, missing components such as textboxes, options, or icons after performing an upgrade of the Intel Unite software. This is due to MIME types blocked by the request filtering option at IIS.
Workaround/Solution:
- Open IIS Manager.
- Display properties for the IIS Server.
- Click MIME Types and then add the JSON extension:
- File name extension: .json
- MIME type: application/json
- Go back to the properties for IIS Server.
- Click on Handler Mappings.
- Add a script map
- Request path: *.json
- Executable: C:\WINDOWS\system32\inetsrv\asp.dll
- Name: JSON
- In the Connections pane, go to the connection, site, application, or directory for which you want to modify your request filtering settings.
- In the Home pane, double-click Request Filtering.
- Locate Allow File Name Extension
- Add the following 4 extensions:
- .json
- .less
- .woff
- .woff2
Appendix A. Enterprise Server Preparation
Enabling IIS
For Windows 2008:
In Windows Server 2008, you would need to download the update for .NET Framework 4.5 (https://www.microsoft.com/en-us/download/details.aspx?id=40779)
- Click Start, point to Administrative Tools and then click Server Manager.
- In Roles Summary, click Add Roles.
- Use the Add Roles Wizard to add the Web Server (IIS) role (check this box).

- Click Next until you have the Select Role Services window.
- In the Application Development section, verify that ASP.NET is checked, if not, select it. Please note that ASP.NET will not be checked by default. Add Required Role Services for ASP.NET. You also need ASP.NET 4.5.

- Once the role is created, under the Roles menu, go to Web Server (IIS) - on the right side of the panel, go to Internet Information Services (IIS) Manager and select your server in the left Connections pane.
Reference: Windows Server Library link Installing IIS on Windows Server 2008 [TBD - update link]
Note: The latest version of Intel Unite solution only accepts SHA-2 certificates or greater. You should work with your IT department to ensure the trusted web server certificate issued is a SHA-2 certificate and the certification path is valid.
For a test environment, either work with your Certificate Authority team to obtain a SHA-2 certificate or disable encryption.
- To use Unite without encryption, skip the next steps that provide details on Site Bindings for secure port 443 and proceed to install MS SQL Server and prepare the DNS service record. You also need to make sure that the service is found on port 80 when a DNS service record is created.
- Alternatively you may skip the certificate check by adding the registry key in the machine account of the hub and client. HKEY_LOCAL_MACHINE\software\Intel\Unite\AllowInsecureCertificates (DWORD) [1 if certificate algorithm check should be skipped, 0 otherwise. (if value is 0, we force the enterprise certificate to use a SHA2 certificate)]
- To assign the certificate, in the left Connections pane, expand Sites and click on Default Web Site.
- In the right Actions pane, select Bindings (located under Edit Site).
- In the Site Bindings window, click on Add.
- Use the following information:
- Type: https (Note: not http)
- IP Address: All Unassigned
- Port: 443
- Hostname: (leave blank)
- SSL Certificate: Use the SSL certificate that was installed in the previous steps.
Click OK.
Windows 2012:
- Open Server Manager.
- Under Manage menu, select Add Roles and Features.
- Select Role-based or Feature-based Installation.
- Select the appropriate server (local is selected by default).
- Select Web Server (IIS) and Add Features that are required for Web Server (IIS) and click Next.
NOTE: If you need additional details to request an Internet Server Certificate in the Unite Server, go to the following Microsoft web link https://technet.microsoft.com/en-us/library/cc732906.aspx and follow the SSL certificate vendor steps to get a signed certificate. [TBD - upldate link]

- In Features, add the following features for IIS (as they are not default options):
- .NET Framework 3.5 Features
- ASP.NET 4.5
- WCF Services
- HTTP Activation (Add features that are required for HTTP activation when prompted) and click Next.

Note: .NET 3.5 might give an error during installation. Provide an alternate source path if the target computer does not have access to Windows Update. Click on Specify an alternate source path link to specify the path to the \sources\sxs folder on the installation media. [TBD - update link]
Reference: https://technet.microsoft.com/en-us/library/dn482071.aspx
- In the Role Services page, add Web Server Role (IIS) as a role to your server or accept the default value.
- Select the following Role Services to install for the Web Server:
- Common HTTP features
- Default Document

- Click Next to continue and click Install on the next window to install the selected roles and features.
- Once the role is created, under the Roles menu, go to Web Server Role (IIS) - on the right side of the panel, go to Internet Information Services (IIS) Manager and select your server in the left Connections pane.
Note: The latest version of the Intel Unite solution only accepts SHA-2 certificates or greater. You should work with your IT department to ensure the trusted web server certificate issued is a SHA-2 certificate and the certification path is valid.
For a test environment, either disable encryption or create a self-signed SHA 2 certificate.
- To use Unite without encryption, skip the next steps that provide details on Site Bindings for secure port 443 and proceed to install MS SQL Server and prepare the DNS service record. You also need to make sure that the service is found on port 80 when a DNS service record is created.
- Run the following PowerShell command as an administrator.
- New-SelfSignedCertificate –dnsname “yourservername” –CertStoreLocation cert:\LocalMachine\My ; where “yourservername” is the FQDN of the enterprise server.
- Alternatively you may skip the certificate check by adding the registry key in the machine account of the hub and client. HKEY_LOCAL_MACHINE\software\Intel\Unite\AllowInsecureCertificates (DWORD) [1 if certificate algorithm check should be skipped, 0 otherwise. (if value is 0, we force the enterprise certificate to use a SHA2 certificate)]
- To assign the certificate, in the left Connections pane, expand Sites and click on Default Web Site.
- In the right Actions pane, select Bindings (located under Edit Site).
- In the Site Bindings window, click on Add.
- Use the following information:
- Type: https (Note: not http)
- IP Address: All Unassigned
- Port: 443
- Hostname: (leave blank)
- SSL Certificate: (select the one you installed in the previous steps)
- Click OK.
- Select Close.
Reference: Windows Server Library link Installing IIS on Windows Server 2012
Note about port 443: The web service for Intel Unite application communicates with the Clients and Hubs using port 443 so make sure this port is enabled as mentioned above. [TBD - update link]
Microsoft SQL Server Install
The Enterprise Server requires MS SQL to run, minimum requirements are version 2008 R2 or higher. You can install a new, dedicated SQL server if you wish to run a “test environment” and get comfortable with the application, however, it is not required. The Intel Unite application will create its own database, data tables and indexes in your existing database without interfering with other tables or existing data.
See below for installing MS SQL 2014
- Run the SQL server setup and open the SQL server installation Center. Click on Installation on the left pane and choose New SQL Server stand-alone installation or add features to an existing installation.

- Enter the product key, accept the license terms and click Next.

- Select Use Microsoft Update to check for updates (recommended) to check for updates and click Next. On the next window, the setup will look for Product Updates and install the necessary updates. To continue, click Next.

- SQL setup checks for potential failures and requirements to be met before the installation. Click Next to continue.

- Select SQL Server Feature Installation and click Next.

- Under the Feature Selection, select Database Engine Services, Management tools- Complete and click Next.

- Specify the name and instance ID for the SQL server and click Next.

- Specify the service accounts for each service and click Next to continue.

- Select Mixed Mode Authentication (which includes SQL server and Windows authentication), specify the SQL Server administrators and click Next.

- Verify the features to be installed and click on Install.

- Close the dialog box after the installation is complete.

Creating a DNS service record
The Hub or Clients will locate the Enterprise Server using DNS service during an automatic lookup for the Enterprise Server. You may also use the manual lookup but it is highly recommended that you use DNS. If you plan on providing the Enterprise Server hostname manually during Hub and Client installation, you can skip this section.
When a DNS service record is used, the Hub or Client will look for the service named _uniteservice._tcp within the DNS service records _uniteservice._tcp.example.com 86400 IN 0 5 443 uniteserver.example.com.
To add a DNS Service Record in Microsoft Windows:
- On your DNS server, open DNS Manager.
- Expand the Forward Lookup Zones (left pane).
- Right click on the zone and select "Other New Records..."
- In Select a resource record type: select Service Location (SRV) and select Create Record.
- For Service enter: _uniteservice
- For Protocol enter: _tcp
- For Port enter: 443
- Host offering this service: Enter the hostname/IP of the Enterprise server(s).

NOTE: Go to the following Microsoft link for details about configuring a DNS server to use forwarders: https://technet.microsoft.com/en-us/library/cc754941.aspx [TBD - update link]
Appendix B. Example of ServerConfig.xml
The ServerConfig.xml file gets created during the installation of hub and client components of the Intel Unite software. The default location of the xml file is C:\Program Files (x86)\Intel\Intel Unite\Hub or C:\Program Files (x86)\Intel\Intel Unite\Client for Hub and Client respectively.
This file gets edited when you choose Specify Server and enter the server host name or when the Public Key is entered manually while installing Intel Unite software on the Hub or Client.
If you wish to edit the serverconfig.xml file after the installation, navigate to the folder where the file exists and make the necessary changes.

If a server is defined in the ServerConfig.xml, it will take precedence over the DNS Service Record.
Appendix C. Intel Unite Solution - Security Overview
Intel Unite Software - Security Flow
This section briefly describes the security aspects of Intel Unite application. Security aspects of the connection are discussed for the following four steps:
1. PIN assignment
2. PIN lookup
3. Connection initiation
4. Connection approval
The following image contains a high level overview of how the Client (with Intel vPro technology) and Hub applications securely receive PINs from the Enterprise Server, resolve PINs, and establish a connection.

Step 1: PIN Assignment
The image below shows how PINs are assigned. All network communication during this process is SSL encrypted over a web service (TCP 443).
In addition to receiving PINs, the Hub and Client also register their connection information and a public key to the server. The public key is used during connection to validate that each component is communicating with the intended target.
Note: PIN assignment for Client (with Intel vPro technology) and Hub follow the same flow.
Also note the following:
- The PIN refresh interval is configurable.
- When Hub or Client sends connection information, IP addresses in the local host (127.0.0.0/8) and 169.254.0.0/16 ranges are ignored.
- The TCP port can be configured per Client or Hub, or pushed via a profile from the Admin Portal. The default behavior is to let the operating system assign a port.
- Expired PINs will be allowed access for up to 15 seconds.
- Expired PINs will not be reassignment for up to 5 minutes after expiration to ensure that users don’t accidentally connect to the wrong display.

Step 2: PIN Lookup
The image below shows how PINs are resolved by the Enterprise Server. All network communication during the PIN lookup processes is SSL encrypted over a web service (TCP 443).
When a user enters a PIN of the target in the Client, the Client sends the PIN to the Enterprise Server to obtain the connection information. On a successful lookup, the Enterprise Server returns the valid connection information of the target. The target can either be a Hub or a Client (with Intel vPro technology) running the Intel Unite software.
In addition to receiving connection information, the public key of the target is also given, so that the Client application can validate that it is communicating with the correct target.
NOTE: PIN lookup for Hub and Clients follows the same flow.

PIN Lookup Back off
To prevent attackers from trying to harvest PINs from the Enterprise Server, failed attempts are logged. A user can have up to 3 failed attempts in a 10 second period before the back off mechanism begins enforcing a delay in responses (2^x seconds, where x=number of failed attempts within a 5 minute period).
Step 3: Connection Initiation
The image below shows how a connection is initiated. The Client initiates a TCP peer-to-peer connection with the target (a Hub or a Client with Intel vPro technology running the Intel Unite software), and starts an SSL handshake. The certificate provided by the target is hashed and compared against the hash the Client received during step 2. This type of validation prevents attacks and also prevents situations where IP addresses of DHCP Clients may change.

Step 4: Connection Approval
The image below shows how the connection is established between the client and the target, which could be a Hub or a Client (with Intel vPro technology) running the Intel Unite software. Once the target verifies the PIN and Client certificate, it accepts the connection and a connection is established between the client and the target.

Appendix D. Intel Unite Solution – Load Balancer
This section briefly describes how to work around the PIN back off behind load balancer/proxy.
If you are behind a load balancer, you will want to make sure the SQL stored procedure dbo.spGetPinBackoffTime always returns a 0.
Steps:
- Alter the stored procedure dbo.spGetPinBackoffTime. You can comment out everything and just use “select 0” at the end.
- Execute the script.
If you are not behind a load balancer, you will want to make sure that the stored procedure is left as the default.

- The Admin Portal page cannot be reached after installing the Intel Unite application on the server
- Software Upgrade
If your organization is performing a Software Upgrade:
- Ensure you back-up the database because changes can’t be undone.
- All connections to the database must be closed before the upgrade (log off from the Admin Portal)
- During the upgrade, the Database option will be selected by default - both for local and remote installation - when the Intel Unite server.msi is run on the Pin server.